Page 119 of 356
117 Controls in detail
Instrument cluster
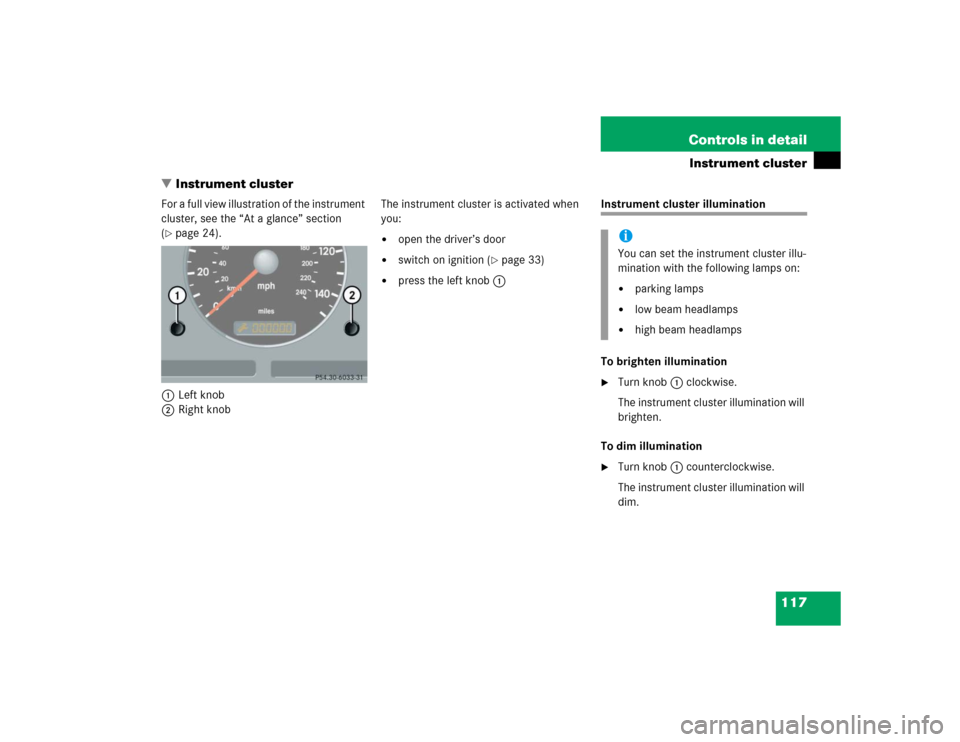
�Instrument cluster
For a full view illustration of the instrument
cluster, see the “At a glance” section
(�page 24).
1Left knob
2Right knobThe instrument cluster is activated when
you:
�
open the driver’s door
�
switch on ignition (
�page 33)
�
press the left knob1
Instrument cluster illumination
To brighten illumination�
Turn knob1 clockwise.
The instrument cluster illumination will
brighten.
To dim illumination
�
Turn knob1 counterclockwise.
The instrument cluster illumination will
dim.iYou can set the instrument cluster illu-
mination with the following lamps on:�
parking lamps
�
low beam headlamps
�
high beam headlamps
Page 276 of 356

274 Practical hintsReplacing bulbsBulbs
Safe vehicle operation depends on proper
exterior lighting and signaling. It is there-
fore essential that all bulbs and lamp as-
semblies are in good working order at all
times.
Correct headlamp adjustment is extremely
important. Have headlamps checked and
readjusted at regular intervals and when a
bulb has been replaced. See an authorized
Mercedes-Benz Light Truck Center for
headlamp adjustment.Front lamps
iBackup bulbs will be brought into use
when the following lamps malfunction:�
Turn signal lamps
�
Parking lamps
�
Tail lamps
iIf the headlamps or front fog lamps are
fogged up on the inside as a result of
high humidity, driving the vehicle a dis-
tance with the lights on should clear up
the fogging.
Lamp
Type
1
Front Fog lamp
H8 (35 W)
2
High beam
H7 (55 W)
Parking, standing lamp
5W5
3
Low beam
1
1Vehicles with Xenon* headlamps: Do not replace
the Xenon bulbs yourself. See your authorized
Mercedes-Benz Light Truck Center.
H7 (55 W)
Xenon*:
D2S-35 W
4
Turn signal and side
marker lamp
1157 NA
(32 / 3 cp
bulb)
5
Additional turn signal
lamp
LED
Page 278 of 356
276 Practical hintsReplacing bulbsHave the LEDs and bulbs for the following
lamps replaced by an authorized
Mercedes-Benz Light Truck Center:�
Additional turn signals in the exterior
rear view mirrors
�
Xenon*-lamps
�
Front fog lamps (vehicles with sport
package*)
�
High mounted brake lamp (only vehi-
cles with an exterior spare-wheel
rack*)
Replacing bulbs for front lamps
Before you start to replace a bulb for a
front lamp, do the following first:�
Turn the combination switch to
positionD (
�page 107).
�
Open the hood (
�page 222).
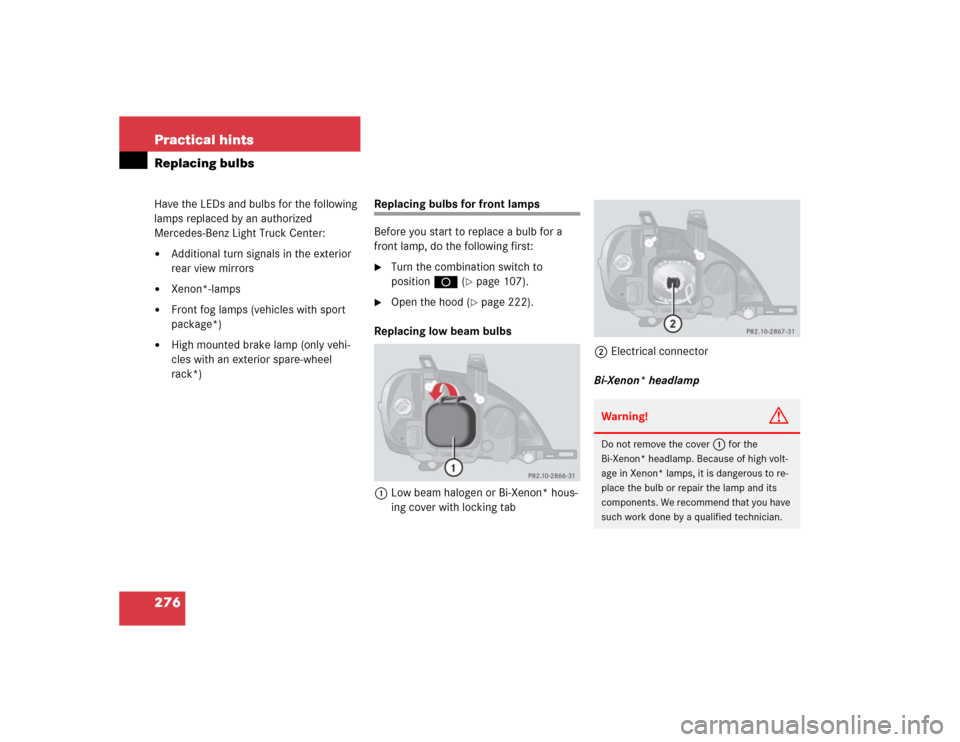
Replacing low beam bulbs
1Low beam halogen or Bi-Xenon* hous-
ing cover with locking tab2Electrical connector
Bi-Xenon* headlamp
Warning!
G
Do not remove the cover
1
for the
Bi-Xenon* headlamp. Because of high volt-
age in Xenon* lamps, it is dangerous to re-
place the bulb or repair the lamp and its
components. We recommend that you have
such work done by a qualified technician.
Page 279 of 356

277 Practical hints
Replacing bulbs
Low beam halogen headlamp�
Press down the tab on top end of hous-
ing cover1 and remove it in direction
of arrow.
�
Pull electrical connector2 off.
�
Unclip the retainer spring on the bulb
socket and take out of the bulb.
�
Insert the new bulb so that its socket
locates in the recess of the lamp hous-
ing.
�
Clip on the retainer spring.
�
Plug electrical connector2 onto the
bulb.
�
Align housing cover1 and press until
it engages.High beam halogen bulb (vehicles with
halogen bulbs: high beam and high
beam flasher; vehicles with Xenon*
headlamps: high beam flasher only),
parking and standing lamp
1Housing cover for high beam halogen
bulb (vehicles with halogen bulbs: high
beam and high beam flasher; vehicles
with Xenon* headlamps: high beam
flasher only), parking and standing
lamp2Electrical connector for high beam
halogen bulb (vehicles with halogen
bulbs: high beam and high beam flash-
er; vehicles with Xenon* headlamps:
high beam flasher only)
3Bulb socket for parking and standing
lamp bulb
Page 284 of 356

282 Practical hintsReplacing bulbsAdjusting headlamp aim
VVertical centerline
HHeadlamp mounting high, measured
from the center
Correct headlamp adjustment is extremely
important. To check and readjust a head-
lamp, follow the steps described:
�
Park the vehicle on a level surface
25 feet (7.6 m) from a vertical test
screen or wall.
�
Switch the headlamps on
(�page 107).
If the beam does not show a beam pattern
as indicated in the figure left, then follow
the steps below:
�
Open hood (
�page 222).
2Headlamp vertical adjustment screw
3Headlamp vertical adjustment screw
�
Always turn adjustment screws2
and3 simultaneously for vertical ad-
justment until the headlamp is adjust-
ed as shown1. Turn clockwise for
upward movement and counterclock-
wise for downward movement.
Graduations:
screw2: 0.50° pitch
screw3: 0.67° pitch
The left and right headlamps must be ad-
justed individually.
iHigh beam adjustments simultaneous-
ly aim the low beam.
Vehicle should have a normal trunk
load.
iIf it is not possible to obtain a proper
headlamp adjustment, have the system
checked at an authorized
Mercedes-Benz Light Truck Center.
Page 325 of 356

Prevents the wheels from locking up
during braking so that the vehicle can
continue to be steered.
BabySmart
TM airbag deactivation
system
This sy")
323 Technical terms
ABS
(A
ntilock B
rake S
ystem)
Prevents the wheels from locking up
during braking so that the vehicle can
continue to be steered.
BabySmart
TM airbag deactivation
system
This system detects if a special system
compatible child restraint seat is in-
stalled on the front passenger seat. The
system will automatically deactivate
the passenger front airbag when such a
seat is properly installed (indicator
lamp7 in the instrument cluster
lights up). See an authorized
Mercedes-Benz Light Truck Center for
availability.
BabySmartTM compatible child seats
Special restraint system for children.
The sensor system for the passenger
seat prevents deployment of the pas-
senger front airbag if a BabySmart
TM
compatible child seat is installed.BAS
(B
rake A
ssist S
ystem)
System for potentially reducing braking
distances in emergency braking situa-
tions. The system is activated when it
senses an emergency based on how
fast the brake is applied.
Bi-Xenon headlamps*
Headlamps which use an electric arc as
the light source and produce a more
intense light than filament headlamps.
Bi-Xenon headlamps produce low
beam and high beam.
CAC
(C
ustomer A
ssistance C
enter)
Mercedes-Benz customer service
center, which can help you with any
questions about your vehicle and
provide assistance in the event of a
breakdown.CAN system
(C
ontroller A
rea N
etwork)
Data bus network serving to control
vehicle functions such as door locking
or windshield wiping.
Cockpit
All instruments, switches, buttons and
indicator / warning lamps in the
passenger compartment needed for
vehicle operation and monitoring.
Cruise control
Driving convenience system for
automatically maintaining the vehicle
speed set by the driver.
Engine number
The number set by the manufacturer
and placed on the cylinder block to
uniquely identify each engine
produced.
Page 333 of 356

331 Index
Automatic headlamp mode 108
Automatic interior lighting control
Activating 114
Deactivating 114
Automatic locking when driving 93
Automatic transmission
Accelerator position 124
Emergency operation
(Limp Home Mode) 126
Gear ranges 122
Gear selector lever position 123
Gear shifting malfunctions 126
Kickdown 124
Manual shifting 121
One-touch gearshifting 121
Selector lever position 120
Towing a trailer 125
Transmission fluid 227
B
BabySmart
TM
Airbag deactivation system 70
Compatible child seats 70, 323
Self-test 70
BabySmart
TM airbag
deactivation system 323Backrest tilt 36
Backup lamps 275, 279
Bulbs 275
BAS 78, 323
Malfunction indicator lamp 251, 252,
253
Warning lamp 251
Batteries, remote control
Replacing 273
Battery discharged
Jump starting 291
Battery indicator lamp
Indicator lamp 261
Battery, vehicle 228, 272
Charging 289
Disconnecting 289
Reconnecting 289
Reinstalling 289
Removing 289
Bi-Xenon headlamps* 323
Block heater (Canada only) 236
Blocking
Rear door window operation 74
Brake assist system (BAS) 323
Brake fluid 314
Brake lamp bulbs 275Brake pad wear
Indicator lamp 261
Brakes 198
Warning lamp 250
Break-in period 196
Bulbs, replacing 274
Additional turn signals 274
Backup lamps 275
Brake lamps 275
Fog lamps 274
Front fog lamp 279
Front lamps 274
High beam 274
High mounted brake lamp 281
License plate lamps 275, 281
Low beam 274
Parking, standing lamp 274
Rear fog lamps 279
Rear side marker lamp bulbs 279
Side marker lamps 274, 275
Standing lamps 274
Tail lamp assemblies 279
Turn signal lamps 274, 275
Turn signal, side marker lamp 274
Page 335 of 356

333 Index
Cleaning
Cup holder 244
Gear selector lever 244
Hard plastic trim items 244
Headlamps 133
Headliner 244
Instrument cluster 244
Leather upholstery 245
Light alloy wheels 244
MB Tex upholstery 245
Plastic and rubber parts 245
Seat belts 244
Steering wheel 244
Windows 243
Windshield 51
Wiper blades 243
Clock 26, 119
Closing
Glove box 167
Hood 223
Liftgate 92
Power tilt/sliding sunroof* 271
Rear quarter windows* 149
Side windows 147
Tilt/sliding sunroof* 150Closing tilt/sliding sunroof*
In an emergency 271
Cockpit 22, 323
Combination switch
High beam flasher 50
Turn signals 50
Windshield wipers 51
Compass 190
Calibrating 191
Setting compass zone 191
Compass zone 191
Consumer information 320
Control and operation of radio
transmitters 216
Coolant 227, 316
Adding 228
Anticorrosion/antifreeze
quantity 316
Checking level 227
Indicator lamp 256
Temperature 218
Temperature gauge 118Coolant level
Checking 227
Crossing obstacles 209
Cruise control 153, 323
Canceling 154
Driving downhill 154
Driving uphill 154
Fine adjustment 155
LOW RANGE mode 155
Saving current speed 154
Setting speeds 155
Cruise control lever 153
Cup holder 169
Cleaning 244
In front seat armrest 170
In instrument panel 169
In rear center console 170
Customer Assistance Center (CAC) 323