Page 79 of 356

77 Safety and Security
Driving safety systems
Braking
At the instant one of the wheels is about to
lock up, a slight pulsation can be felt in the
brake pedal, indicating that the ABS is in
the regulating mode.�
Keep firm and steady pressure on the
brake pedal while experiencing the pul-
sation.
Continuous, steady brake pedal pressure
yields the advantages provided by the ABS,
namely braking power and the ability to
steer the vehicle.
The pulsating brake pedal can be an indica-
tion of hazardous road conditions and
functions as a reminder to take extra care
while driving.Emergency brake maneuver
�
Keep continuous full pressure on the
brake pedal.LOW RANGE– ABS
During off-road driving, a special low range
system for the ABS is operational with
transmission in LOW RANGE mode
(
�page 127).
When applying the service brakes at
speeds below approximately
18 mph (30 km / h), the front wheels are
locked cyclically to shorten the braking
distance (dig-in effect). This affects steer-
ing the vehicle.
iWith the ABS malfunctioning, the BAS,
the ESP, and the 4-ETS are also
switched off.
Normal driving and braking functions
are still available.
Page 83 of 356
.
In th")
81 Safety and Security
Driving safety systems
LOW RANGE – ESP
During off-road driving, a special low range
system for the ESP is operational with
transmission in LOW RANGE mode
(�page 127).
In the LOW RANGE mode, the ESP ope-
rates in a traction improving fashion spe-
cifically adapted for off-road driving. At
speeds below 27 mph (45 km / h), the ESP
assists in over- / understeering, thus im-
proving vehicle traction.Switching off the ESP
To improve the vehicle’s traction, turn off
the ESP in driving situations where it would
be advantageous to have the drive wheels
spin and thus cut into surfaces for better
grip such as:
�
starting out on slippery surfaces and in
deep snow in conjunction with snow
chains
�
in sand or gravel
�
when driving off-road
Warning!
G
The ESP cannot prevent the natural laws of
physics from acting on the vehicle, nor can
it increase the traction afforded. The ESP
cannot prevent accidents, including those
resulting from excessive speed in turns, fol-
lowing another vehicle too closely, or hydro-
planing. Only a safe, attentive, and skillful
driver can prevent accidents. The capabili-
ties of an ESP equipped vehicle must never
be exploited in a reckless or dangerous
manner which could jeopardize the user’s
safety or the safety of others.
!Because of the ESP’s automatic opera-
tion, the engine must be shut off (Key in
steering lock position0 or1) when the
parking brake is being tested on a
brake test dynamometer.
Active braking action through ESP may
otherwise seriously damage the front
or rear axle brake system.
Operational tests with the engine
running can only be conducted on a
two-axle dynamometer.
Warning!
G
The ESP should not be switched off during
normal driving other than in the circum-
stances described below. Disabling of the
system will reduce vehicle stability in stan-
dard driving maneuvers.
Page 142 of 356
 to one the following
symbols:
Windshield fogged on the outside
�
Switch the wind")
140 Controls in detailAutomatic climate controlAdjusting air distribution�
Turn air distribution control8
(�page 137) to one the following
symbols:
Windshield fogged on the outside
�
Switch the windshield wipers on,
(�page 51).
�
Turn air distribution control8 toh
ork.
Defrosting
Activating�
Press buttonP (
�page 137).
The indicator lamp on the buttonP
comes on.
Deactivating
�
Press buttonP again.
or
�
Press buttonU (
�page 137).
The indicator lamp on the buttonP
goes out.
Air recirculation mode
Switch to air recirculation mode to prevent
unpleasant odors from entering the vehicle
from the outside. This setting cuts off the
intake of outside air and recirculates the
air in the passenger compartment.
Symbol
Function
h
Directs air to the center
and side air vents
j
Directs air to the wind-
shield and side air vents
V
Directs air into the en-
tire vehicle interior
k
Directs air to the foot-
wells and side air vents
iThese settings should only be selected
for a short time.
When the defrost setting has been se-
lected, only the rear window defroster
can be switched on. No other settings
are possible.
Warning!
G
When the outside temperature is below
41°F (5°C), only switch to air recirculation
mode for short periods to prevent window
fogging.
Page 159 of 356

157 Controls in detail
Driving systems
Range of the sensors
To function properly, the sensors must be
free of dirt, ice, snow and slush. Clean the
sensors regularly, being careful not to
scratch or damaging the sensors.Front sensors
Rear sensorsMinimum distance
When an obstacle is located in this area, all
warning displays will light up and a warning
tone will sound. If the vehicle moves closer
than the minimum distance to an object,
the distance may no longer be displayed.
Center
approx. 39.4 in (100 cm)
Corners
approx. 23.6 in (60 cm)
Center
approx. 47.2 in (120 cm)
Corners
approx. 31.5 in (80 cm)
!During parking maneuvers, pay special
attention to objects located above or
below the height of the sensors (e.g.
planters or trailer hitches). The Park-
tronic system will not detect such ob-
jects at close range and damage to
your vehicle or the object may result.
Ultrasonic signals from outside sourc-
es (e.g. truck air brakes or jackham-
mers) may impair the operation of the
Parktronic system.
Center
approx. 8 in (20 cm)
Corners
approx. 6 in (15 cm)
Page 170 of 356
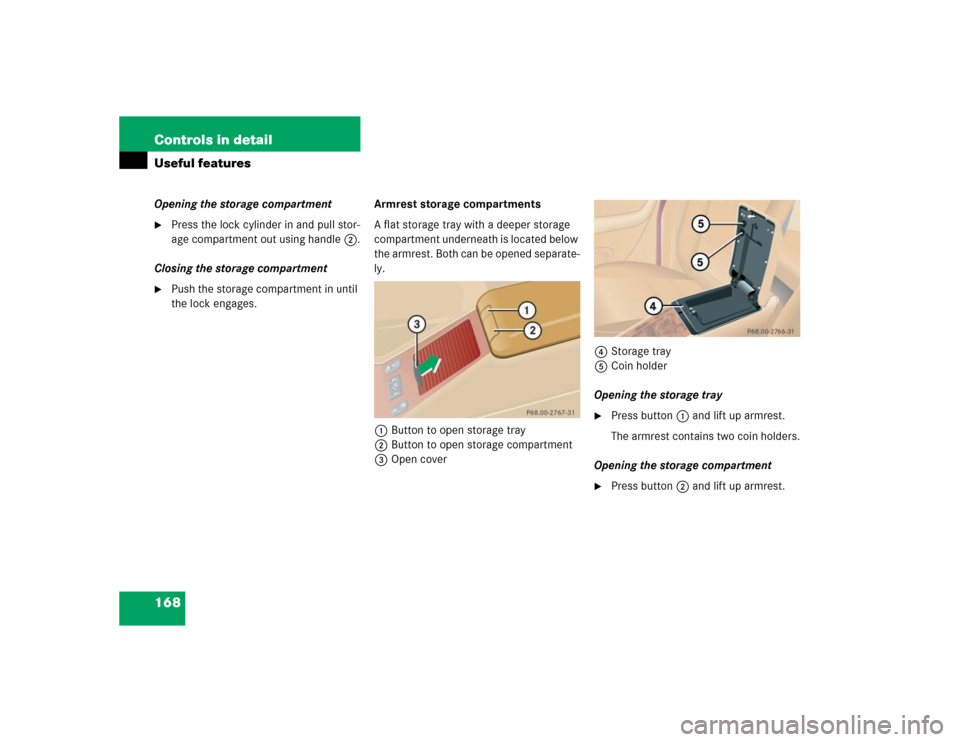
168 Controls in detailUseful featuresOpening the storage compartment �
Press the lock cylinder in and pull stor-
age compartment out using handle2.
Closing the storage compartment
�
Push the storage compartment in until
the lock engages.Armrest storage compartments
A flat storage tray with a deeper storage
compartment underneath is located below
the armrest. Both can be opened separate-
ly.
1Button to open storage tray
2Button to open storage compartment
3Open cover4Storage tray
5Coin holder
Opening the storage tray
�
Press button1 and lift up armrest.
The armrest contains two coin holders.
Opening the storage compartment
�
Press button2 and lift up armrest.
Page 171 of 356
169 Controls in detail
Useful features
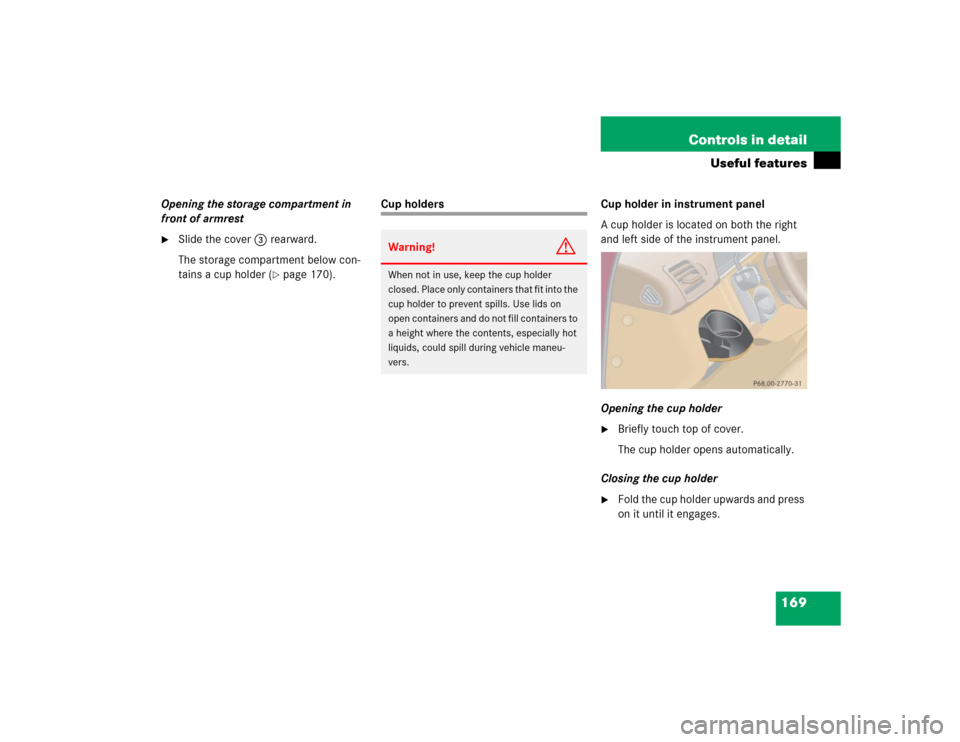
Opening the storage compartment in
front of armrest�
Slide the cover3 rearward.
The storage compartment below con-
tains a cup holder (
�page 170).
Cup holders Cup holder in instrument panel
A cup holder is located on both the right
and left side of the instrument panel.
Opening the cup holder
�
Briefly touch top of cover.
The cup holder opens automatically.
Closing the cup holder
�
Fold the cup holder upwards and press
on it until it engages.
Warning!
G
When not in use, keep the cup holder
closed. Place only containers that fit into the
cup holder to prevent spills. Use lids on
open containers and do not fill containers to
a height where the contents, especially hot
liquids, could spill during vehicle maneu-
vers.
Page 194 of 356
 repeat-
edly until the stop watch display ap-
pears in the trip computer display3.
Counting
�
Press RESET1 (
�page 189) to sta")
192 Controls in detailUseful featuresStop watch�
Press MODE2 (
�page 189) repeat-
edly until the stop watch display ap-
pears in the trip computer display3.
Counting
�
Press RESET1 (
�page 189) to start
counting.Stopping
�
Press RESET1 again to stop counting.
Resetting
�
Press and hold RESET1 until the dis-
play shows “0:00”.
Average fuel consumption
�
Press MODE2 (
�page 189) repeat-
edly until the average fuel consumption
display appears in the trip computer
display3.Distance remaining with fuel presently
in tank
�
Press MODE2 (
�page 189) repeat-
edly until the distance remaining dis-
play appears in the trip computer
display3.
iIf CAL
remains in the display, calibration
was not successfully completed. You
have to recalibrate:
�
Remove the key from the steering
lock.
�
Start the vehicle and start the cali-
bration procedure described previ-
ously.
We recommend that you have the com-
pass calibrated at a Mercedes-Benz
Light Truck Center.
iWhen the fuel supply drops to reserve
level the display flashes distance re-
maining.�
USA only:
The display alternates between FUEL
and distance remaining until
supply is consistently below the re-
serve level. When the fuel supply is
very low (approximately 1.5 gal
[5.5 l])
FUEL
is displayed
continuously.
Page 205 of 356

203 Operation
Driving instructions
Road salts and chemicals can adversely af-
fect braking efficiency. Increased pedal
force may become necessary to produce
the normal brake effect.
Depressing the brake pedal periodically
when traveling at length on salt-strewn
roads can bring road-salt-impaired braking
efficiency back to normal.If the vehicle is parked after being driven
on salt-treated roads, the braking efficien-
cy should be tested as soon as possible af-
ter driving is resumed.
For more information, see “Winter driving”
(
�page 235).
Warning!
G
On slippery road surfaces, never downshift
in order to obtain braking action. This could
result in drive wheel slip and reduced vehi-
cle control. Your vehicle’s ABS will not pre-
vent this type of control loss.
Do not engage the transfer case in position
LOW when driving on ice or packed snow. At
speeds below 18 mph (30 km / h) vehicle
steering is adversely affected by the LOW
RANGE - ABS (
�page 77).
Warning!
G
Make sure not to endanger any other road
users when carrying out these braking ma-
neuvers.Warning!
G
If the vehicle becomes stuck in snow, make
sure that snow is kept clear of the exhaust
pipe and from around the vehicle with the
engine running. Otherwise, deadly carbon
monoxide (CO) gases may enter vehicle in-
terior resulting in unconsciousness and
death.
To assure sufficient fresh air ventilation,
open a window slightly on the side of the ve-
hicle not facing the wind.
Warning!
G
The outside temperature indicator is not de-
signed to serve as an ice-warning device and
is therefore unsuitable for that purpose. In-
dicated temperatures just above the freez-
ing point do not guarantee that the road
surface is free of ice.