Page 153 of 356
.Opening and closing the power
tilt / sliding sunroof
�
To open, close, raise, or lower the
tilt / sliding sunroo")
151 Controls in detail
Power tilt / sliding sunroof*
�
Switch on ignition (
�page 33).Opening and closing the power
tilt / sliding sunroof
�
To open, close, raise, or lower the
tilt / sliding sunroof, move the sunroof
switch to resistance point in the re-
quired direction of arrows1to4.
Release the sunroof switch when the
tilt / sliding sunroof has reached the
desired position.
In a vehicle rollover, occupants not wearing
their seat belts or not wearing them properly
may be thrown out of the opening. Such an
opening also presents a potential for injury
for occupants wearing their seat belts prop-
erly as entire body parts or portions of them
may protrude from the passenger compart-
ment.
When leaving the vehicle, always remove the
key from steering lock and lock your vehicle.
Do not leave children unattended in the ve-
hicle, or with access to an unlocked vehicle.
Unsupervised use of vehicle equipment can
cause an accident and / or serious personal
injury.
!To avoid damaging the seals, do not
transport any objects with sharp edges
which can stick out of the tilt / sliding
sunroof.
Do not open the tilt / sliding sunroof if
there is snow or ice on the roof, as this
could result in malfunctions.
The tilt / sliding sunroof can be opened
or closed manually should an electrical
malfunction occur (
�page 271).
iIf the movement of the tilt / sliding sun-
roof is blocked during the closing pro-
cedure, the tilt / sliding sunroof will
stop and reopen slightly.
Page 159 of 356

157 Controls in detail
Driving systems
Range of the sensors
To function properly, the sensors must be
free of dirt, ice, snow and slush. Clean the
sensors regularly, being careful not to
scratch or damaging the sensors.Front sensors
Rear sensorsMinimum distance
When an obstacle is located in this area, all
warning displays will light up and a warning
tone will sound. If the vehicle moves closer
than the minimum distance to an object,
the distance may no longer be displayed.
Center
approx. 39.4 in (100 cm)
Corners
approx. 23.6 in (60 cm)
Center
approx. 47.2 in (120 cm)
Corners
approx. 31.5 in (80 cm)
!During parking maneuvers, pay special
attention to objects located above or
below the height of the sensors (e.g.
planters or trailer hitches). The Park-
tronic system will not detect such ob-
jects at close range and damage to
your vehicle or the object may result.
Ultrasonic signals from outside sourc-
es (e.g. truck air brakes or jackham-
mers) may impair the operation of the
Parktronic system.
Center
approx. 8 in (20 cm)
Corners
approx. 6 in (15 cm)
Page 160 of 356

158 Controls in detailDriving systemsWarning indicators
The warning indicators show the distance
between the sensor and the obstacle. The
warning indicators for the front area are lo-
cated above the center air vents in the
dashboard. The warning indicator for the
rear area is located in the rear passenger
compartment lamp.Front area warning indicator1Segments, left side of vehicle
2Segments, right side of vehicle
Each warning indicator has six yellow and
two red segments.The gear selector lever position deter-
mines which warning indicator is activat-
ed.
As soon as the sensors detect an obstacle,
one or more segments light up, depending
on the distance. An intermittent acoustic
warning will also sound as the seventh seg-
ment comes on and a constant acoustic
warning lasting a maximum of
three seconds will sound for the eighth
segment.
Selector lever
position
Warning indicator
D, R, N, P
Front area activated
R
Rear area activated
!If all red segments light up in the warn-
ing indicators, a dirty sensor or a ultra-
sonic signal could be the reason.�
Clean the sensors (
�page 243).
After cleaning the sensors, switch
the ignition on.
Page 161 of 356
159 Controls in detail
Driving systems
Switching Parktronic system on / off
The Parktronic system can switched on or
off manually.
The Parktronic switch is located on the
lower part of the center console.
1Parktronic off
2Indicator lamp
3Parktronic onSwitching off the Parktronic system
�
Press Parktronic switch on upper
part1.
Indicator lamp2 comes on.
Switching on the Parktronic system
�
Press Parktronic switch on lower
part3.
The indicator lamp2 goes out.!If the Parktronic system is malfunction-
ing, all red segments of the warning in-
dicators light up and an additional
warning sounds.
Contact your Mercedes-Benz Light
Truck Center as soon as possible.
iIf you switch the ignition on, the Park-
tronic system will be automatically
switched on.
The rear Parktronic sensors will not au-
tomatically disengage when towing a
trailer. Therefore switch the Parktronic
system off.
Page 164 of 356

162 Controls in detailLoadingHooks
Four hooks located on the rear compart-
ment trim panels, two on each side.HooksUse the hooks to secure light weight items.
The maximum permissible weight per hook
is 9 lbs (4 kg).
Partition net*Use of the partition net is a particularly im-
portant safety factor when the vehicle is
loaded higher than the top of the seat
backrests with smaller objects.
The partition net can be installed behind
the backrests of the front or rear seats.
Engaging partition net
1Holder
2Mounting hookWarning!
G
Always lock backrest in its upright position
when rear seat bench is occupied by pas-
sengers, or cargo is being carried behind the
seat bench.
To help avoid personal injury from smaller
objects flying in the occupant compartment
during a collision or sudden maneuver, al-
ways use partition net when transporting
cargo.
The partition net cannot prevent the move-
ment of large, heavier objects into the pas-
senger compartment in an accident. Such
items must be properly secured using the
cargo tie-down rings in the cargo compart-
ment floor (
�page 161).
Passenger use of seats behind installed par-
tition net is restricted because of the foot-
well being taken up by the net.
Page 168 of 356
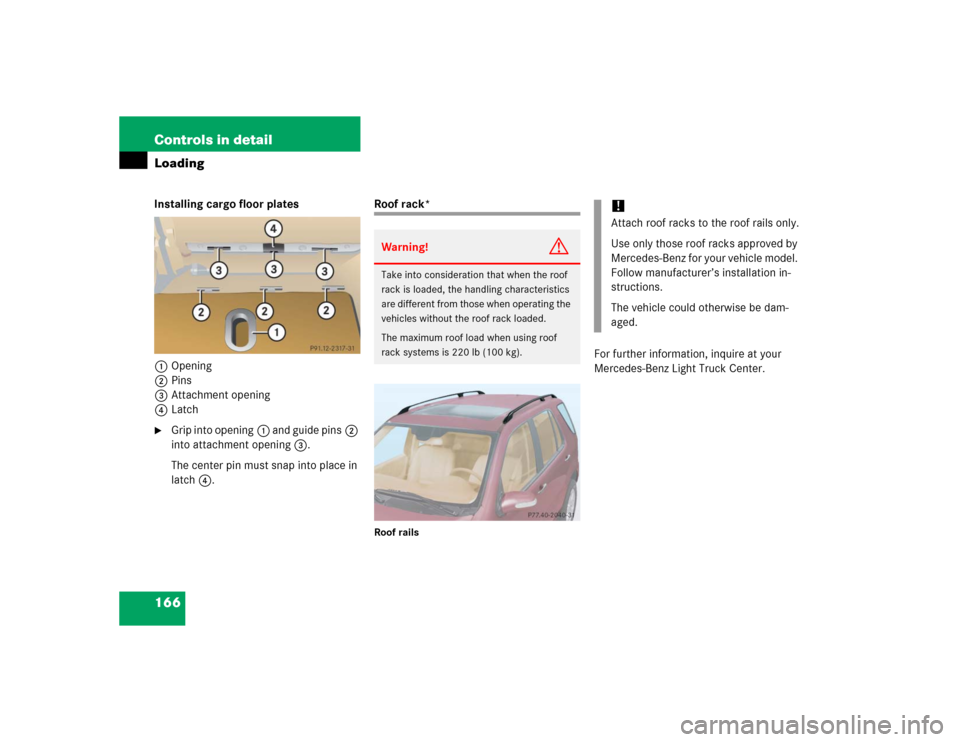
166 Controls in detailLoadingInstalling cargo floor plates
1Opening
2Pins
3Attachment opening
4Latch�
Grip into opening1 and guide pins2
into attachment opening3.
The center pin must snap into place in
latch4.
Roof rack*Roof rails
For further information, inquire at your
Mercedes-Benz Light Truck Center.
Warning!
G
Take into consideration that when the roof
rack is loaded, the handling characteristics
are different from those when operating the
vehicles without the roof rack loaded.
The maximum roof load when using roof
rack systems is 220 lb (100 kg).
!Attach roof racks to the roof rails only.
Use only those roof racks approved by
Mercedes-Benz for your vehicle model.
Follow manufacturer’s installation in-
structions.
The vehicle could otherwise be dam-
aged.
Page 173 of 356

171 Controls in detail
Useful features
Ashtrays and cigarette lighter Ashtray and cigarette lighter in the
front center console
1Ashtray
2Cigarette lighter
3Cover plate
Opening the ashtray
�
Briefly touch cover plate3.
The ashtray opens automatically.Removing ashtray insert
�
Secure vehicle from movement by set-
ting the parking brake. Move the gear
selector lever to positionN.
Now you have more room to take out
the insert.
�
Grip the insert on the sides and pull it
out upwards.
Reinstalling ashtray insert
�
Install ashtray insert.
�
Close the ashtray.
Warning!
G
Never touch the heating element or sides of
the cigarette lighter; they are extremely hot.
Hold the knob only.
When leaving the vehicle always remove the
key from the steering lock. Do not leave chil-
dren unattended in the vehicle, or with ac-
cess to an unlocked vehicle. Unsupervised
use of vehicle equipment may cause an ac-
cident and / or serious personal injury.iThe cigarette lighter socket can be
used to accommodate electrical acces-
sories up to a maximum of 50 W.
If the engine is off, the battery may be-
come discharged when used for long
periods of time.
Warning!
G
Remove ashtray only with vehicle standing
still. Set the parking brake to secure vehicle
from movement. Move gear selector lever to
positionN. With gear selector lever in
positionN, turn off the engine.
Page 174 of 356
172 Controls in detailUseful featuresCigarette lighter�
Switch on the ignition.
�
Push in cigarette lighter2
(�page 171).
The cigarette lighter will pop out auto-
matically when hot.
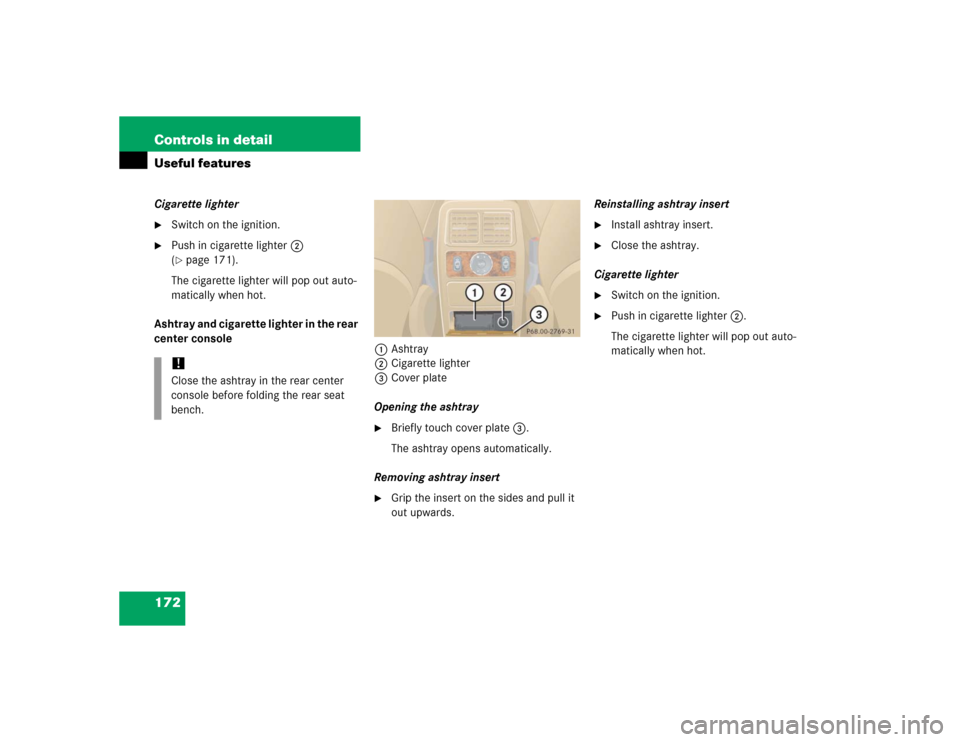
Ashtray and cigarette lighter in the rear
center console
1Ashtray
2Cigarette lighter
3Cover plate
Opening the ashtray
�
Briefly touch cover plate3.
The ashtray opens automatically.
Removing ashtray insert
�
Grip the insert on the sides and pull it
out upwards.Reinstalling ashtray insert
�
Install ashtray insert.
�
Close the ashtray.
Cigarette lighter
�
Switch on the ignition.
�
Push in cigarette lighter2.
The cigarette lighter will pop out auto-
matically when hot.
!Close the ashtray in the rear center
console before folding the rear seat
bench.