Page 221 of 356

219 Operation
At the gas station
�At the gas station
Refueling
The fuel filler flap is located on the
left-hand side of the vehicle towards the
rear. Locking / unlocking the vehicle with
the remote control automatically
locks / unlocks the fuel filler flap.1Fuel filler flap
2Fuel cap
�
Remove the key from the steering lock.
�
Open the fuel filler flap1 by pulling in
direction of the arrow.
�
Turn the fuel cap2 to the left and hold
on to it until possible pressure is re-
leased.
�
Take off the cap.
�
Only fill your tank until the filler nozzle
unit cuts out – do not top up or overfill.
Warning!
G
Gasoline is highly flammable and poisonous.
It burns violently and can cause serious inju-
ry. Whenever you are around gasoline, avoid
inhaling fumes and skin contact, extinguish
all smoking materials. Never allow sparks,
flame or smoking materials near gasoline!
!The fuel filler cap is tethered to the fuel
filler neck. Do not drop the cap. It could
damage the vehicle paint finish.!To prevent damaging the lens of the
plastic tail lamp, make certain that no
gasoline comes into contact with it.Warning!
G
Overfilling of the fuel tank may create pres-
sure in the system which could cause a gas
discharge. This could cause the gas to spray
back out when removing the fuel pump noz-
zle, which could cause personal injury.
��
Page 226 of 356

224 OperationEngine compartmentChecking engine oil level via display
When checking the oil level the vehicle
must�
be parked on level ground
�
be at normal operating temperature
�
have been stationary for at least five
minutes with the engine turned off
To check the engine oil level via the display
in the speedometer, do the following:
�
Turn the key in the steering lock to
position2.
1Button
2Display in speedometer
�
Wait until the display
------
appears in
the speedometer display2.
�
Within one second press button1
twice.
One of the following messages will
subsequently appear in the display:�
OIL i.OThe oil level is correct. Engine oil
does not to be added.
�
–1.0L�
Add 1.0 liter of engine oil.
�
–1.5L�
Add 1.5 liters of engine oil.
�
–2.0L�
Add 2.0 liters of engine oil.
For adding engine oil see (
�page 314).
For more information on engine oil, see the
“Technical data” section (
�page 312) and
(
�page 314).Other display messages
If there is excess engine oil with the engine
at normal operating temperature, the
following message will appear in the
display:
OIL HIThe oil level is too high.�
Have excess oil siphoned.!Excess oil must be siphoned or drained
off. It could cause damage to the
engine and catalytic converter not
covered by the Mercedes-Benz Limited
Warranty.
Page 240 of 356

238 OperationMaintenanceMaintenance service term exceeded
If you have exceeded the suggested
maintenance service term:�
the9 or ½symbol appears in
the display2 for 30 seconds and a
signal sounds after switching on the
ignition.
�
it is preceded by a “–” (minus symbol).
The Mercedes-Benz Light Truck Center will
reset the maintenance service indicator
following a completed maintenance
service.Calling up the maintenance service
indicator�
Within one second press knob1
twice.
The maintenance service indicator dis-
play will appear for ten seconds.Resetting the maintenance service
indicator
In the event that the maintenance service
on your vehicle is not carried out by an au-
thorized Mercedes-Benz Light Truck Cen-
ter, you can reset the maintenance service
indicator yourself.�
Switch ignition on and immediately
press knob1 twice within
one second.
The present status for days or distance
is displayed.
�
Within ten seconds turn the key in
steering lock to position0 (
�page 33).
�
Press and hold knob1 while switch-
ing the ignition on.
The present status for days or distance
is displayed once more.
iIf the battery is disconnected, the days
of disconnection will not be included in
the count shown by the service indica-
tor. To arrive at the true maintenance
service deadline, you will need to sub-
tract these days from the days shown
in the maintenance service indicator.
Do not confuse the maintenance ser-
vice indicator with the engine oil level
indicator:.
Page 245 of 356

243 Operation
Vehicle care
Cleaning the Parktronic* system
sensors
1Parktronic* system sensors�
Use a mild car wash detergent, such as
Mercedes-Benz approved Car Sham-
poo, with plenty of water to clean the
sensors1.
When using a steam cleaner or power
washer, aim nozzle only briefly from a min-
imum distance of 12 in (30 cm) at
sensors1.To prevent scratches, never apply strong
force and only use a soft, non-scratchy
cloth when cleaning the sensor. Do not
attempt to wipe dirty sensors with a dry
cloth or sponge.
Wiper blades
�
Fold wiper arms forward.
�
Clean the wiper blades inserts with a
clean cloth and detergent solution.Window cleaning
�
Fold wiper arms forward.
�
Use a window cleaning solution on all
glass surfaces.
An automotive glass cleaner is recom-
mended.
Warning!
G
For safety reasons, switch off wipers and re-
move key from steering lock before cleaning
the wiper blades, otherwise the wiper motor
might suddenly turn on and cause injury.
!Fold the windshield wiper arms back
onto the windshield before turning the
key in the steering lock.
Hold on to the wiper when folding the
wiper arm back. If released, the force
of the impact from the tensioning
spring could crack the windshield.Warning!
G
For safety reasons, switch off wipers and re-
move key from steering lock before cleaning
the windshield, otherwise the wiper motor
might suddenly turn on and cause injury.
Page 246 of 356

244 OperationVehicle careLight alloy wheels
Mercedes-Benz approved Wheel Care
should be used for regular cleaning of the
light alloy wheels.
If possible, clean wheels once a week with
Mercedes-Benz approved Wheel Care, us-
ing a soft bristle brush and a strong spray
of water.
Follow instructions on container.Instrument cluster
Use a gentle dishwashing detergent or
mild detergent for delicate fabrics as a
washing solution. Wipe with a cloth moist-
ened in lukewarm solution. Do not use
scouring agents.
Steering wheel and gear selector lever
Wipe with a damp cloth and dry thoroughly
or clean with Mercedes-Benz approved
Leather Care.
Cup holder
Use a gentle dishwashing detergent or
mild detergent for delicate fabrics as a
washing solution. Wipe with a cloth moist-
ened in lukewarm solution. Do not use
scouring agents.Hard plastic trim items
Pour Mercedes-Benz approved Interior
Care onto soft lint-free cloth and apply
with light pressure.
Headliner and rear window shelf
Clean with soft bristle brush, or use a
dry-shampoo cleaner in case of excessive
dirt.
Seat belts
The webbing must not be treated with
chemical cleaning agents. Only use clear,
lukewarm water and soap. Do not dry the
webbing at temperatures above 176°F
(80°C) or in direct sunlight.
!Fold the windshield wiper arms back
onto the windshield before turning the
key in the steering lock.
Hold on to the wiper when folding the
wiper arm back. If released, the force
of the impact from the tensioning
spring could crack the windshield.iOnly use acid-free cleaning materials.
Acid may cause corrosion or damage
the clear coat.
Warning!
G
Do not bleach or dye seat belts as this may
severely weaken them. In a crash they may
not be able to provide adequate protection.
Page 249 of 356
247 Practical hints
What to do if …
Where will I find ...?
Unlocking / locking in an emergency
Opening / closing in an emergency
Replacing key batteries
Replacing bulbs
Replacing wiper blades
Flat tire
Battery
Jump starting
Towing the vehicle
Fuses
Page 270 of 356
268 Practical hintsUnlocking / locking in an emergencyUnlocking the vehicle
If you are unable to unlock the driver’s
door using the remote control, open the
door using the folding key.Remote control with folding key
1Release button
�
Press release button1 on the remote
control.
The key folds out.Unlocking the driver’s door
1Unlocking
�
Insert the key into the driver’s door
lock until it stops.
�
Turn the key counterclockwise to
position1.
The driver’s door is unlocked.
iUnlocking the driver’s door with the
folding key will trigger the anti-theft
alarm system.
To cancel the alarm, do one of the
following:�
Press buttonŒ or‹ on the
remote control.
�
Insert the key in the steering lock.
Page 271 of 356
269 Practical hints
Unlocking / locking in an emergency
Locking the vehicle
If you are unable to lock the vehicle with
the remote control, lock it with the folding
key as follows:�
Close the passenger doors and the lift-
gate.
�
Press the upper part of the central
locking switch in the cockpit
(�page 93).
�
Check to see whether the locking
knobs on the passenger doors have
moved down. If necessary push them
down manually.
�
Lock the liftgate if necessary from in-
side (
�page 91).
Except for the driver’s door, the vehicle
should now be locked.1Locking
�
Insert the key into the driver’s door
lock until it stops.
�
Turn the key clockwise to position1.
The driver’s door is locked.
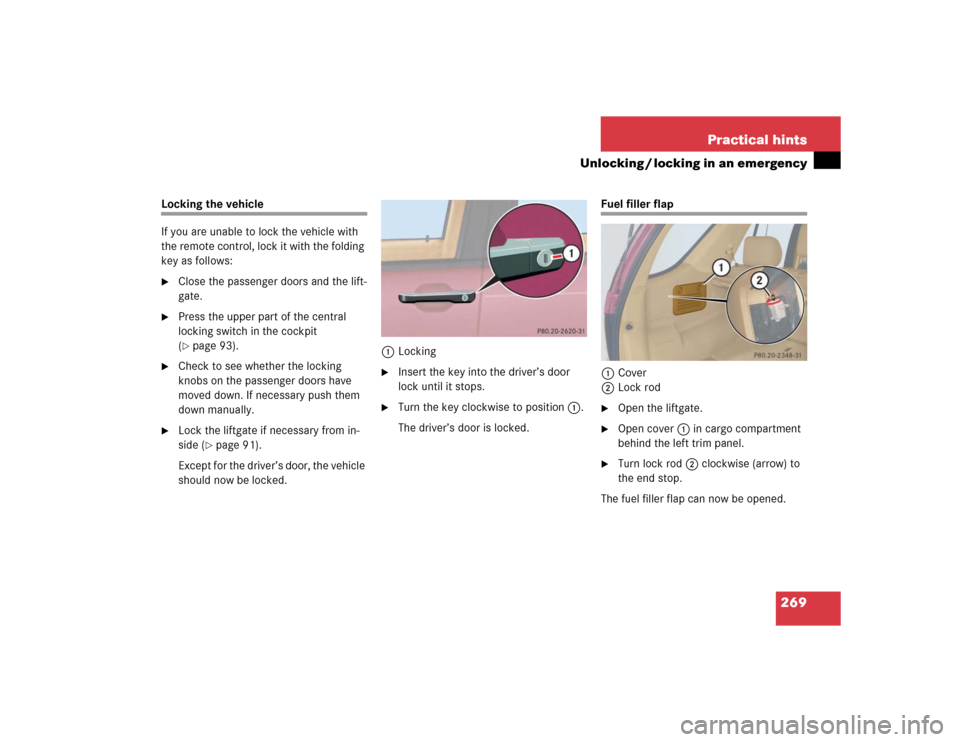
Fuel filler flap
1Cover
2Lock rod�
Open the liftgate.
�
Open cover1 in cargo compartment
behind the left trim panel.
�
Turn lock rod2 clockwise (arrow) to
the end stop.
The fuel filler flap can now be opened.