Page 188 of 356

186 Controls in detailUseful featuresStep 5:�
When the indicator lamp6 flashes
rapidly, release both buttons.
Step 6:
�
Press and hold the just-trained
integrated signal transmitter button
and observe the indicator lamp6.
If the indicator lamp6 stays on con-
stantly, programming is complete and
your device should activate when the
integrated signal transmitter button is
pressed and released.Step 7:
�
To program the remaining two buttons,
repeat the steps above starting with
step 3.Rolling code programming
To train a garage door opener (or other roll-
ing code devices) with the rolling code fea-
ture, follow these instructions after
completing the “Programming” portion
(steps 1 through 6) of this text. (A second
person may make the following training
procedures quicker and easier.)
Step 8:
�
Locate “training” button on the garage
door opener motor head unit.
Exact location and color of the button
may vary by garage door opener brand.
Depending on manufacturer, the
“training” button may also be referred
to as “learn” or “smart” button. If there
is difficulty locating the transmitting
button, refer to the garage door opener
operator’s manual.
iThe indicator lamp6 flashes the first
time the signal transmitter button is
programmed. If this button has already
been programmed, the indicator lamp
will only start flashing after
20 seconds.
iIf the indicator lamp6 flashes rapidly
for about two seconds and then turns
to a constant light, continue with pro-
gramming steps 8 through 12 as your
garage door opener may be equipped
with the “rolling code” feature.
��
Page 189 of 356

187 Controls in detail
Useful features
Step 9:�
Press “training” button on the garage
door opener motor head unit.
The “training light” is activated.
You have 30 seconds to initiate the
following step.
Step 10:
�
Firmly press, hold for two seconds and
release the programmed integrated
signal transmitter button (3, 4
or5).
Step 11:
�
Press, hold for two seconds and
release same button a second time to
complete the training process.
Some garage door openers (or other rolling
code equipped devices) may require you to
perform this procedure a third time to
complete the training.Step 12:
�
Confirm the garage door operation by
pressing the programmed integrated
signal transmitter button (3, 4
or5).
Step 13:
�
To program the remaining two buttons,
repeat the steps above starting with
step 3.Gate operator / Canadian programming
Canadian radio-frequency laws require
transmitter signals to “time-out” (or quit)
after several seconds of transmission
which may not be long enough for the inte-
grated signal transmitter to pick up the sig-
nal during programming. Similar to this
Canadian law, some U.S. gate operators
are designed to “time-out” in the same
manner.
If you live in Canada or if you are having dif-
ficulties programming a gate operator (re-
gardless of where you live) by using the
programming procedures, replace step 4
with the following:
Page 191 of 356

189 Controls in detail
Useful features
Trip computer*
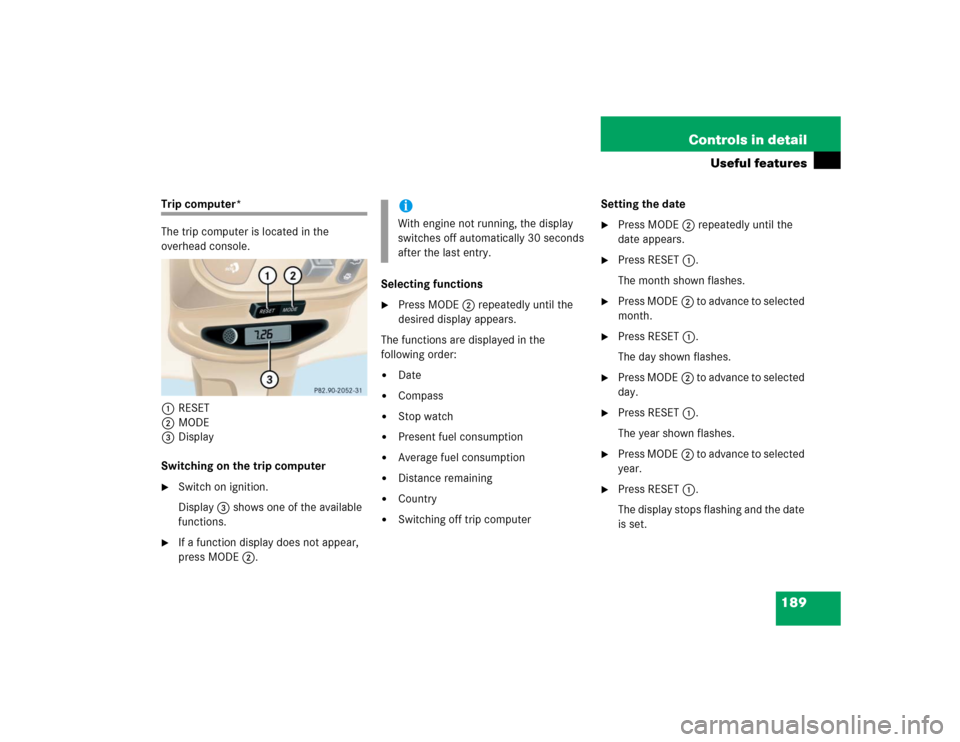
The trip computer is located in the
overhead console.
1RESET
2MODE
3Display
Switching on the trip computer�
Switch on ignition.
Display3 shows one of the available
functions.
�
If a function display does not appear,
press MODE2.Selecting functions
�
Press MODE2 repeatedly until the
desired display appears.
The functions are displayed in the
following order:
�
Date
�
Compass
�
Stop watch
�
Present fuel consumption
�
Average fuel consumption
�
Distance remaining
�
Country
�
Switching off trip computerSetting the date
�
Press MODE2 repeatedly until the
date appears.
�
Press RESET1.
The month shown flashes.
�
Press MODE2 to advance to selected
month.
�
Press RESET1.
The day shown flashes.
�
Press MODE2 to advance to selected
day.
�
Press RESET1.
The year shown flashes.
�
Press MODE2 to advance to selected
year.
�
Press RESET1.
The display stops flashing and the date
is set.
iWith engine not running, the display
switches off automatically 30 seconds
after the last entry.
Page 194 of 356

192 Controls in detailUseful featuresStop watch�
Press MODE2 (
�page 189) repeat-
edly until the stop watch display ap-
pears in the trip computer display3.
Counting
�
Press RESET1 (
�page 189) to start
counting.Stopping
�
Press RESET1 again to stop counting.
Resetting
�
Press and hold RESET1 until the dis-
play shows “0:00”.
Average fuel consumption
�
Press MODE2 (
�page 189) repeat-
edly until the average fuel consumption
display appears in the trip computer
display3.Distance remaining with fuel presently
in tank
�
Press MODE2 (
�page 189) repeat-
edly until the distance remaining dis-
play appears in the trip computer
display3.
iIf CAL
remains in the display, calibration
was not successfully completed. You
have to recalibrate:
�
Remove the key from the steering
lock.
�
Start the vehicle and start the cali-
bration procedure described previ-
ously.
We recommend that you have the com-
pass calibrated at a Mercedes-Benz
Light Truck Center.
iWhen the fuel supply drops to reserve
level the display flashes distance re-
maining.�
USA only:
The display alternates between FUEL
and distance remaining until
supply is consistently below the re-
serve level. When the fuel supply is
very low (approximately 1.5 gal
[5.5 l])
FUEL
is displayed
continuously.
Page 219 of 356

217 Operation
Driving instructions
Catalytic converter
Your Mercedes-Benz is equipped with
monolithic-type catalytic converters, an
important element in conjunction with the
oxygen sensors to achieve substantial con-
trol of the pollutants in the exhaust emis-
sions. Keep your vehicle in proper
operating condition by following our rec-
ommended maintenance instructions as
outlined in your Maintenance Booklet.
Emission control
Certain engine systems serve to keep the
toxic components of the exhaust gases
within permissible legal limits.
These systems, of course, will function
properly only when maintained strictly ac-
cording to factory specifications. Any ad-
justments on the engine should, therefore,
be carried out only by qualified
Mercedes-Benz Light Truck Center autho-
rized technicians. Engine adjustments
should not be altered in any way. More-
over, the specified service jobs must be
carried out regularly according to Mercedes-Benz servicing requirements.
For details refer to the Maintenance Book-
let.
!To prevent damage to the catalytic con-
verters, use only premium unleaded
gasoline in this vehicle.
Any noticeable irregularities in engine
operation should be repaired promptly.
Otherwise, excessive unburned fuel
may reach the catalytic converter,
causing it to overheat and start a fire.
Warning!
G
As with any vehicle, do not idle, park or op-
erate this vehicle in areas where combusti-
ble materials such as grass, hay or leaves
can come into contact with the hot exhaust
system, as these materials could be ignited
and cause a vehicle fire.
Warning!
G
Inhalation of exhaust gas is hazardous to
your health. All exhaust gas contains carbon
monoxide, and inhaling it can cause uncon-
sciousness and lead to death.
Do not run the engine in confined areas
(such as a garage) which are not properly
ventilated. If you think that exhaust gas
fumes are entering the vehicle while driving,
have the cause determined and corrected
immediately. If you must drive under these
conditions, drive only with at least one win-
dow fully open at all times.
Page 222 of 356
220 OperationAt the gas station�
Replace the fuel cap by turning it to the
right.
You will hear when the fuel cap is tight-
ened.
�
Close the fuel filler flap.iOnly use premium unleaded gasoline
with a minimum Posted Octane Rating
of 91 (average of 96 RON / 86 MON).
Information on gasoline quality can
normally be found on the fuel pump.
For more information on gasoline, see
the Factory Approved Service Products
pamphlet.
iLeaving the engine running and the fuel
cap open can cause the yellow fuel
tank reserve warning lamp to flash and
the? malfunction indicator lamp
(USA only) or the± malfunction in-
dicator lamp (Canada only) to illumi-
nate.
For more information, see “Practical
hints” (
�page 254).
��
Page 292 of 356
290 Practical hintsBattery
Batteries contain materials that can harm
the environment if disposed of improperly.
Large 12 volt storage batteries contain
lead. Recycling of batteries is the preferred
method of disposal. Many states require
sellers of batteries to accept old batteries
for recycling.
iThe following procedures must be car-
ried out following any interruption of
battery power (e.g. due to reconnec-
tion):�
Set the clock (
�page 119).
�
Set the date in trip computer
(�page 189).
�
Calibrate the compass
(�page 191).
�
Resynchronize the ESP
(�page 252).
�
Resynchronize side power windows
(�page 148).
�
Resynchronize tilt / sliding
sunroof*(
�page 152).
Page 299 of 356
297 Practical hintsFuses
�Fuses
The electrical fuses in your vehicle serve to
stop the supply of electricity to a device
that is malfunctioning. This helps to
prevent damage to the other vehicle
electronics.
The following aids are available to help you
change fuses (
�page 298):
�
Fuse chart
�
Spare fuses
�
Fuse extractorThe electrical fuses are located in different
fuse boxes:
�
Main fuse box in engine compartment
(�page 298)
�
Fuse box in front passenger footwell
(�page 299)
Warning!
G
Only use fuses approved for Mercedes-Benz
with the specified amperage for the system
in question. Otherwise, a short circuit could
result and cause a fire.!Only install fuses that have been tested
and approved by Mercedes-Benz and
that have the specified amperage
rating.
Otherwise, electrical parts or systems
could be damaged.
Never attempt to repair or bridge a
blown fuse. Have the cause determined
and remedied by an authorized
Mercedes-Benz Light Truck Center.