Page 281 of 356
279 Practical hints
Replacing bulbs
Front fog lamp
1Front fog lamp�
Use a suitable object (e.g. screwdriver)
to press on the release lever behind the
front panel.
Front fog lamp1 releases.
�
Pull front fog lamp1 out of the
bumper.2Bulb socket of front fog lamp bulb
3Tabs
�
Turn bulb socket2 with the bulb
counterclockwise and remove it.
�
Insert new bulb socket2 with the bulb
into the lamp and turn it clockwise.
�
Reinstall front fog lamp1 into the
bumper.
Let tabs3 engage in the bumper.
Replacing bulbs for rear lamps
Before you start to replace a bulb for a rear
lamp, do the following first:�
Turn the combination switch to
positionD (
�page 107).
Tail lamp unit
1Hexagon cap nut (with washer)
2Rear fog lamp (only driver’s side), tail
lamp, parking and standing lamp
3Side marker lamp
4Turn signal lamp
5Backup lamp
6Brake lamp
��
Page 282 of 356

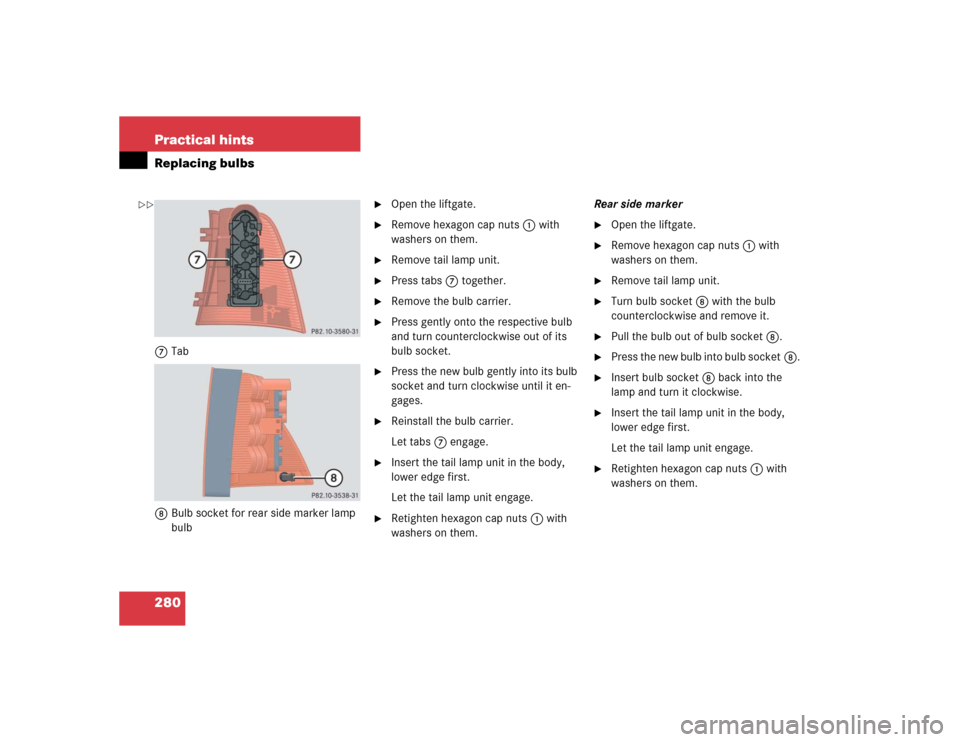
280 Practical hintsReplacing bulbs7Tab
8Bulb socket for rear side marker lamp
bulb
�
Open the liftgate.
�
Remove hexagon cap nuts1 with
washers on them.
�
Remove tail lamp unit.
�
Press tabs7 together.
�
Remove the bulb carrier.
�
Press gently onto the respective bulb
and turn counterclockwise out of its
bulb socket.
�
Press the new bulb gently into its bulb
socket and turn clockwise until it en-
gages.
�
Reinstall the bulb carrier.
Let tabs7 engage.
�
Insert the tail lamp unit in the body,
lower edge first.
Let the tail lamp unit engage.
�
Retighten hexagon cap nuts1 with
washers on them.Rear side marker
�
Open the liftgate.
�
Remove hexagon cap nuts1 with
washers on them.
�
Remove tail lamp unit.
�
Turn bulb socket8 with the bulb
counterclockwise and remove it.
�
Pull the bulb out of bulb socket8.
�
Press the new bulb into bulb socket8.
�
Insert bulb socket8 back into the
lamp and turn it clockwise.
�
Insert the tail lamp unit in the body,
lower edge first.
Let the tail lamp unit engage.
�
Retighten hexagon cap nuts1 with
washers on them.
��
Page 283 of 356

281 Practical hints
Replacing bulbs
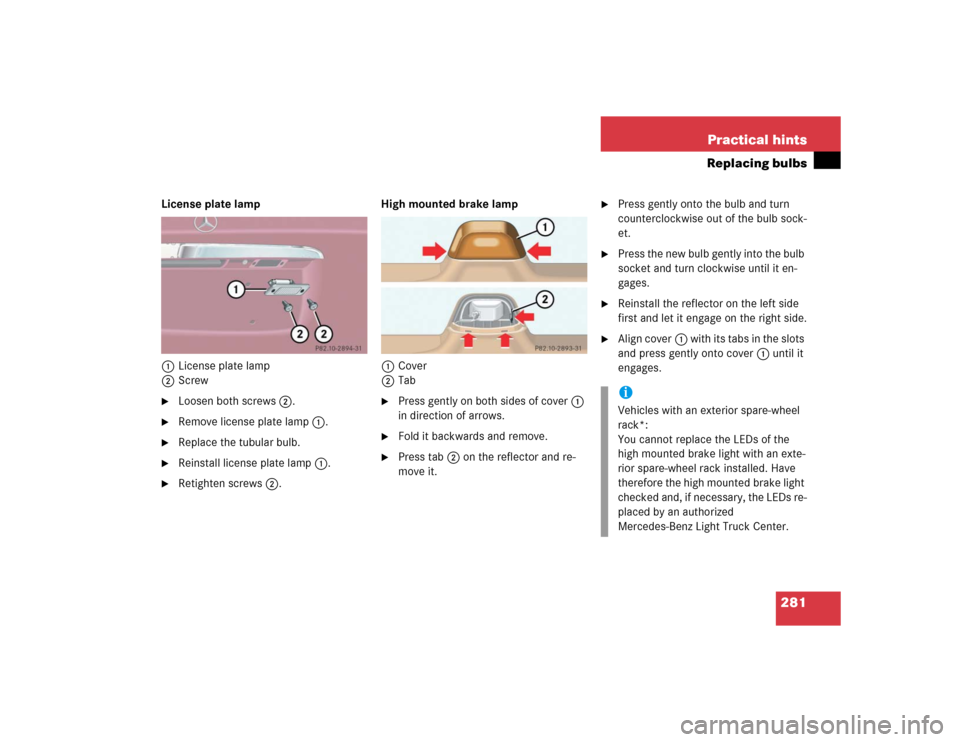
License plate lamp
1License plate lamp
2Screw�
Loosen both screws2.
�
Remove license plate lamp1.
�
Replace the tubular bulb.
�
Reinstall license plate lamp1.
�
Retighten screws2.High mounted brake lamp
1Cover
2Tab
�
Press gently on both sides of cover1
in direction of arrows.
�
Fold it backwards and remove.
�
Press tab2 on the reflector and re-
move it.
�
Press gently onto the bulb and turn
counterclockwise out of the bulb sock-
et.
�
Press the new bulb gently into the bulb
socket and turn clockwise until it en-
gages.
�
Reinstall the reflector on the left side
first and let it engage on the right side.
�
Align cover1 with its tabs in the slots
and press gently onto cover1 until it
engages.iVehicles with an exterior spare-wheel
rack*:
You cannot replace the LEDs of the
high mounted brake light with an exte-
rior spare-wheel rack installed. Have
therefore the high mounted brake light
checked and, if necessary, the LEDs re-
placed by an authorized
Mercedes-Benz Light Truck Center.
Page 284 of 356

282 Practical hintsReplacing bulbsAdjusting headlamp aim
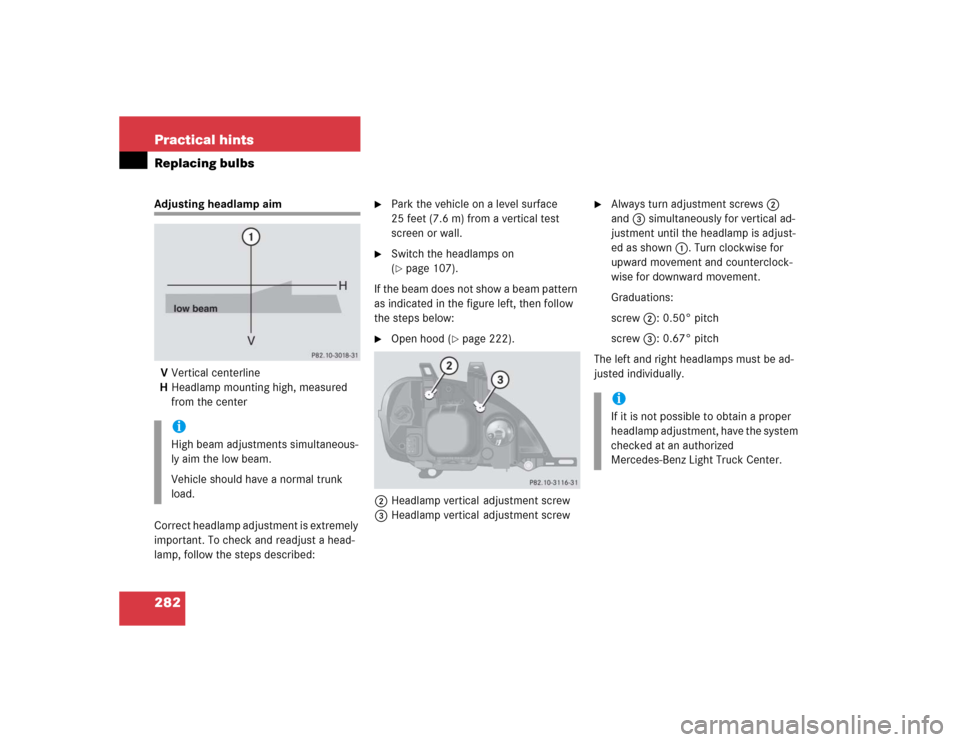
VVertical centerline
HHeadlamp mounting high, measured
from the center
Correct headlamp adjustment is extremely
important. To check and readjust a head-
lamp, follow the steps described:
�
Park the vehicle on a level surface
25 feet (7.6 m) from a vertical test
screen or wall.
�
Switch the headlamps on
(�page 107).
If the beam does not show a beam pattern
as indicated in the figure left, then follow
the steps below:
�
Open hood (
�page 222).
2Headlamp vertical adjustment screw
3Headlamp vertical adjustment screw
�
Always turn adjustment screws2
and3 simultaneously for vertical ad-
justment until the headlamp is adjust-
ed as shown1. Turn clockwise for
upward movement and counterclock-
wise for downward movement.
Graduations:
screw2: 0.50° pitch
screw3: 0.67° pitch
The left and right headlamps must be ad-
justed individually.
iHigh beam adjustments simultaneous-
ly aim the low beam.
Vehicle should have a normal trunk
load.
iIf it is not possible to obtain a proper
headlamp adjustment, have the system
checked at an authorized
Mercedes-Benz Light Truck Center.
Page 333 of 356

331 Index
Automatic headlamp mode 108
Automatic interior lighting control
Activating 114
Deactivating 114
Automatic locking when driving 93
Automatic transmission
Accelerator position 124
Emergency operation
(Limp Home Mode) 126
Gear ranges 122
Gear selector lever position 123
Gear shifting malfunctions 126
Kickdown 124
Manual shifting 121
One-touch gearshifting 121
Selector lever position 120
Towing a trailer 125
Transmission fluid 227
B
BabySmart
TM
Airbag deactivation system 70
Compatible child seats 70, 323
Self-test 70
BabySmart
TM airbag
deactivation system 323Backrest tilt 36
Backup lamps 275, 279
Bulbs 275
BAS 78, 323
Malfunction indicator lamp 251, 252,
253
Warning lamp 251
Batteries, remote control
Replacing 273
Battery discharged
Jump starting 291
Battery indicator lamp
Indicator lamp 261
Battery, vehicle 228, 272
Charging 289
Disconnecting 289
Reconnecting 289
Reinstalling 289
Removing 289
Bi-Xenon headlamps* 323
Block heater (Canada only) 236
Blocking
Rear door window operation 74
Brake assist system (BAS) 323
Brake fluid 314
Brake lamp bulbs 275Brake pad wear
Indicator lamp 261
Brakes 198
Warning lamp 250
Break-in period 196
Bulbs, replacing 274
Additional turn signals 274
Backup lamps 275
Brake lamps 275
Fog lamps 274
Front fog lamp 279
Front lamps 274
High beam 274
High mounted brake lamp 281
License plate lamps 275, 281
Low beam 274
Parking, standing lamp 274
Rear fog lamps 279
Rear side marker lamp bulbs 279
Side marker lamps 274, 275
Standing lamps 274
Tail lamp assemblies 279
Turn signal lamps 274, 275
Turn signal, side marker lamp 274
Page 338 of 356

336 IndexEngine oil 223, 314
Adding 226
Additives 314
Checking level 223
Consumption 223
Messages in display 224
Oil dipstick 226
Viscosity 324
Enlarged cargo compartment 100
Error
Display messages 263
ESP 25, 80, 324
Indicator lamp 251
LOW RANGE mode 81
Malfunction indicator lamp 251, 252,
253
Switching off 81
Switching on 82
Synchronizing 252
Warning lamp 258
ETD 324
Safety guidelines 62
ETD (Emergency tensioning device) 67Exterior mirrors
Folding 130
Exterior rear view mirrors
Adjusting 41
Folding electrically 130
F
Fastening the seat belts 43
Fine adjustment
Cruise control 155
First aid kit 264
Flat tire 284
Lowering the vehicle 287
Preparing the vehicle 284
Spare wheel 266
Flexible Service System (FSS) 237, 324
Fluid level
Automatic transmission 227
Fog lamps 111
Replacing bulbs 274
Fog lamps, front
Replacing bulbs 276
Switching on 112
Folding
Exterior mirrors 130Folding electrically
Exterior rear view mirrors 130
4-ETS 25, 79
Indicator lamp 259
LOW RANGE mode 80
Malfunction indicator lamp 259
Warning lamp 258
Front airbags 63
Front fog lamps
Indicator lamp 260
Front lamps
Replacing bulbs 274, 276
Front towing eye 295
Front turn signal bulbs
Replacing 278
FSS (Flexible Service System) 237, 324
Fuel 220
Additives 315
Fuel reserve warning lamp 259
Gasoline additives 315
Premium unleaded gasoline 220,
315
Requirements 315
Reserve warning 25
Page 340 of 356

338 IndexHeadlamp cleaning system* 230
Headlamps
Automatic control 108
Bi-Xenon* 323
Cleaning 242
Cleaning system* 133, 230
Refilling washer fluid 230
Switching off 55
Switching on 50
Washer fluid 319
Washer system 319
Headliner
Cleaning 244
Heated seats* 98
Height adjustment
Head restraints 37, 39
Seat belts 46
Steering wheel 40
High beam 111
High beam flasher 50, 111
High beam halogen headlamps
Replacing bulbs 277
High beam headlamps
Replacing bulbs 274
High mounted brake lamp
Replacing bulbs 281Hood 222
Closing 223
Opening 222
Hooks
Loading 162
Hydroplaning 201
I
Identification labels 304
Certification label 304
Vehicle identification number
(VIN) 304
Ignition 33
Immobilizer 83
Activating 83
Deactivating 83
Indicator lamp
Adjustable steering column 260
Brake pad wear 261
Coolant 256
Front fog lamps 260
Low engine oil level 260
Infant and child restraint systems 68
Installing 71
LATCH child seat mounts 73Information
About service and warranty 10
Button for Tele Aid* 180
Inside rear view mirror
Antiglare 128
Installing
Infant and child restraint systems 71
Wiper blades 283
Instrument cluster 24, 117, 325
Cleaning 244
Coolant temperature gauge 118
Display in the speedometer 118
Illumination 117
Lamps in 259
Outside temperature indicator 119
Instruments and controls see Cockpit
Integrated remote control
Erasing memory 188
Operating 188
Interior lighting 114
Activating automatic control 114
Deactivating automatic control 114
Manual control 115
Reading lamps 115
Interior rear view mirror
Adjusting 41
Page 341 of 356

339 Index
Intermittent wiping 132
J
Jack 265
Jump starting 291
K
Key
Global locking 89
Global unlocking 89
Loss of 90
Positions in steering lock 33
Remote control with folding key 88
Unlocking liftgate 89
Unlocking the driver’s door,
fuel filler flap 89
Key, Mechanical 268
Key, Remote control
Unlocking with 32
Kickdown 124, 325
L
Labels, identification 304
Lamp bulbs, exterior 274
Lamps, exterior
Front 274
Rear 275Lamps, indicator and warning
4-ETS 258, 259
ABS 248
Adjustable steering column 260
AIRBAG OFF 63, 249
BAS 78, 251, 252
Battery indicator lamp 261
Brake pad wear 261
Brakes 250
CHECK ENGINE 254, 255
CHECK Engine malfunction indicator
lamp 255
Coolant 256
EBP 251
Engine diagnostics 254, 255
ESP 251, 252, 258
Front fog lamps 260
Fuel reserve 259
Low engine oil level 260
LOW RANGE 259
Low washer system fluid level 260
Seat belts 260
Service indicator 237
SRS 262
Turn signals 25LATCH child seat anchors 73
LATCH child seat mounts 73
Layout of poly-V-belt drive 305
Leather upholstery
Cleaning 245
Lever
For cruise control 153
License plate lamps
Replacing bulbs 275, 281
Liftgate
Closing 92
Opening 89, 91
Opening from inside 91
Opening from outside 91
Light alloy wheels
Cleaning 244
Lighter see cigarette lighter