Page 277 of 356

275 Practical hints
Replacing bulbs
Rear lamps Notes on bulb replacement
�
Only use 12 volt bulbs of the same type
and with the specified watt rating.
�
Switch lights off before changing a bulb
to prevent short circuits.
�
Always use a clean lint-free cloth when
handling bulbs.
�
Your hands should be dry and free of oil
and grease.
�
If the newly installed bulb does not
come on, visit an authorized
Mercedes-Benz Light Truck Center.
Lamp
Type
6
Brake lamp
1073
(32 cp bulb)
7
Backup lamp
1073
(32 cp bulb)
8
Turn signal lamp
PY 21 W
9
Side marker lamp
W 5 W
a
Tail, parking, standing
lamp, rear fog lamp
(only driver’s side)
P 21 / 4 W
b
High mounted brake
lamp
1073
(32 cp bulb)
c
License plate lamps
C 5 W
Warning!
G
Bulbs and bulb sockets can be very hot.
Allow the lamp to cool down before chang-
ing a bulb.
Keep bulbs out of reach of children.
Halogen lamps contain pressurized gas.
A bulb can explode if you:�
touch or move it when hot
�
drop the bulb
�
scratch the bulb
Wear eye and hand protection.
Because of high voltage in Xenon lamps, it is
dangerous to replace the bulb or repair the
lamp and its components. We recommend
that you have such work done by a qualified
technician.
Page 278 of 356
276 Practical hintsReplacing bulbsHave the LEDs and bulbs for the following
lamps replaced by an authorized
Mercedes-Benz Light Truck Center:�
Additional turn signals in the exterior
rear view mirrors
�
Xenon*-lamps
�
Front fog lamps (vehicles with sport
package*)
�
High mounted brake lamp (only vehi-
cles with an exterior spare-wheel
rack*)
Replacing bulbs for front lamps
Before you start to replace a bulb for a
front lamp, do the following first:�
Turn the combination switch to
positionD (
�page 107).
�
Open the hood (
�page 222).
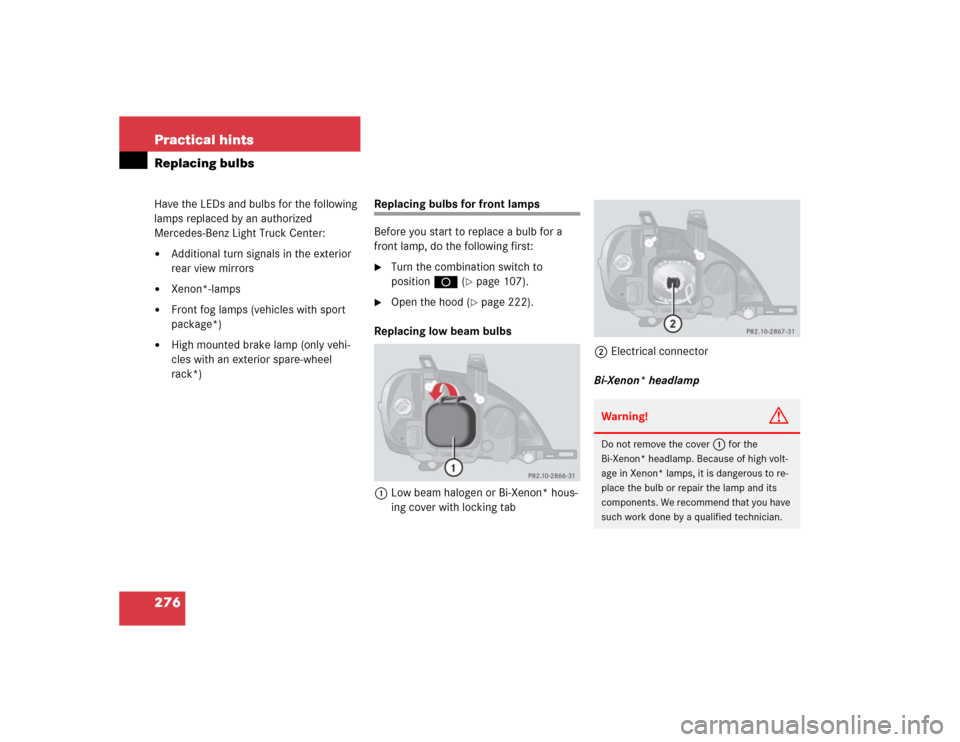
Replacing low beam bulbs
1Low beam halogen or Bi-Xenon* hous-
ing cover with locking tab2Electrical connector
Bi-Xenon* headlamp
Warning!
G
Do not remove the cover
1
for the
Bi-Xenon* headlamp. Because of high volt-
age in Xenon* lamps, it is dangerous to re-
place the bulb or repair the lamp and its
components. We recommend that you have
such work done by a qualified technician.
Page 285 of 356

283 Practical hints
Replacing wiper blades
�Replacing wiper blades
Removing�
Fold the wiper arm forward.
�
Turn wiper blade at a right angle to wip-
er arm.
1Wiper blade
2Safety tab
�
Press safety tab down2.
�
Push wiper blade downward1 and
remove.
Installing�
Slide the wiper blade into end of wiper
arm until it locks in place.
�
Fold the wiper arm back to rest on the
windshield. Make sure you hold onto
the wiper when folding the wiper arm
back.
Warning!
G
For safety reasons, remove key from steer-
ing lock before replacing a wiper blade. Oth-
erwise the motor could suddenly turn on and
cause injury.
!Never open the hood when the wiper
arms are folded forward.
Hold on to the wiper when folding the
wiper arm back. If released, the force
of the impact from the tensioning
spring could crack the windshield.
Do not allow the wiper arms to contact
the windshield glass without a wiper
blade inserted.
Make certain that the wiper blades are
properly installed. Improperly installed
wiper blades may cause windshield
damage.
For your convenience, we recommend
that you have this work carried out by
an authorized Mercedes-Benz Center.
Page 286 of 356

284 Practical hintsFlat tireMounting the spare wheel Preparing the vehicle
�
Park the vehicle as far as possible from
moving traffic on a hard surface.
�
Turn on the hazard warning flashers.
�
Engage the steering wheel lock in the
straight ahead position.
�
Set the parking brake.
�
Move the gear selector lever toP.
�
Have any passenger exit the vehicle at
a safe distance from the roadway.
�
Take the spare wheel out of its carrier
(�page 266).Lifting the vehicle
�
Prevent the vehicle from rolling away
by blocking wheels with wheel chocks
(not included) or other sizable objects.
When changing wheel on a level surface:
�
Place one chock in front of and one be-
hind the wheel that is diagonally oppo-
site to the wheel being changed.
When changing wheel on a hill:
�
Place chocks on the downhill side
blocking both wheels of the other axle.
�
Take the two-piece wheel wrench and
the jack out of the rear cargo compart-
ment (
�page 264). Assemble wheel
wrench.
Warning!
G
The dimensions of the spare wheel are dif-
ferent from those of the road wheels. As a
result, the vehicle handling characteristics
change when driving with a mounted spare
wheel. Adapt your driving style accordingly.
The spare wheel is for temporary use only.
When driving with spare wheel mounted,
make sure proper tire pressure and do not
exceed vehicle speed of 50 mph (80 km / h).
Drive to the nearest Mercedes-Benz Light
Truck Center as soon as possible to have the
spare wheel replaced with a regular road
wheel.
Never operate the vehicle with more than
one spare wheel mounted.
iOpen door only when conditions are
safe to do so.
Page 287 of 356
.
The jack take-up brackets are located di-
rectly behi")
285 Practical hints
Flat tire
�
On wheel to be changed, loosen but do
not yet remove the wheel bolts
(approximately one full turn with
wrench).
The jack take-up brackets are located di-
rectly behind the front wheel housings and
in front of the rear wheel housings.1Take-up bracket
2Jack
�
Place jack on firm ground.
�
Position jack2 under the take-up
bracket1 so that it is always vertical
(plumb-line) as seen from the side,
even if the vehicle is parked on an in-
cline.
�
Jack up the vehicle until the wheel is a
maximum of 1.2 in (3 cm) from the
ground. Never start engine while vehi-
cle is raised.
Warning!
G
The jack is designed exclusively for jacking
up the vehicle at the jack take-up brackets
built into both sides of the vehicle. To help
avoid personal injury, use the jack only to lift
the vehicle during a wheel change. Never
get beneath the vehicle while it is supported
by the jack. Keep hands and feet away from
the area under the lifted vehicle. Always
firmly set parking brake and block wheels
before raising vehicle with jack.
Do not disengage parking brake while the
vehicle is raised. Be certain that the jack is
always vertical (plumb line) when in use, es-
pecially on hills. Always try to use the jack
on level surface. Make sure that the jack
arm is fully seated in the jack take-up brack-
et. Always lower the vehicle onto sufficient
capacity jackstands before working under
the vehicle.
!Do not position the jack on the body of
the vehicle, as this may cause damage
to the vehicle.
Page 288 of 356

286 Practical hintsFlat tireRemoving the wheel�
Unscrew and remove all wheel bolts.
�
Remove the remaining bolts.
�
Grip the wheel from the sides and re-
move it.
Mounting the new wheel
�
Clean contact surfaces of wheel and
wheel hub.
�
Install spare wheel on wheel hub.
�
Insert wheel bolts and tighten them
slightly.!Do not place wheel bolts in sand or dirt.
This could result in damage to the bolt
and wheel hub threads.
!To avoid paint damage, place wheel flat
against hub and hold it there while in-
stalling first wheel bolt.Warning!
G
Always replace wheel bolts that are
damaged or rusted.
Never apply oil or grease to wheel bolts.
Damaged wheel hub threads should be
repaired immediately. Do not continue to
drive under these circumstances! Contact
an authorized Mercedes-Benz Light Truck
Center or call Roadside Assistance.
Incorrect wheel bolts or improperly tight-
ened wheel bolts can cause the wheel to
come off. This could cause an accident.
Make sure to use the correct wheel bolts.
Warning!
G
Use only genuine equipment
Mercedes-Benz wheel bolts. Other wheel
bolts may come loose.
Do not tighten the wheel bolts when the ve-
hicle is raised. Otherwise the vehicle could
tip over.
Page 289 of 356
287 Practical hints
Flat tire
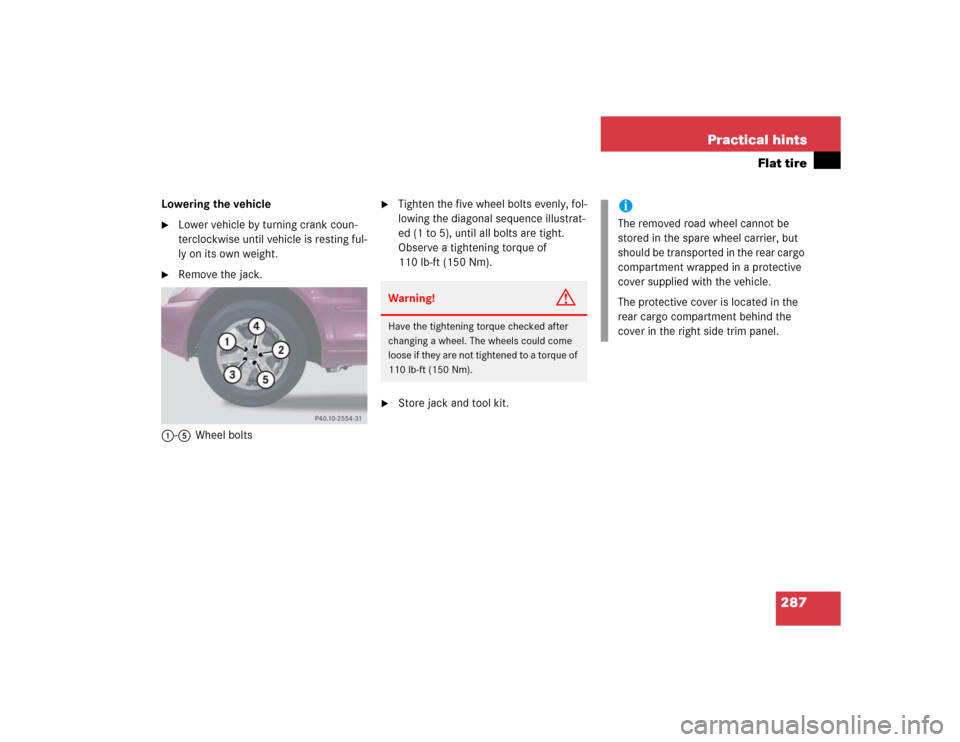
Lowering the vehicle�
Lower vehicle by turning crank coun-
terclockwise until vehicle is resting ful-
ly on its own weight.
�
Remove the jack.
1-5Wheel bolts
�
Tighten the five wheel bolts evenly, fol-
lowing the diagonal sequence illustrat-
ed (1 to 5), until all bolts are tight.
Observe a tightening torque of
110 lb-ft (150 Nm).
�
Store jack and tool kit.Warning!
G
Have the tightening torque checked after
changing a wheel. The wheels could come
loose if they are not tightened to a torque of
110 lb-ft (150 Nm).
iThe removed road wheel cannot be
stored in the spare wheel carrier, but
should be transported in the rear cargo
compartment wrapped in a protective
cover supplied with the vehicle.
The protective cover is located in the
rear cargo compartment behind the
cover in the right side trim panel.
Page 290 of 356

288 Practical hintsBatteryThe battery is located on the passenger
side of the engine compartment.
1Negative terminal
2Positive terminal
Warning!
G
Failure to follow these instructions can
result in severe injury or death.
Observe all safety instructions and precau-
tions when handling automotive batteries
(�page 228).
Never lean over batteries while connecting,
you might get injured.
Battery fluid contains sulfuric acid. Do not
allow this fluid to come in contact with eyes,
skin or clothing. In case it does, immediately
flush affected area with water and seek
medical help if necessary.
A battery will also produce hydrogen gas,
which is flammable and explosive. Keep
flames or sparks away from battery, avoid
improper connection of jumper cables,
smoking etc.
!Never loosen or detach battery termi-
nal clamps while the engine is running
or the key is in the steering lock. Other-
wise the alternator and other electronic
components could be severely dam-
aged.
Have the battery checked regularly by
an authorized Mercedes-Benz Light
Truck Center.
Refer to Maintenance Booklet for main-
tenance intervals or contact an autho-
rized Mercedes-Benz Light Truck
Center for further information.Warning!
G
Do not place metal objects on the battery as
this could result in a short circuit.
Use leak-proof battery only to avoid the risk
of acid burns in the event of an accident.