Page 315 of 416

315 Practical hints
What to do if …
Display symbol
Display message
Possible cause
Possible solution
.
MARKER LIGHT, FL
CHECK LIGHT!
The left front side marker lamp is mal-
functioning.
�
Replace the bulb as soon as possible.
MARKER LIGHT, FR
CHECK LIGHT!
The right front side marker lamp is mal-
functioning.
�
Replace the bulb as soon as possible.
REAR FOGLIGHT
CHECK LIGHT!
The rear fog lamp is malfunctioning.
�
Replace the bulb as soon as possible.
REAR FOGLIGHT
TURN OFF
BACK-UP LIGHT ON!
A lamp is malfunctioning. A backup bulb
is being used.
�
Turn the rear fog lamp off.
REVERSE LIGHT, R
CHECK LIGHT!
The right backup lamp is malfunctioning.
�
Replace the bulb as soon as possible.
TAIL LIGHT, L
CHECK LIGHT!
BACK-UP LIGHT ON!
The left tail lamp is malfunctioning.
A backup bulb is being used.
�
Replace the bulb as soon as possible.
TAIL LIGHT, R
CHECK LIGHT!
BACK-UP LIGHT ON!
The right tail lamp is malfunctioning.
A backup bulb is being used.
�
Replace the bulb as soon as possible.
TURN SIG., LF
CHECK LIGHT!
BACK-UP LIGHT ON!
The left front turn signal lamp is malfunc-
tioning. A backup bulb is being used.
�
Replace the bulb as soon as possible.
Page 316 of 416

316 Practical hintsWhat to do if …Display symbol
Display message
Possible cause
Possible solution
.
TURN SIG., RF
CHECK LIGHT
!
BACK-UP LIGHT ON!
The right front turn signal lamp is mal-
functioning. A backup bulb is being
used.
�
Replace the bulb as soon as
possible.
TURN SIG., LR
CHECK LIGHT
!
BACK-UP LIGHT ON!
The left rear turn signal lamp is malfunc-
tioning. A backup bulb is being used.
�
Replace the bulb as soon as
possible.
TURN SIG., RR
CHECK LIGHT!
BACK-UP LIGHT ON!
The right rear turn signal lamp is mal-
functioning. A backup bulb is being
used.
�
Replace the bulb as soon as
possible.
VISIT WORKSHOP!
DISPLAY MALFUNCTION
The display for the lamps or the system
is malfunctioning.
�
Visit an authorized Mercedes-Benz
Light Truck Center as soon as
possible.
TURN SIG. MIRROR, L
CHECK LIGHT!
The left turn signal in the side mirror is
malfunctioning. This message will only
appear if all light emitting diodes have
stopped working.
�
Visit an authorized Mercedes-Benz
Light Truck Center as soon as
possible.
TURN SIG. MIRROR, L
CHECK LIGHT!
The right turn signal in the side mirror is
malfunctioning. This message will only
appear if all light emitting diodes have
stopped working.
�
Visit an authorized Mercedes-Benz
Light Truck Center as soon as
possible.
Page 334 of 416
334 Practical hintsReplacing bulbsBulbs Front lamps Rear lamps
Lamp
Type
1
Additional turn
signal lamp
LED
2
Turn signal lamp
1156 NA
3
Side marker lamp
T 4 W
4
High and low beam
H4 60 (55 W)
Parking and
standing lamp
T 4 W
5
Fog lamp
H3 (55 W)
Lamp
Type
6
High mounted brake
lamp
LED
7
Turn signal lamp
PY 21 W
Brake lamp
P 21 W
Tail, parking and
standing lamp
R 5 W
8
Backup lamp
P 21 W
9
License plate lamps
C 5 W
a
Rear fog lamp
P 21 W
b
Side marker lamp
T 4 W
Page 335 of 416

335 Practical hints
Replacing bulbs
Notes on bulb replacement�
Use only 12 volt bulbs of the same type
and with the specified watt rating.
�
Switch lights off before changing a bulb
to prevent short circuits.
�
Always use a clean lint-free cloth when
handling bulbs.
�
Your hands should be dry and free of oil
and grease.
�
If the newly installed bulb does not
come on, visit an authorized
Mercedes-Benz Light Truck Center.
Have the LEDs for the following lamps re-
placed by an authorized Mercedes-Benz
Light Truck Center.
�
Additional turn signals in the exterior
rear view mirrors
�
High mounted brake lamp
�
Lamps in the exterior rear view mirrors
Warning!
G
Bulbs and bulb sockets can be very hot. Al-
low the lamp to cool down before changing
a bulb.
Keep bulbs out of reach of children.
Halogen lamps contain pressurized gas.
A bulb can explode if you:�
touch or move it when hot
�
drop the bulb
�
scratch the bulb
Wear eye and hand protection.
iHave the headlamp adjustment
checked regularly by a Mercedes-Benz
Light Truck Center.
Do not turn the headlamp adjusting
screws. If the adjusting screws are
turned, the headlamp adjustment must
be checked by a Mercedes-Benz Light
Truck Center.
Page 340 of 416
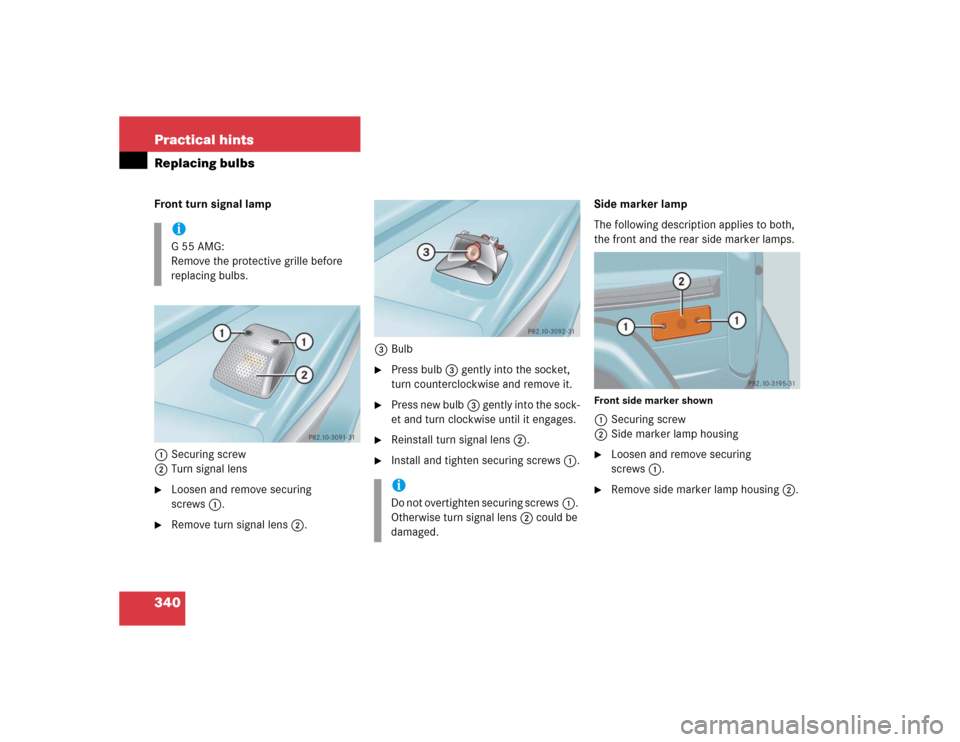
340 Practical hintsReplacing bulbsFront turn signal lamp
1Securing screw
2Turn signal lens�
Loosen and remove securing
screws1.
�
Remove turn signal lens2.3Bulb
�
Press bulb3 gently into the socket,
turn counterclockwise and remove it.
�
Press new bulb3 gently into the sock-
et and turn clockwise until it engages.
�
Reinstall turn signal lens2.
�
Install and tighten securing screws1.Side marker lamp
The following description applies to both,
the front and the rear side marker lamps.
Front side marker shown1Securing screw
2Side marker lamp housing�
Loosen and remove securing
screws1.
�
Remove side marker lamp housing2.
iG55AMG:
Remove the protective grille before
replacing bulbs.
iDo not overtighten securing screws1.
Otherwise turn signal lens2 could be
damaged.
Page 342 of 416
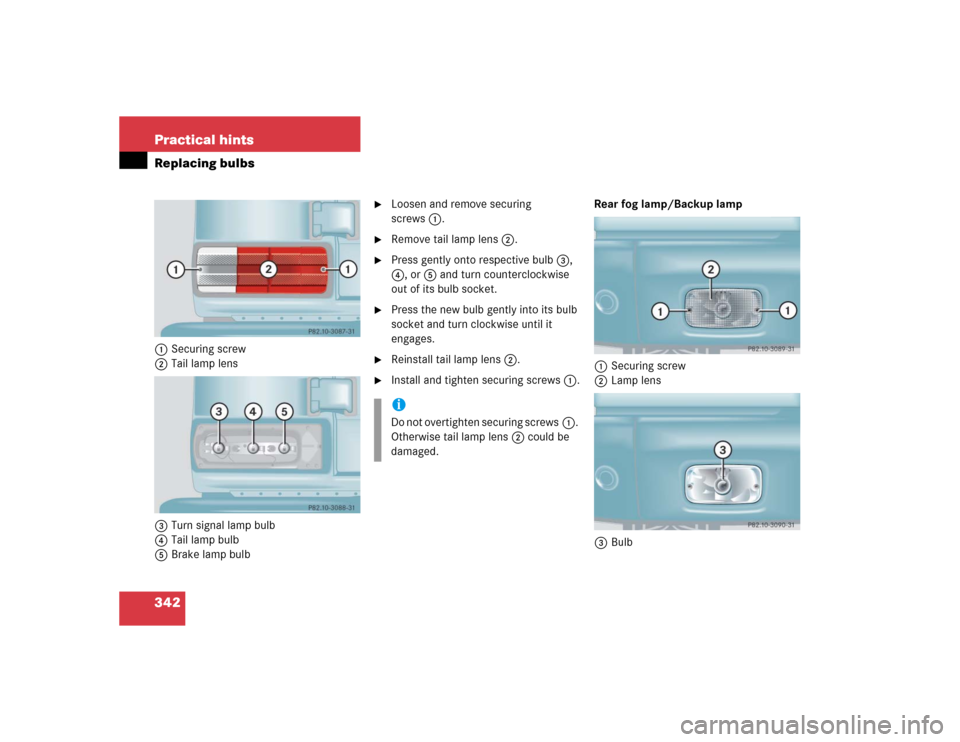
342 Practical hintsReplacing bulbs1Securing screw
2Tail lamp lens
3Turn signal lamp bulb
4Tail lamp bulb
5Brake lamp bulb
�
Loosen and remove securing
screws1.
�
Remove tail lamp lens2.
�
Press gently onto respective bulb3,
4, or5 and turn counterclockwise
out of its bulb socket.
�
Press the new bulb gently into its bulb
socket and turn clockwise until it
engages.
�
Reinstall tail lamp lens2.
�
Install and tighten securing screws1.Rear fog lamp/Backup lamp
1Securing screw
2Lamp lens
3BulbiDo not overtighten securing screws1.
Otherwise tail lamp lens2 could be
damaged.
Page 389 of 416
 276
Blocking rear door window operation 78
B-pillar 366
Brake assist system (BAS) 381
Brake fluid 237, 376
Brake lamp bulbs, left and right 334
Brake lamp")
389 Index
Bead 271
Block heater (Canada only) 276
Blocking rear door window operation 78
B-pillar 366
Brake assist system (BAS) 381
Brake fluid 237, 376
Brake lamp bulbs, left and right 334
Brake lamp, high mounted 334
Brake pads
Message in display 303
Brakes 217
Warning lamp 290, 291
Break-in period 214
Brush guard* 329
Lowering 330
Raising and securing 330
Bulbs, replacing
Additional turn signals 334
Backup lamps 334, 342
Brake lamps 334, 341
Front fog lamps 334, 338
Front lamps 333, 334
Front turn signal lamps 334, 339
High and low beam 336High beam lamps 334
High mounted brake lamp 334
License plate lamps 334, 342
Low beam lamps 334
Parking lamps 334, 336
Rear fog lamp 334, 342
Rear turn signal lamps 334
Side marker lamps 334, 340
Standing lamps 334, 336
Tail lamp unit 334, 341C
CAC (Customer Assistance Center) 381
Calling up
Maintenance service indicator 278
Range (distance to empty) 145
CAN system 381
Capacities
Fuels, coolants, lubricants, etc. 374
Cargo area see Cargo compartment
Cargo compartment
Tailgate 97, 98
Tie-down rings 189
Cargo compartment cover 182
Installing 183
Removing 183
Cargo tie-down rings 189
Catalytic converter 232
CD changer 322
CD player
Operating 130
Center console 28
AIRBAG OFF indicator lamp 295
Lower part 29
Upper part 28
Page 394 of 416

394 IndexEngine oil level see Oil level
Enlarged cargo compartment 183
ESP 25, 80, 84, 382
Messages in display 300
Switching off 86
Switching on 87
Synchronizing 300
Warning lamp 293
ETD 62, 71, 382
Safety guidelines 66
Exterior lamp switch 110
Exterior lamps
Delayed shut-off 139
Exterior rear view mirrors
Adjusting 41
Parking position for 143F
Fahrenheit
Setting temperature units 135
Fastening the seat belts 43
Fine adjustment
Cruise control 178
First aid kit 321
Flat tire 346
Lowering the vehicle 350
Mounting the spare wheel 347
Spare wheel 323
Flexible Service System (FSS, Canada
vehicles) 382
Fog lamp, rear 114, 334
Fog lamps, front 113
Messages in display 313
4-ETS 80, 83
Front airbags 67
Front axle differential lock
Switching on 159
Front fog lamps
Replacing bulbs 334, 338Front lamps
Messages in display 312, 314
Replacing bulbs 334, 335
Switching on 110
Front seat head restraints
Installing 102
Removing 101
Front towing eye 359
Front turn signal lamp
Replacing bulbs 339
FSS (Flexible Service System, Canada
vehicles) 382
Fuel 236
Additives 377
Fuel reserve warning lamp 294
Gasoline additives 377
Premium unleaded gasoline 236,
374, 376
Refueling 235
Requirements 377
Reserve warning 25
Technical data 374

Parkin")