Page 114 of 416
�
Switch on the front fog lamps
(�page 113).
�
Pull out the exterior lamp switch to
second stop.
The rear fog lamp switches on.
The")
114 Controls in detailLightingRear fog lamp (driver’s side only)�
Switch on the front fog lamps
(�page 113).
�
Pull out the exterior lamp switch to
second stop.
The rear fog lamp switches on.
The yellow indicator lamp† in the
exterior lamp switch comes on
(�page 110).
�
Push in the exterior lamp switch to first
stop.
The rear fog lamp switches off.
The yellow indicator lamp† in the
exterior lamp switch goes out.
The front fog lamps remain lit.
Combination switch
The combination switch is located on the
left side of the steering column.
1High beam
2High beam flasherHigh beam
�
Turn the exterior lamp switch to
positionB orU (
�page 110).
�
Push the combination switch in direc-
tion of arrow1 to switch on the high
beam.
The high beam headlamp indicator
lampA in the instrument cluster
comes on (
�page 24).
�
Pull the combination switch in direction
of arrow2 to its original position to
switch off the high beam.
The high beam headlamp indicator
lampA in the instrument cluster
goes out.
High beam flasher
�
Pull the combination switch briefly in
direction of arrow2.
Page 138 of 416
 activated.
With daytime runnin")
138 Controls in detailControl system
The selection marker is on the current
setting.
�
Pressæ orç to select manual
operation or daytime running lamp
mode (constant) activated.
With daytime running lamp mode activated
and the exterior lamp switch in
positionMorU, the low beam
headlamps are switched on when the en-
gine is running.In low ambient light conditions the follow-
ing lamps will switch on additionally:
�
Parking lamps
�
Tail lamps
�
License plate lamps
�
Side marker lamps
For more information on the daytime run-
ning lamp mode, see “Lighting”
(
�page 110).Setting locator lighting
With the locator lighting feature activated
and the exterior lamp switch in position
U, the following lamps will switch on
when the vehicle is unlocked with the
SmartKey during darkness:
�
Parking lamps
�
Tail lamps
�
License plate lamps
�
Side marker lamps
�
Front fog lamps
The locator lighting switches off when the
driver’s door is opened.
If you do not open a door after unlocking
with the SmartKey the lamps will switch off
automatically after approximately
40 seconds.
iFor safety reasons, resetting the LIGHTING
submenu to factory settings
while driving (
�page 132) will not de-
activate the daytime running lamp
mode.
The following message appears in the
multifunction display:
LIGHTING – CANNOT BE TOTALLY RESET
TO FACTORY SETTINGS WHILE DRIVING
��
Page 139 of 416

139 Controls in detail
Control system
�
Move the selection marker with
theæ orç button to the LIGHTING
submenu.
�
Press buttonj ork repeatedly
until you see this message in the dis-
play:
LOCATOR LIGHTING
.
The selection marker is on the current
setting.
�
Pressæ orç to switch the loca-
tor lighting function
ON or
OFF
.
�
Turn the exterior lamp switch to
positionU when exiting the vehicle
(�page 110).
The locator lighting feature is
activated.Setting night security illumination
(Headlamps delayed shut-off)
Use this function to set whether and how
long you would like the exterior lamps to
illuminate during darkness after exiting the
vehicle and all doors closed.
With the delayed shut-off feature activated
and the exterior lamp switch in
positionU before the engine is turned
off, the following lamps will switch on after
you have removed the SmartKey from the
starter switch:
�
Parking lamps
�
Tail lamps
�
License plate lamps
�
Side marker lamps
�
Front fog lamps
If you do not open a door after removing
the SmartKey from the starter switch, the
lamps will switch off automatically after
approximately 60 seconds.
�
Move the selection marker with
theæ orç button to the LIGHTING
submenu.
�
Press buttonj ork repeatedly
until you see this message in the dis-
play:
HEADLIGHTS DELAYED SHUT-OFF
.
The selection marker is on the current
setting.
�
Pressæ orç to select the
desired lamp-on period.iYou can reactivate this function within
ten minutes by opening a door.
��
Page 140 of 416

140 Controls in detailControl system
You can select:�
0 s
, the delayed shut-off feature is
deactivated.
�
15 s
, 30 s
, 45 s
or
60 s
, select the
desired lamp-on period.
�
Turn the exterior lamp switch to
positionU before turning off the
engine.
The headlamps delayed shut-off
feature is activated.
You can temporarily deactivate the
delayed shut-off feature:
�
Before exiting the vehicle, turn the
SmartKey in the starter switch to
position0.
�
Then turn it to position2 and back to
position0.
The delayed shut-off feature is deacti-
vated. It will reactivate as soon as you
reinsert the SmartKey in the starter
switch.Setting interior lighting delayed shut-off
Use this function to set whether and how
long you would like the interior lighting to
remain lit during darkness after you have
removed the SmartKey from the starter
switch.
�
Move the selection marker with
theæ orç button to the LIGHTING
submenu.
�
Press buttonj ork repeatedly
until you see this message in the dis-
play:
INT. LIGHTING DELAYED
SHUT-OFF
.The selection marker is on the current
setting.
�
Pressæ orç to select the de-
sired lamp-on time period.
You can select:�
0 s
, the delayed shut-off feature is
deactivated.
�
5 s,
10 s
, 15 s
or
20 s
, the interior
lighting delayed shut-off feature is
activated with the desired lamp-on
period.
��
Page 160 of 416
 and for
setting the exterior rear view mirrors, see
“Mirrors” (
�page 41).
Rea")
160 Controls in detailGood visibilityFor information on windshield wipers, see
“Windshield wipers” (
�page 53) and for
setting the exterior rear view mirrors, see
“Mirrors” (
�page 41).
Rear view mirror
Auto-dimming mirrors
The reflection brightness of the exterior
rear view mirrors and the interior rear view
mirror will respond automatically to glare
when �
ignition is switched on, and
�
incoming light from headlamps falls on
the sensor in the interior rear view
mirror
The interior rear view mirror will not react if
�
reverse gear is engaged
�
the interior lighting is turned on
Warning!
G
The auto-dimming function does not react if
incoming light is not aimed directly at sen-
sors in the interior rear view mirror.
The interior rear view mirror and the exterior
rear view mirrors do not react, for example,
if the cargo compartment is fully loaded.
Glare can endanger you and others.
Warning!
G
In the case of an accident, liquid electrolyte
may escape from the mirror housing if the
mirror glass breaks.
Electrolyte has an irritating effect. Do not al-
low the liquid to come into contact with
eyes, skin, clothing, or the respiratory sys-
tem. In case it does, immediately flush af-
fected area with water, and seek medical
help if necessary.!Electrolyte drops coming into contact
with the vehicle paint finish can be
completely removed only while in the
liquid state by applying plenty of water.
Page 162 of 416
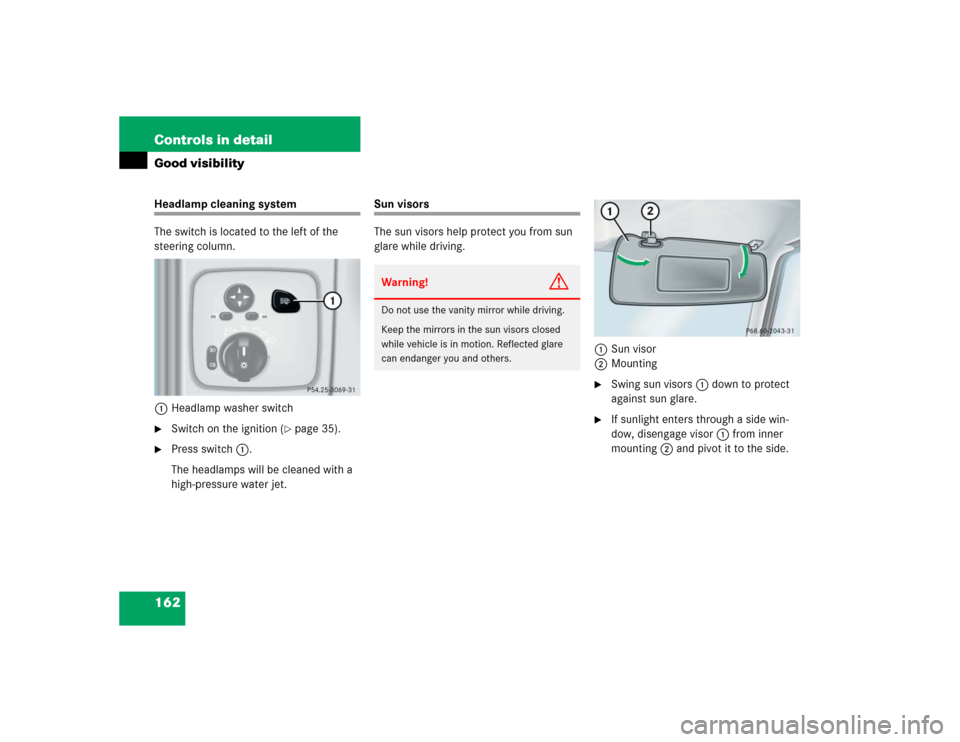
162 Controls in detailGood visibilityHeadlamp cleaning system
The switch is located to the left of the
steering column.
1Headlamp washer switch�
Switch on the ignition (
�page 35).
�
Press switch1.
The headlamps will be cleaned with a
high-pressure water jet.
Sun visors
The sun visors help protect you from sun
glare while driving.
1Sun visor
2Mounting
�
Swing sun visors1 down to protect
against sun glare.
�
If sunlight enters through a side win-
dow, disengage visor1 from inner
mounting2 and pivot it to the side.
Warning!
G
Do not use the vanity mirror while driving.
Keep the mirrors in the sun visors closed
while vehicle is in motion. Reflected glare
can endanger you and others.
Page 237 of 416
. For more information,
see “Coolant level” (
�page 244) and see
�")
237 Operation
At the gas station
G55AMG1Coolant
2Brake fluidCoolant
For normal replenishing, use water (pota-
ble water quality). For more information,
see “Coolant level” (
�page 244) and see
“Fuels, coolants, lubricants, etc.”
(
�page 374).
Brake fluidEngine oil level
For more information on engine oil, see
“Engine oil” (
�page 239).
Tire inflation pressure
For more information, see “Checking tire
inflation pressure” (
�page 259).
Vehicle lighting
Check function and cleanliness. For infor-
mation on replacing light bulbs, see “Re-
placing bulbs” (
�page 333).
For more information, see “Exterior lamp
switch” (
�page 110).
Windshield/rear window washer sys-
tem and headlamp cleaning system
For more information on refilling the reser-
voir, see “Windshield/rear window washer
system and headlamp cleaning system”
(
�page 245).
iOpening the hood, see (
�page 238).
!If you find that the brake fluid in the
brake fluid reservoir has fallen to the
minimum mark or below, have the
brake system checked for brake pad
thickness and leaks immediately. Noti-
fy an authorized Mercedes-Benz Light
Truck Center immediately. Do not add
brake fluid as this will not solve the
problem. For more information, see
“Practical hints” (
�page 290).
Page 245 of 416
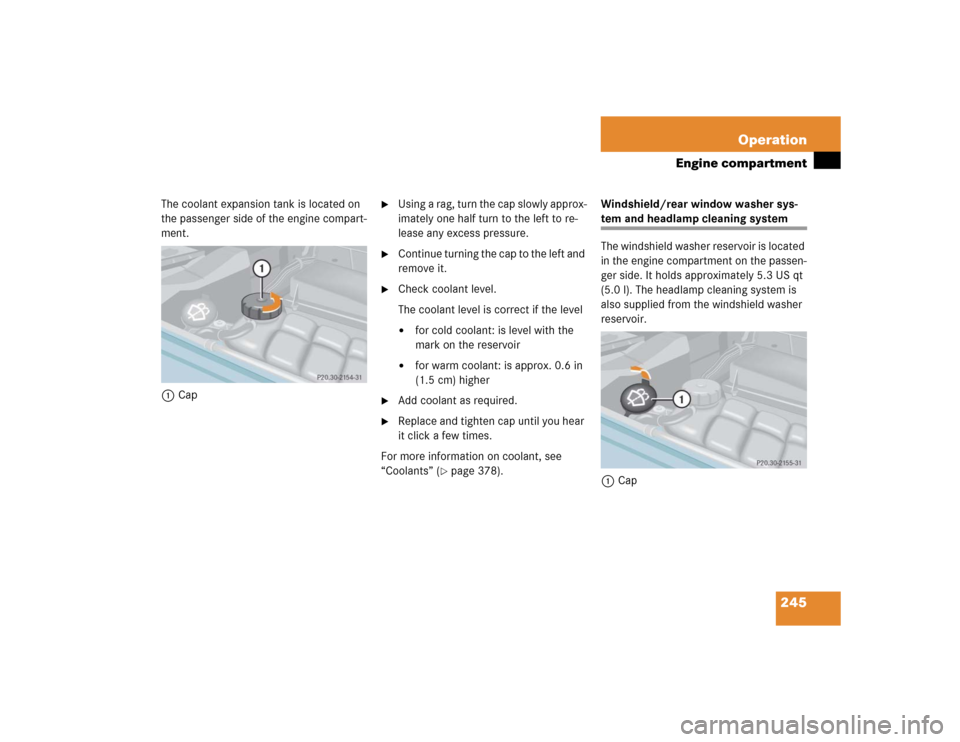
245 Operation
Engine compartment
The coolant expansion tank is located on
the passenger side of the engine compart-
ment.
1Cap
�
Using a rag, turn the cap slowly approx-
imately one half turn to the left to re-
lease any excess pressure.
�
Continue turning the cap to the left and
remove it.
�
Check coolant level.
The coolant level is correct if the level �
for cold coolant: is level with the
mark on the reservoir
�
for warm coolant: is approx. 0.6 in
(1.5 cm) higher
�
Add coolant as required.
�
Replace and tighten cap until you hear
it click a few times.
For more information on coolant, see
“Coolants” (
�page 378).Windshield/rear window washer sys-
tem and headlamp cleaning system
The windshield washer reservoir is located
in the engine compartment on the passen-
ger side. It holds approximately 5.3 US qt
(5.0 l). The headlamp cleaning system is
also supplied from the windshield washer
reservoir.
1Cap