Page 79 of 416

79 Safety and Security
Panic alarm
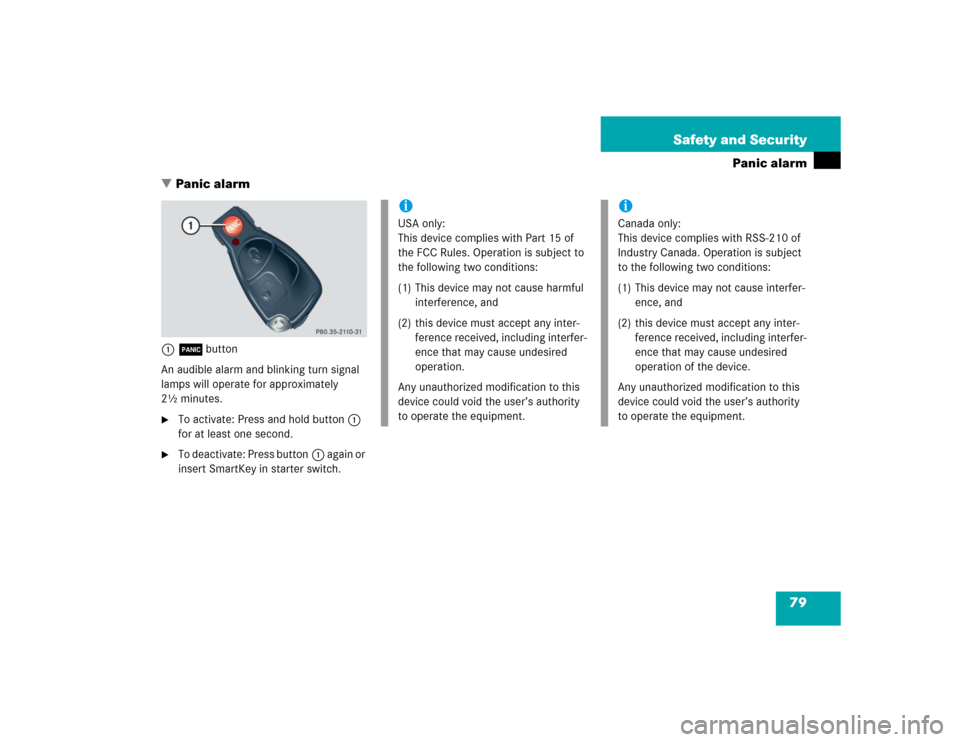
�Panic alarm
1Âbutton
An audible alarm and blinking turn signal
lamps will operate for approximately
2½ minutes.�
To activate: Press and hold button1
for at least one second.
�
To deactivate: Press button1 again or
insert SmartKey in starter switch.
iUSA only:
This device complies with Part 15 of
the FCC Rules. Operation is subject to
the following two conditions:
(1) This device may not cause harmful
interference, and
(2) this device must accept any inter-
ference received, including interfer-
ence that may cause undesired
operation.
Any unauthorized modification to this
device could void the user’s authority
to operate the equipment.
iCanada only:
This device complies with RSS-210 of
Industry Canada. Operation is subject
to the following two conditions:
(1) This device may not cause interfer-
ence, and
(2) this device must accept any inter-
ference received, including interfer-
ence that may cause undesired
operation of the device.
Any unauthorized modification to this
device could void the user’s authority
to operate the equipment.
Page 88 of 416

88 Safety and SecurityAnti-theft systemsImmobilizer
The immobilizer prevents unauthorized
persons from starting your vehicle.
Activating
Removing the SmartKey from the starter
switch activates the immobilizer.
Deactivating
Inserting the SmartKey in the starter
switch deactivates the immobilizer.
Anti-theft alarm
Once the alarm system has been armed, a
visual and audible alarm is triggered when
someone opens�
a door
�
the tailgate
�
the hood
The alarm will stay on even if the activating
element (a door, for example) is immedi-
ately closed.
The alarm system will also be triggered
when
�
someone attempts to raise the vehicle
�
the vehicle is opened with the mechan-
ical keyArming the alarm system
The alarm system is armed after locking
the vehicle with the SmartKey. The turn
signal lamps blink three times to indicate
that the alarm system is being armed.
A red lamp in the tow-away alarm switch
begins to blink after arming the alarm
system (
�page 28).
iIn case the engine cannot be started
(yet the vehicle’s battery is charged),
the system is not operational. Contact
an authorized Mercedes-Benz Light
Truck Center or call
1-800-FOR-MERCedes (in the USA), or
1-800-387-0100 (in Canada).
iIf the alarm stays on for more than
20 seconds, an emergency call is initi-
ated automatically by the Tele Aid sys-
tem (
�page 198) provided Tele Aid
service was subscribed to and properly
activated, and that necessary cellular
service and GPS coverage are avail-
able.
Page 89 of 416

89 Safety and Security
Anti-theft systems
Disarming the alarm system
The alarm system is disarmed when you
unlock your vehicle with the SmartKey. The
turn signal lamps blink once to indicate
that the alarm system is disarmed.Canceling the alarm
To cancel the alarm:
�
Press the Œ or ‹ button on the
SmartKey.
or
�
Insert the SmartKey in the starter
switch.
Tow-away alarm
Once the tow-away alarm is armed, a visual
and audible alarm will be triggered when
someone attempts to raise the vehicle.
iIf the turn signal lamps do not blink
three times, one of the following ele-
ments may not be properly closed:�
a door
�
the tailgate
�
the hood
Close the respective element and lock
the vehicle again.
iThe tow-away protection alarm is trig-
gered, for example, if the vehicle is lift-
ed on one side.
If the alarm stays on for more than
20 seconds, an emergency call is initi-
ated automatically by the Tele Aid sys-
tem provided Tele Aid service was
subscribed to and properly activated,
and that necessary cellular service and
GPS coverage are available.
Page 94 of 416

94 Controls in detailLocking and unlockingFactory setting
Global unlocking�
Press buttonŒ.
All turn signal lamps flash once. The
locking knobs on the doors move up.
The anti-theft alarm system is dis-
armed.
The vehicle will lock again automatically
within approximately 40 seconds of un-
locking if:
�
neither door nor tailgate is opened
�
the SmartKey is not inserted in the
starter switch
�
the central locking switch is not
activatedGlobal locking
�
Press button‹.
With the hood, tailgate and all doors
closed, all turn signal lamps flash three
times. The locking knobs on the doors
move down.
The anti-theft alarm system is armed.
Selective setting
If you frequently travel alone, you may wish
to reprogram the SmartKey so that
pressingŒ only unlocks the driver’s
door and the fuel filler flap.
�
Press and hold buttonsŒ and‹
simultaneously for about five seconds
until battery check lamp4 blinks
twice.
The SmartKey will then function as
follows:Unlocking the driver’s door and fuel
filler flap
�
Press buttonΠonce.
All turn signal lamps flash once. The
locking knobs on the doors move up.
The anti-theft alarm system is
disarmed.
Global unlocking
�
Press buttonΠtwice.
All turn signal lamps flash once. The
locking knobs on the doors move up.
The anti-theft alarm system is
disarmed.
Page 95 of 416

95 Controls in detail
Locking and unlocking
Global locking�
Press button‹.
With the hood, tailgate and all doors
closed, all turn signal lamps flash three
times. The locking knobs on the doors
move down.
The anti-theft alarm system is armed.
Restoring to factory setting
�
Press and hold buttonsŒ and‹
simultaneously for about six seconds
until battery check lamp4 blinks
twice.Checking the batteries
�
Press button‹ orŒ.
Battery check lamp4 comes on brief-
ly to indicate that the SmartKey batter-
ies are in order.
!If you can no longer lock or unlock the
vehicle with the SmartKey, then the
batteries in the SmartKey are dis-
charged, the SmartKey is malfunction-
ing or the vehicle battery is drained.�
Check the batteries in the
SmartKey (
�page 95) and replace
them if necessary (
�page 331).
�
Use the mechanical key to unlock
the driver’s door (
�page 325).
�
Have the vehicle battery and the
battery connections checked by an
authorized Mercedes-Benz Light
Truck Center (
�page 351).
�
Use the mechanical key to lock the
driver’s door and the tailgate
(�page 326).
If the SmartKey is malfunctioning, con-
tact an authorized Mercedes-Benz
Light Truck Center.
!If battery check lamp4 does not
come on briefly during check, then the
SmartKey batteries are discharged.
Replace the batteries (
�page 331).
You can obtain the required batteries
at any authorized Mercedes-Benz Light
Truck Center.
iIf the batteries are checked within sig-
nal range of the vehicle, pressing the
button‹ orŒ will lock or unlock
the vehicle accordingly.
Page 110 of 416

110 Controls in detailLightingFor information on how to switch on the
headlamps and use the turn signals, see
“Switching on headlamps” and “Turn sig-
nals” (
�page 51).
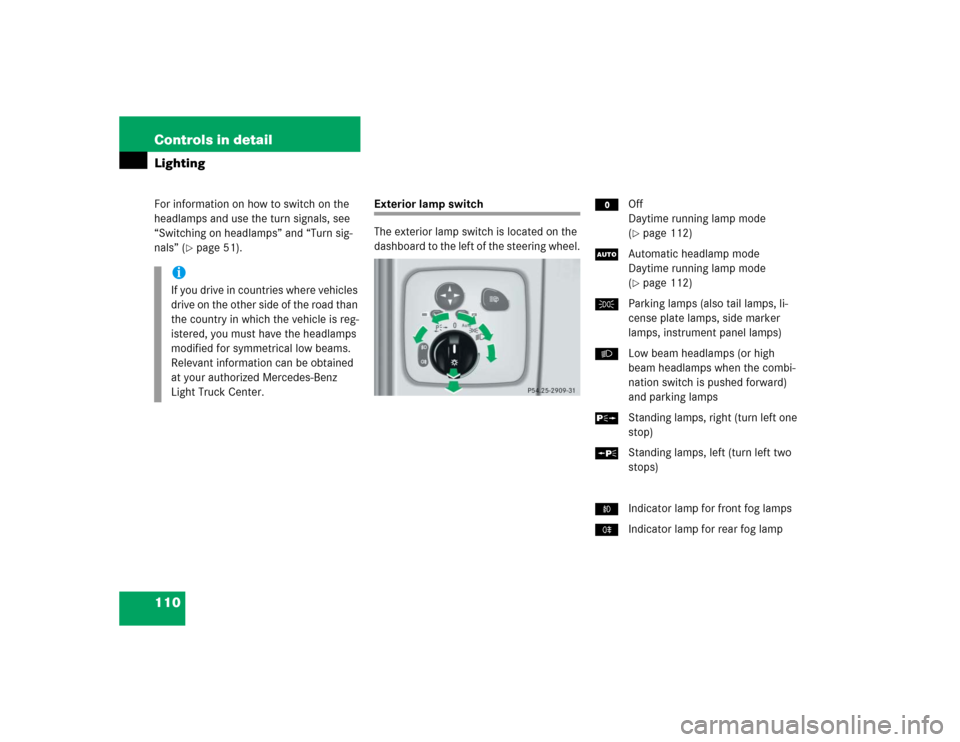
Exterior lamp switch
The exterior lamp switch is located on the
dashboard to the left of the steering wheel.MOff
Daytime running lamp mode
(
�page 112)
UAutomatic headlamp mode
Daytime running lamp mode
(�page 112)
CParking lamps (also tail lamps, li-
cense plate lamps, side marker
lamps, instrument panel lamps)
BLow beam headlamps (or high
beam headlamps when the combi-
nation switch is pushed forward)
and parking lamps
ˆStanding lamps, right (turn left one
stop)
‚Standing lamps, left (turn left two
stops)
‡Indicator lamp for front fog lamps
†Indicator lamp for rear fog lamp
iIf you drive in countries where vehicles
drive on the other side of the road than
the country in which the vehicle is reg-
istered, you must have the headlamps
modified for symmetrical low beams.
Relevant information can be obtained
at your authorized Mercedes-Benz
Light Truck Center.
Page 115 of 416
115 Controls in detail
Lighting
Hazard warning flasher
The hazard warning flasher can be
switched on at all times, even with the
SmartKey removed from the starter
switch.
The hazard warning flasher switches on au-
tomatically when an airbag deploys.
The hazard warning flasher switch is locat-
ed on the center console.
1Hazard warning flasher switchSwitching on hazard warning flasher
�
Press hazard warning flasher
switch1.
All the turn signal lamps are flashing.Switching off hazard warning flasher
�
Press hazard warning flasher switch1
again.
iWith the hazard warning flasher acti-
vated and the combination switch set
for either left or right turn, only the re-
spective turn signals will operate when
the SmartKey is in starter switch
position1or2.
iIf the hazard warning flasher has been
activated automatically, press hazard
warning flasher switch1 once to
switch it off.
Page 209 of 416

209 Controls in detail
Useful features
Step 7:�
To program the remaining two buttons,
repeat the steps above starting with
step 3.
Rolling code programming
To train a garage door opener (or other roll-
ing code devices) with the rolling code fea-
ture, follow these instructions after
completing the “Programming” portion
(steps 1 through 6) of this text. (A second
person may make the following training
procedures quicker and easier.)
Step 8:
�
Locate “training” button on the garage
door opener motor head unit. Exact location and color of the button
may vary by garage door opener brand.
Depending on manufacturer, the “train-
ing” button may also be referred to as
“learn”or “smart” button. If there is dif-
ficulty locating the transmitting button,
refer to the garage door opener opera-
tor’s manual.
Step 9:
�
Press “training” button on the garage
door opener motor head unit.
The “training light” is activated.
You have 30 seconds to initiate the follow-
ing step.
Step 10:
�
Firmly press, hold for two seconds and
release the programmed integrated
signal transmitter button (2, 3
or4).
Step 11:
�
Press, hold for two seconds and re-
lease same button a second time to
complete the training process.Some garage door openers (or other rolling
code equipped devices) may require you to
perform this procedure a third time to
complete the training.
Step 12:
�
Confirm the garage door operation by
pressing the programmed integrated
signal transmitter button (2, 3
or4).
Step 13:
�
To program the remaining two buttons,
repeat the steps above starting with
step 3.
Gate operator/Canadian programming
Canadian radio-frequency laws require
transmitter signals to “time-out” (or quit)
after several seconds of transmission
which may not be long enough for the inte-
grated signal transmitter to pick up the sig-
nal during programming. Similar to this
Canadian law, some U.S. gate operators
are designed to “time-out” in the same
manner.
iIf the indicator lamp1 blinks rapidly
for about two seconds and then turns
to a constant light, continue with pro-
gramming steps 8 through 12 as your
garage door opener may be equipped
with the “rolling code” feature.