Page 297 of 416
297 Practical hints
What to do if …
On the pages that follow, you will find a
compilation of the most important warning
and malfunction messages that may ap-
pear in the multifunction display.
For your convenience the messages are
divided into two sections:�
Text messages (
�page 298)
�
Symbol messages (
�page 302)
Warning!
G
No messages will be displayed if either the
instrument cluster or the multifunction dis-
play is inoperative. Systems that have a sig-
nificant influence on handling performance
may not be functioning.
Contact your nearest authorized
Mercedes-Benz Light Truck Center.
iSwitching on ignition (
�page 35),
causes all instrument cluster lamps
(except high beam headlamp indicator
lamp and turn signal indicator lamps
unless activated) as well as the multi-
function display to come on. Make sure
the lamps and multifunction display are
all in working order before starting your
journey.
Page 314 of 416

314 Practical hintsWhat to do if …Display symbol
Display message
Possible cause
Possible solution
.
LIGHT SENSOR
DRIVE TO WORKSHOP!
The lamp sensor is malfunctioning. The
headlamps switch on automatically.
�
In the control system, set lamp opera-
tion to manual (
�page 137).
�
Switch on headlamps using the
exterior lamp switch (
�page 110).
�
Visit an authorized Mercedes-Benz
Light Truck Center as soon as possi-
ble.
LICENSE PLATE LIGHT, L
CHECK LIGHT!
The left license plate lamp is malfunction-
ing.
�
Replace the bulb as soon as possible.
LICENSE PLATE LIGHT R
CHECK LIGHT!
The right license plate lamp is malfunc-
tioning.
�
Replace the bulb as soon as possible.
LIGHTS
TURN OFF LIGHTS!
The display appears if the driver’s door is
opened with the engine shut off and no
SmartKey in the starter switch.
�
Insert SmartKey in the starter switch.
�
Switch off the lights (
�page 110).
LOW BEAM, L
CHECK LIGHT!
The left low beam lamp is malfunctioning.
�
Visit an authorized Mercedes-Benz
Light Truck Center as soon as
possible.
LOW BEAM, R
CHECK LIGHT!
The right low beam lamp is malfunction-
ing.
�
Visit an authorized Mercedes-Benz
Light Truck Center as soon as
possible.
Page 334 of 416
334 Practical hintsReplacing bulbsBulbs Front lamps Rear lamps
Lamp
Type
1
Additional turn
signal lamp
LED
2
Turn signal lamp
1156 NA
3
Side marker lamp
T 4 W
4
High and low beam
H4 60 (55 W)
Parking and
standing lamp
T 4 W
5
Fog lamp
H3 (55 W)
Lamp
Type
6
High mounted brake
lamp
LED
7
Turn signal lamp
PY 21 W
Brake lamp
P 21 W
Tail, parking and
standing lamp
R 5 W
8
Backup lamp
P 21 W
9
License plate lamps
C 5 W
a
Rear fog lamp
P 21 W
b
Side marker lamp
T 4 W
Page 337 of 416
337 Practical hints
Replacing bulbs
Removing�
Loosen and remove securing
screws1.
�
Remove headlamp trim panel2 and
seal.
�
Loosen and remove headlamp-securing
screws4.
�
Remove headlamp3.
Installing
�
Insert headlamp3 and install and
tighten headlamp-securing screws4.
�
Install headlamp trim panel2 and
seal.
�
Install and tighten securing screws1.Headlamp bulbs
1Protection cover
2Electrical connector for parking and
standing lamp bulb
3Electrical connector for high and low
beam bulb4Retainer spring
5High and low beam bulb
6Parking and standing lamp bulb socket
Page 338 of 416
338 Practical hintsReplacing bulbsHigh and low beam bulb�
Remove protection cover1.
�
Pull off electrical connector3.
�
Unclip retainer spring4.
�
Remove bulb5.
�
Insert the new bulb so that its socket
locates in the recess of the lamp
housing.
�
Clip on retainer spring4.
�
Plug electrical connector3 onto
bulb5.
�
Reinstall protection cover1.Parking and standing lamp bulb
�
Pull off electrical connector2 from
bulb socket6.
�
Turn bulb socket6 counterclockwise
out of the lamp housing.
�
Insert a new bulb into bulb socket6.
�
Insert bulb socket6 into the lamp
housing and turn clockwise until it
engages.
�
Plug electrical connector2 onto bulb
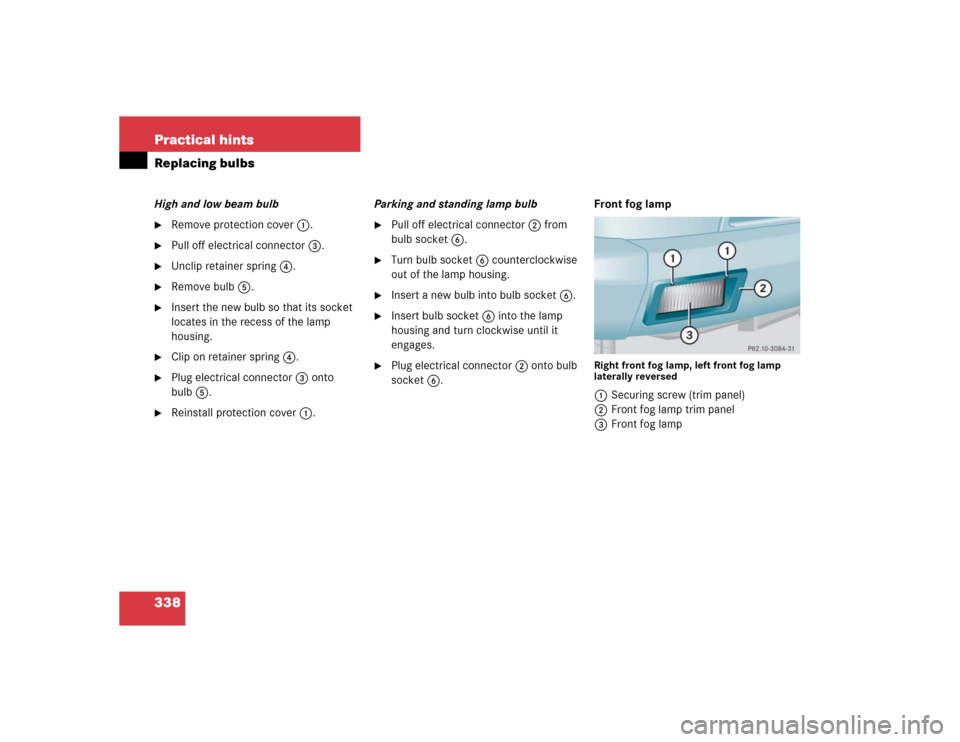
socket6.Front fog lamp
Right front fog lamp, left front fog lamp
laterally reversed1Securing screw (trim panel)
2Front fog lamp trim panel
3Front fog lamp
Page 389 of 416
 276
Blocking rear door window operation 78
B-pillar 366
Brake assist system (BAS) 381
Brake fluid 237, 376
Brake lamp bulbs, left and right 334
Brake lamp")
389 Index
Bead 271
Block heater (Canada only) 276
Blocking rear door window operation 78
B-pillar 366
Brake assist system (BAS) 381
Brake fluid 237, 376
Brake lamp bulbs, left and right 334
Brake lamp, high mounted 334
Brake pads
Message in display 303
Brakes 217
Warning lamp 290, 291
Break-in period 214
Brush guard* 329
Lowering 330
Raising and securing 330
Bulbs, replacing
Additional turn signals 334
Backup lamps 334, 342
Brake lamps 334, 341
Front fog lamps 334, 338
Front lamps 333, 334
Front turn signal lamps 334, 339
High and low beam 336High beam lamps 334
High mounted brake lamp 334
License plate lamps 334, 342
Low beam lamps 334
Parking lamps 334, 336
Rear fog lamp 334, 342
Rear turn signal lamps 334
Side marker lamps 334, 340
Standing lamps 334, 336
Tail lamp unit 334, 341C
CAC (Customer Assistance Center) 381
Calling up
Maintenance service indicator 278
Range (distance to empty) 145
CAN system 381
Capacities
Fuels, coolants, lubricants, etc. 374
Cargo area see Cargo compartment
Cargo compartment
Tailgate 97, 98
Tie-down rings 189
Cargo compartment cover 182
Installing 183
Removing 183
Cargo tie-down rings 189
Catalytic converter 232
CD changer 322
CD player
Operating 130
Center console 28
AIRBAG OFF indicator lamp 295
Lower part 29
Upper part 28
Page 398 of 416

398 IndexL
Labels, identification 366
Lamp bulbs, exterior 333
Lamps, exterior
Front 334
Light sensor 314
Messages in display 312, 314
Rear 334
Replacing bulbs for rear 341
Lamps, indicator and warning
ABS 288, 289
Battery (SmartKey) 94
Brakes 290, 291
CHECK ENGINE 292
Engine diagnostics 292
ESP 293
Fuel reserve 294
Instrument cluster 294
Maintenance service indicator 277
Seat belts 294
SRS 63
Turn signals 25
Language
Multifunction display 136
Setting 136LATCH child seat anchors 77
Layout of poly-V-belt drive 367
Leather upholstery
Cleaning 285
License plate lamps
Messages in display 314
Replacing bulbs 334, 342
Light alloy wheels
Cleaning 284
Technical data 370, 371
Light sensor 314
Lighter see Cigarette lighter
Lighting 110
Automatic headlamp mode 111
Combination switch 114
Daytime running lamp mode 112
Exterior lamp switch 110
Front fog lamps 113
High beam flasher 114
High beams 114
Instrument cluster illumination 120
Interior 116
Locator lighting 113
Low beams 110
Manual headlamp mode 111Night security illumination 113
Parking lamps 110
Rear fog lamp 114
Settings (control system) 137
Limiting the gear range 150
Limp Home Mode 153
Line of fall 383
Loading 182
Cargo compartment cover 182
Cargo tie-down rings 189
Instructions 187
Partition net* 185
Roof rack 182
Split rear bench seat 183
Loading terminology 271
Loading the vehicle 251
Locator lighting 113
Setting 138
Lock button 383
Locking 57, 92
Fuel filler flap 235
Global, SmartKey 94
Vehicle in an emergency 326
Loss of keys 96
Page 399 of 416

399 Index
Loss of Service and Warranty Information
Booklet 365
Low beam headlamps
Messages in display 314
Replacing bulbs 334, 336
LOW RANGE - ABS 81
Lowering
Vehicle 350
Lubricants
Technical data 374M
Main dimensions 373
Maintenance 277
Maintenance service
Basic service (Service A) 277
Calling up the maintenance service
indicator 278
Extended service (Service B) 277
Overdue 278
Types 278
When due 277
Maintenance service indicator 277
Calling up 278, 279
Clearing 278, 279
Maintenance System (U.S. vehicles) 383
Malfunction
Displaying 131
Rear Parking Assist* 181
Manual headlamp mode 111
Manual operations
Fuel filler flap 326
Interior lighting control 117
Locking the vehicle 326
Tilt/sliding sunroof 328
Unlocking the driver’s door 325Unlocking the tailgate 325
Unlocking transmission gear selector
lever 327
Maximum inflation pressure 272
Maximum load rating 272
Maximum loaded vehicle weight 272
MB Tex upholstery
Cleaning 285
Mechanical key 325
Memory function 107, 384
Recalling positions from
memory 108
Storing exterior rear view mirror
parking positions 109
Storing key dependent settings 108
Menus 125
AUDIO 128
In control system 126, 127
NAVI 130
Settings menu 132
Standard display 128
Submenus 125
TEL 145
Trip computer 144
Vehicle status message memory 131


Parkin")