Page 235 of 416

235 Operation
At the gas station
�At the gas station
Refueling
The fuel filler flap is located on the
right-hand side of the vehicle towards the
rear.
Locking/unlocking the vehicle with the re-
mote control automatically locks/unlocks
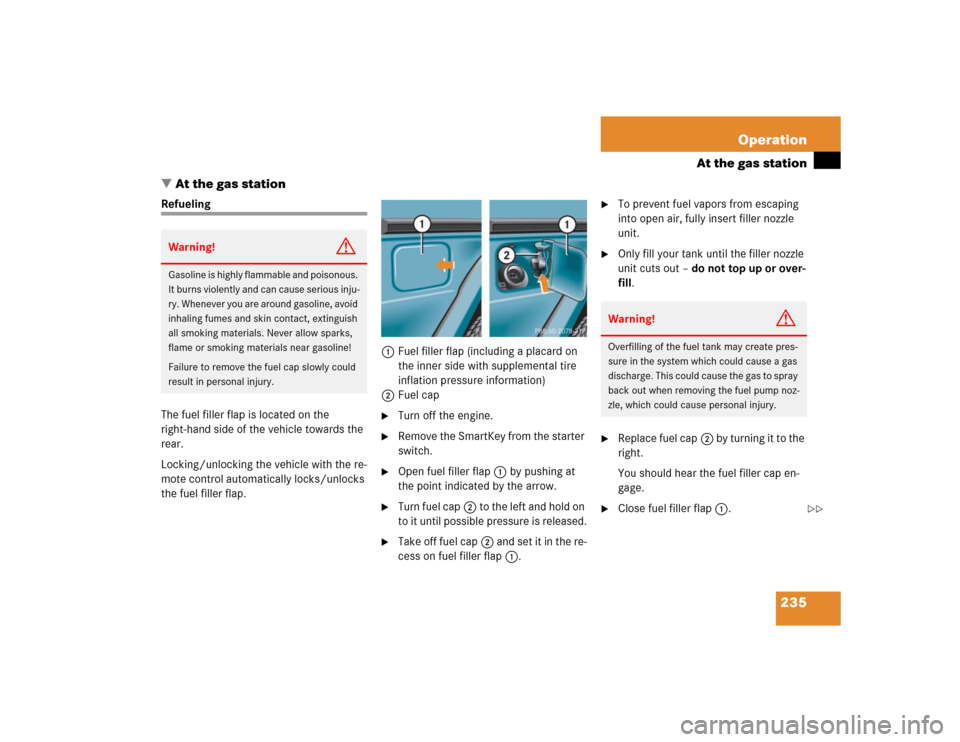
the fuel filler flap.1Fuel filler flap (including a placard on
the inner side with supplemental tire
inflation pressure information)
2Fuel cap
�
Turn off the engine.
�
Remove the SmartKey from the starter
switch.
�
Open fuel filler flap1 by pushing at
the point indicated by the arrow.
�
Turn fuel cap2 to the left and hold on
to it until possible pressure is released.
�
Take off fuel cap2 and set it in the re-
cess on fuel filler flap1.
�
To prevent fuel vapors from escaping
into open air, fully insert filler nozzle
unit.
�
Only fill your tank until the filler nozzle
unit cuts out – do not top up or over-
fill.
�
Replace fuel cap2 by turning it to the
right.
You should hear the fuel filler cap en-
gage.
�
Close fuel filler flap1.
Warning!
G
Gasoline is highly flammable and poisonous.
It burns violently and can cause serious inju-
ry. Whenever you are around gasoline, avoid
inhaling fumes and skin contact, extinguish
all smoking materials. Never allow sparks,
flame or smoking materials near gasoline!
Failure to remove the fuel cap slowly could
result in personal injury.
Warning!
G
Overfilling of the fuel tank may create pres-
sure in the system which could cause a gas
discharge. This could cause the gas to spray
back out when removing the fuel pump noz-
zle, which could cause personal injury.
��
Page 259 of 416

259 Operation
Tires and wheels
Checking tire inflation pressure
Regularly check your tire inflation pressure
at least once a month.
Check and adjust the tire inflation
pressure when the tires are cold. The tires
can be considered cold if the vehicle has
been parked for at least three hours or
driven less than one mile (1.6 km).
If you check the tire inflation pressure
when the tires are warm (the vehicle has
been driven for several miles or sitting less
than three hours), the reading will be
approximately 4 psi (0.3 bar) higher than
the cold reading. This is normal. Do not let
air out to match the specified cold tire in-
flation pressure. Otherwise, the tire will be
underinflated.
Follow the steps below to achieve correct
tire inflation pressure:�
Remove the cap from the valve on one
tire.
�
Firmly press a tire gauge onto the
valve.
�
Read tire inflation pressure on tire
gauge and check against the recom-
mended tire inflation pressure on the
placard on the driver’s door B-pillar
(�page 257). If necessary, add air to
achieve the recommended tire inflation
pressure.
�
Install the valve cap.
�
Repeat this procedure for each tire.iIf you have overfilled the tire, release
tire inflation pressure by pushing the
metal stem of the valve with e.g. a tip of
a pen. Then recheck the tire inflation
pressure with the tire gauge.iThe recommended tire inflation pres-
sures for your vehicle can be found on
the tire placard located on the driver’s
door B-pillar. The tire inflation pres-
sures are not listed in the Operator’s
Manual.
Warning!
G
Follow recommended tire inflation
pressures.
Do not underinflate tires. Underinflated tires
wear excessively and / or unevenly,
adversely affect handling and fuel economy,
and are more likely to fail from being over-
heated.
Do not overinflate tires. Overinflated tires
can adversely affect handling and ride
comfort, wear unevenly, increase stopping
distance, and result in sudden deflation
(blowout) because they are more likely to
become punctured or damaged by road
debris, potholes etc.
Do not overload the tires by exceeding the
specified load limit as indicated on the plac-
ard on the driver’s door B-pillar. Overloading
the tires can overheat them, possibly caus-
ing a blowout.
Page 292 of 416

292 Practical hintsWhat to do if …Problem
Possible cause
Suggested solution
?
(USA only)
±
(Canada only)
The yellow engine mal-
function indicator lamp
comes on while driving.
There is a malfunction of:�
The fuel management system
�
The ignition system
�
The emission control system
�
Systems which impact emissions
Such malfunctions may result in excessive
emissions values and may switch the engine
to its limp-home mode. Serious damage can
occur to the emission system.
�
Have the vehicle checked as soon as possi-
ble by an authorized Mercedes-Benz Light
Truck Center.
An on-board diagnostic connector is used
by the service station to link the vehicle to
the shop diagnostics system. It allows the
accurate identification of system malfunc-
tions through the readout of diagnostic trou-
ble codes. It is located near the hood lock
release on the upper left of footwell.
A loss of pressure has been detected in the
fuel system. The fuel cap may not be closed
properly or the fuel system may be leaky.
�
Check the fuel cap (
�page 235).
If it is not closed properly:
�
Close the fuel cap.
If it is closed properly:
�
Have the fuel system checked by an autho-
rized Mercedes-Benz Light Truck Center.
Your fuel tank is empty.
�
After refueling start, turn off and restart the
engine three or four times in succession.
The limp-home mode is canceled. You do
not need to have your vehicle checked.