Page 107 of 416

107 Controls in detail
Memory function
�Memory function
The memory button and stored position
switch are located on the door.
You can store up to three different settings
per SmartKey.
The following settings are saved for each
stored position:�
Driver’s seat and seat backrest posi-
tion, head restraint position
�
Steering wheel position
�
Driver’s side exterior rear view mirror
position
�
Passenger-side exterior rear view
mirror positionThe following settings are not key-depen-
dent. They are stored when using the but-
tons on the front passenger door:
�
Front passenger seat and backrest po-
sition, head restraint position.
These key-dependent memory settings
can be deactivated if desired
(
�page 143).
!Prior to operating the vehicle, the driv-
er should check and adjust the seat
height, seat position fore and aft, and
seat backrest angle if necessary, to
ensure adequate control, reach and
comfort. The head restraint should also
be adjusted for proper height. See also
the section on airbags (
�page 63) for
proper seat positioning.
In addition, adjust the steering wheel to
ensure adequate control, reach, opera-
tion and comfort. Both the interior and
exterior rear view mirrors should be ad-
justed for adequate rear vision.
Fasten seat belts. Infants and small
children should be seated in a properly
secured restraint system that complies
with U.S. Federal Motor Vehicle Safety
Standards 213 and 225 and Canadian
Motor Vehicle Safety Standards 213
and 210.2.
Warning!
G
Do not activate the memory function while
driving. Activating the memory function
while driving could cause the driver to lose
control of the vehicle.
Page 108 of 416
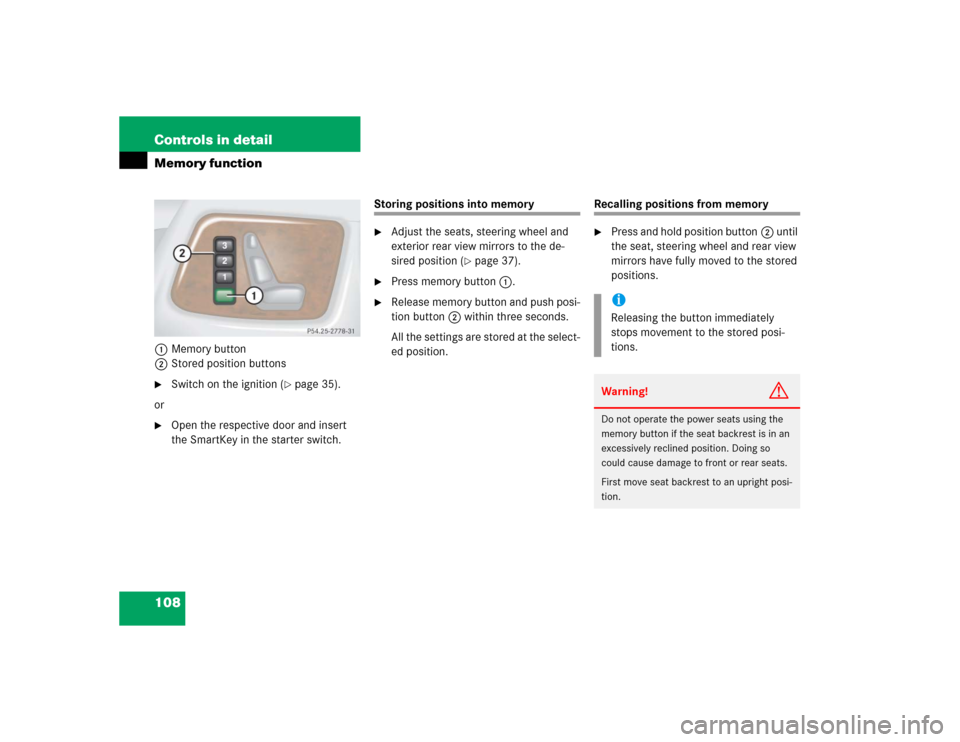
108 Controls in detailMemory function1Memory button
2Stored position buttons�
Switch on the ignition (
�page 35).
or
�
Open the respective door and insert
the SmartKey in the starter switch.
Storing positions into memory�
Adjust the seats, steering wheel and
exterior rear view mirrors to the de-
sired position (
�page 37).
�
Press memory button1.
�
Release memory button and push posi-
tion button2 within three seconds.
All the settings are stored at the select-
ed position.
Recalling positions from memory�
Press and hold position button2 until
the seat, steering wheel and rear view
mirrors have fully moved to the stored
positions.iReleasing the button immediately
stops movement to the stored posi-
tions.Warning!
G
Do not operate the power seats using the
memory button if the seat backrest is in an
excessively reclined position. Doing so
could cause damage to front or rear seats.
First move seat backrest to an upright posi-
tion.
Page 109 of 416

109 Controls in detail
Memory function
Storing exterior rear view mirror park-ing position
For easier parking, you can adjust the pas-
senger-side exterior rear view mirror so
that you can see the right rear wheel as
soon as you engage reverse gearR.
For information on activating the parking
position, see “Activating exterior rear view
mirror parking position” (
�page 161).
1Adjustment button
2Driver’s side mirror
3Passenger-side mirror
4Memory button
�
Switch on the ignition (
�page 35).
�
Press button3.
The passenger-side exterior rear view
mirror is selected.
�
Adjust the exterior rear view mirror
with button1 so that you see the rear
wheel and the curb.
�
Press memory button4 on the door.
�
Within three seconds, press bottom of
adjustment button1 above the exteri-
or lamp switch.
The parking position is stored if the
mirror does not move.
iYou can store a parking position for the
passenger-side exterior rear view mir-
ror for each SmartKey using the memo-
ry switch.
iIf the mirror does move, repeat the
above steps. After the setting is stored
you can move the mirror again.
Page 111 of 416

111 Controls in detail
Lighting
Manual headlamp mode
The low beam headlamps and the parking
lamps can be switched on and off with the
exterior lamp switch.
Automatic headlamp mode
The following lamps switch on and off au-
tomatically depending on the brightness of
the ambient light:�
Low beam headlamps
�
Tail and parking lamps
�
License plate lamps
�
Side marker lamps
�
Turn the exterior lamp switch to
positionU.
With the SmartKey in starter switch
position1 only the parking lamps will
switch on and off automatically.
When the engine is running, the low
beam headlamps, the tail and parking
lamps, the license plate lamps, and the
side marker lamps will switch on and
off automatically.
iWith the SmartKey removed from the
starter switch and the driver’s door
open, a warning sounds if the parking
lamps or low beam headlamps are
switched on.
The message
TURN OFF LIGHTS!
ap-
pears in the multifunction display.
Warning!
G
If the exterior lamp switch is set toU,�
the headlamps may switch off unexpect-
edly when the system senses bright am-
bient light, for example light from
oncoming traffic.
�
the headlamps will not be automatically
switched on under foggy conditions.
To minimize risk to you and to others,
activate headlamps by turning exterior
lamp switch to
B
when driving or
when traffic and / or ambient lighting
conditions require you to do so.
In low ambient lighting conditions, only
switch from position U
to
B
with
the vehicle at a standstill. Switching
from
U
to
B
will briefly switch
off the headlamps. Doing so while driv-
ing in low ambient lighting conditions
may result in an accident.
The automatic headlamp feature is only an
aid to the driver. The driver is responsible for
the operation of the vehicle’s lights at all
times.
Page 115 of 416
115 Controls in detail
Lighting
Hazard warning flasher
The hazard warning flasher can be
switched on at all times, even with the
SmartKey removed from the starter
switch.
The hazard warning flasher switches on au-
tomatically when an airbag deploys.
The hazard warning flasher switch is locat-
ed on the center console.
1Hazard warning flasher switchSwitching on hazard warning flasher
�
Press hazard warning flasher
switch1.
All the turn signal lamps are flashing.Switching off hazard warning flasher
�
Press hazard warning flasher switch1
again.
iWith the hazard warning flasher acti-
vated and the combination switch set
for either left or right turn, only the re-
spective turn signals will operate when
the SmartKey is in starter switch
position1or2.
iIf the hazard warning flasher has been
activated automatically, press hazard
warning flasher switch1 once to
switch it off.
Page 116 of 416

116 Controls in detailLightingInterior lighting
The controls are located in the overhead
control panel.
1Cargo compartment lamps
2Right reading lamp
3Rocker switch for automatic control
system
4Left reading lampAutomatic control
Activating
�
Move rocker switch3 to center
position.
The interior lighting switches on in
darkness when you�
unlock the vehicle
�
open a door
�
remove the SmartKey from the
starter switch
Additionally, entry lamps in the door
trays will come on when you open
a door.
The interior lighting switches off automati-
cally following an adjustable time delay.
For more information, see “Setting interior
lighting delayed shut-off” (
�page 140).Deactivating
�
Press the = symbol on rocker
switch3.
The interior lighting and the entry
lamps remain switched off in darkness,
even when you�
unlock the vehicle
�
open a door
�
remove the SmartKey from the
starter switch
iLeaving an interior light switch in the
ON position for extended periods of
time with the engine turned off could
result in a discharged battery.
iIf the door remains open, the interior
lamps switch off automatically after
approximately five minutes.
Page 117 of 416
117 Controls in detail
Lighting
Manual control
Switching lamps on�
Press the W symbol on rocker
switch3.
The interior lighting remains on even
when the doors are closed.
Switching lamps off
�
Move rocker switch3 to center posi-
tion to activate the automatic control.
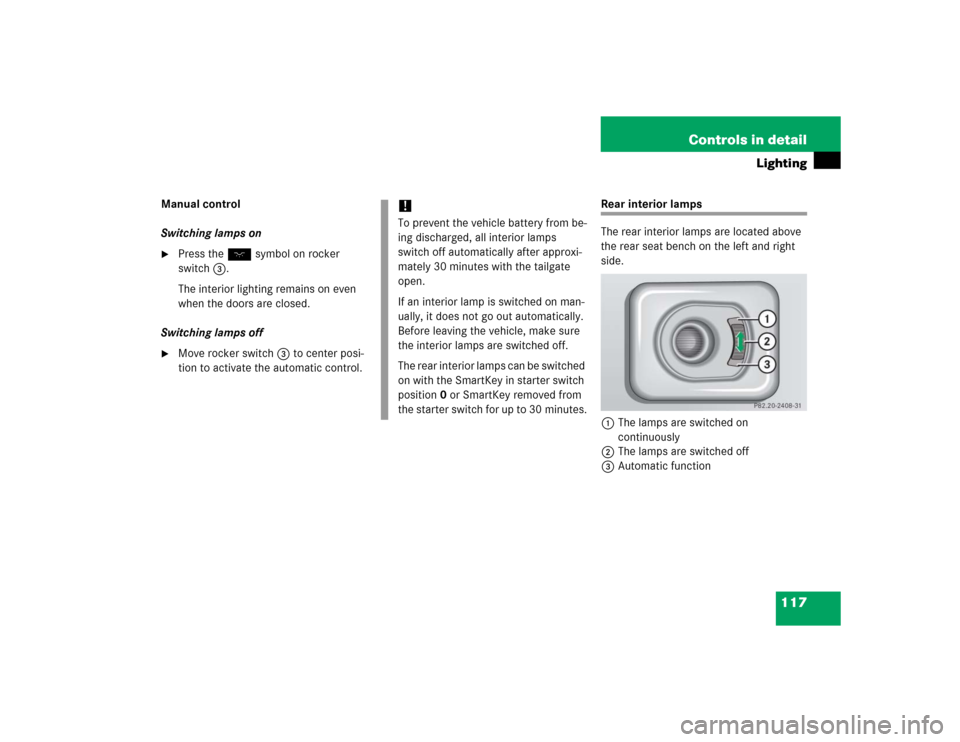
Rear interior lamps
The rear interior lamps are located above
the rear seat bench on the left and right
side.
1The lamps are switched on
continuously
2The lamps are switched off
3Automatic function
!To prevent the vehicle battery from be-
ing discharged, all interior lamps
switch off automatically after approxi-
mately 30 minutes with the tailgate
open.
If an interior lamp is switched on man-
ually, it does not go out automatically.
Before leaving the vehicle, make sure
the interior lamps are switched off.
The rear interior lamps can be switched
on with the SmartKey in starter switch
position0 or SmartKey removed from
the starter switch for up to 30 minutes.
Page 123 of 416

123 Controls in detail
Control system
�Control system
The control system is activated as soon as
the SmartKey in the starter switch is
turned to position1. The control system
enables you to�
call up information about your vehicle
�
change vehicle settings
For example, you can use the control sys-
tem to find out when your vehicle is next
due for service, to set the language for
messages in the instrument cluster display
and much more.
The control system relays information to
the multifunction display.
Multifunction display
1Trip odometer
2Main odometer
3Outside temperature
4Clock
1
5Current gear selector lever position
6Transfer case program mode
Warning!
G
A driver’s attention to the road and traffic
conditions must always be his /her primary
focus when driving.
For your safety and the safety of others, se-
lecting features through the multifunction
steering wheel should only be done by the
driver when traffic and road conditions per-
mit it to be done safely.
Bear in mind that at a speed of just 30 mph
(approximately 50 km/h), your vehicle is
covering a distance of 44 feet
(approximately 14 m) every second.
1See separate operating instructions for the
COMAND system for clock setting.