Page 340 of 416
340 Practical hintsReplacing bulbsFront turn signal lamp
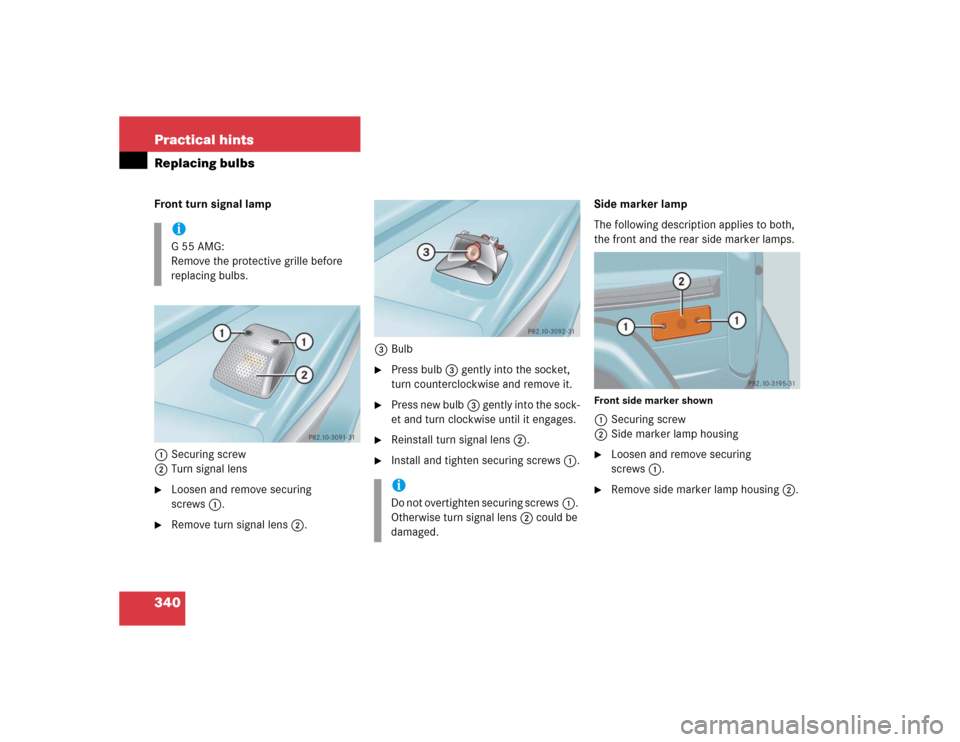
1Securing screw
2Turn signal lens�
Loosen and remove securing
screws1.
�
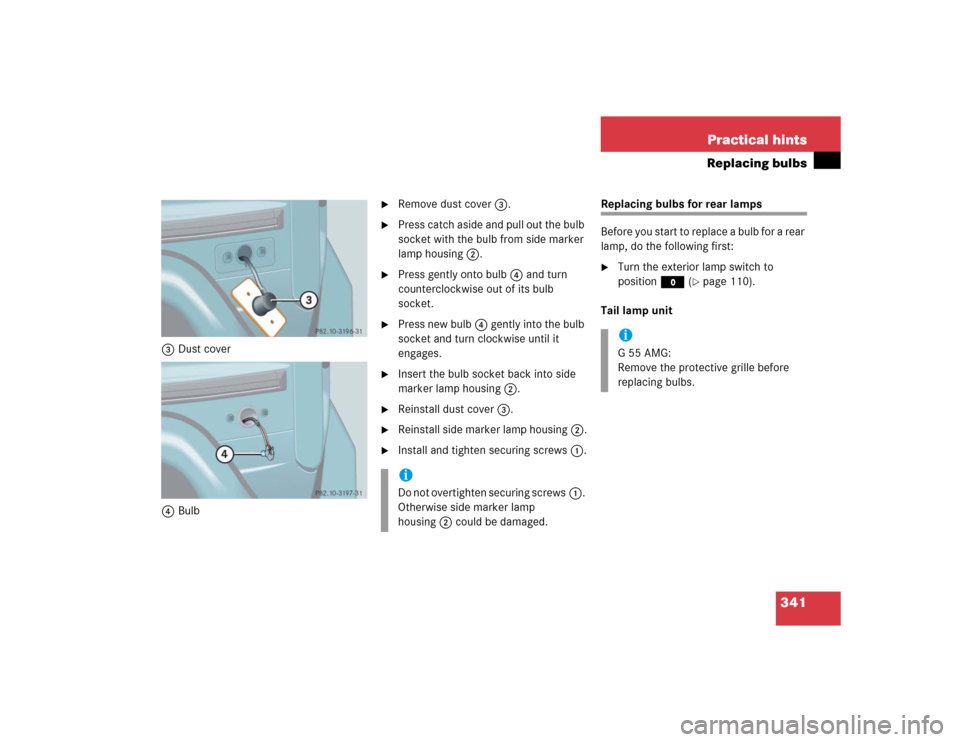
Remove turn signal lens2.3Bulb
�
Press bulb3 gently into the socket,
turn counterclockwise and remove it.
�
Press new bulb3 gently into the sock-
et and turn clockwise until it engages.
�
Reinstall turn signal lens2.
�
Install and tighten securing screws1.Side marker lamp
The following description applies to both,
the front and the rear side marker lamps.
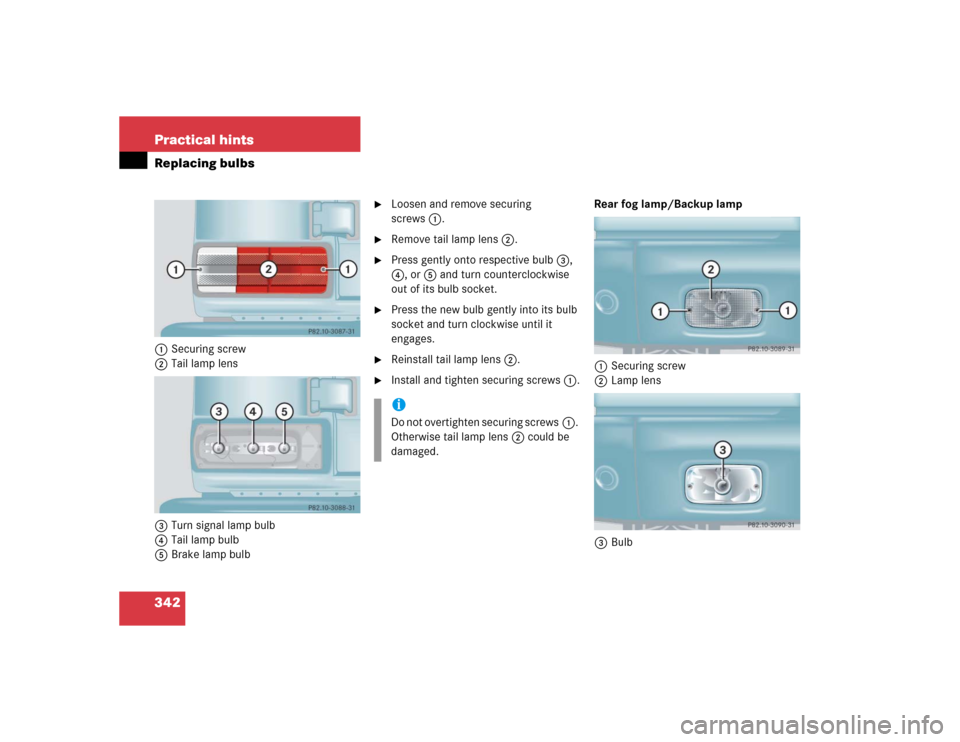
Front side marker shown1Securing screw
2Side marker lamp housing�
Loosen and remove securing
screws1.
�
Remove side marker lamp housing2.
iG55AMG:
Remove the protective grille before
replacing bulbs.
iDo not overtighten securing screws1.
Otherwise turn signal lens2 could be
damaged.
Page 341 of 416
341 Practical hints
Replacing bulbs
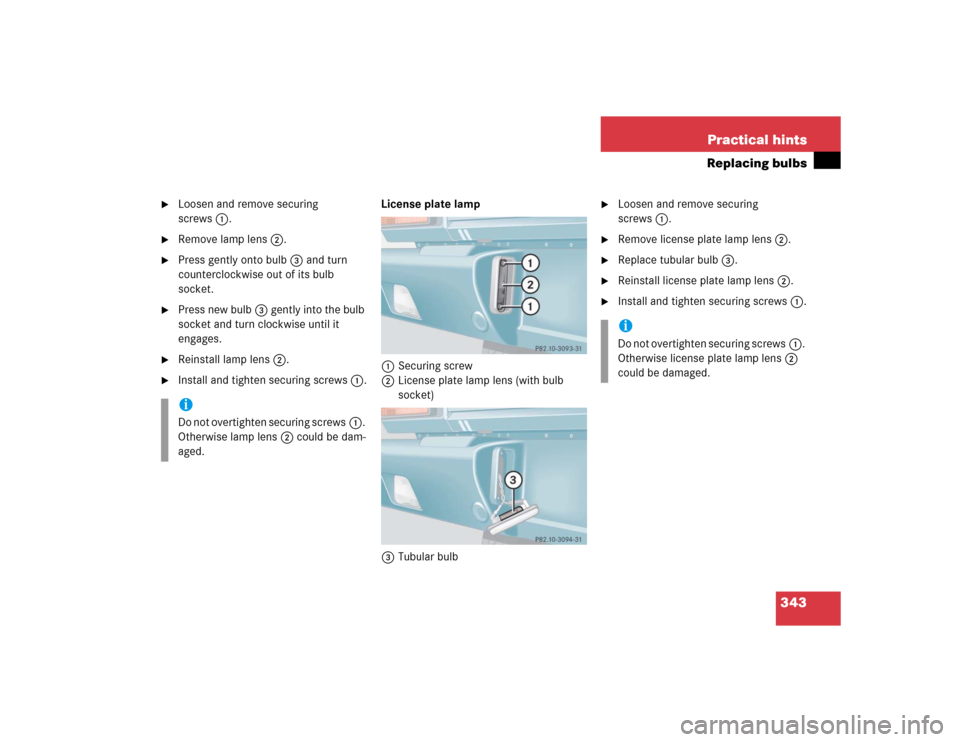
3Dust cover
4Bulb
�
Remove dust cover3.
�
Press catch aside and pull out the bulb
socket with the bulb from side marker
lamp housing2.
�
Press gently onto bulb4 and turn
counterclockwise out of its bulb
socket.
�
Press new bulb4 gently into the bulb
socket and turn clockwise until it
engages.
�
Insert the bulb socket back into side
marker lamp housing2.
�
Reinstall dust cover3.
�
Reinstall side marker lamp housing2.
�
Install and tighten securing screws1.
Replacing bulbs for rear lamps
Before you start to replace a bulb for a rear
lamp, do the following first:�
Turn the exterior lamp switch to
positionM (
�page 110).
Tail lamp unit
iDo not overtighten securing screws1.
Otherwise side marker lamp
housing2 could be damaged.
iG55AMG:
Remove the protective grille before
replacing bulbs.
Page 342 of 416
342 Practical hintsReplacing bulbs1Securing screw
2Tail lamp lens
3Turn signal lamp bulb
4Tail lamp bulb
5Brake lamp bulb
�
Loosen and remove securing
screws1.
�
Remove tail lamp lens2.
�
Press gently onto respective bulb3,
4, or5 and turn counterclockwise
out of its bulb socket.
�
Press the new bulb gently into its bulb
socket and turn clockwise until it
engages.
�
Reinstall tail lamp lens2.
�
Install and tighten securing screws1.Rear fog lamp/Backup lamp
1Securing screw
2Lamp lens
3BulbiDo not overtighten securing screws1.
Otherwise tail lamp lens2 could be
damaged.
Page 343 of 416
343 Practical hints
Replacing bulbs
�
Loosen and remove securing
screws1.
�
Remove lamp lens2.
�
Press gently onto bulb3 and turn
counterclockwise out of its bulb
socket.
�
Press new bulb3 gently into the bulb
socket and turn clockwise until it
engages.
�
Reinstall lamp lens2.
�
Install and tighten securing screws1.License plate lamp
1Securing screw
2License plate lamp lens (with bulb
socket)
3Tubular bulb
�
Loosen and remove securing
screws1.
�
Remove license plate lamp lens2.
�
Replace tubular bulb3.
�
Reinstall license plate lamp lens2.
�
Install and tighten securing screws1.
iDo not overtighten securing screws1.
Otherwise lamp lens2 could be dam-
aged.
iDo not overtighten securing screws1.
Otherwise license plate lamp lens2
could be damaged.
Page 388 of 416
 381
Anti-theft alarm system
Arming 88
Canceling alarm 89
Disarming 89
Anti-theft systems 88
Anti-theft alar")
388 IndexAlarm system
Anti-theft 88
Anticorrosion/antifreeze 379
Antilock brake system (ABS) 381
Anti-theft alarm system
Arming 88
Canceling alarm 89
Disarming 89
Anti-theft systems 88
Anti-theft alarm system 88
Tow-away alarm 89
Aquaplaning see Hydroplaning
Armrest
Storage compartment below 191
Storage compartment in front of 191
Ashtrays 194
Aspect ratio 271
At the gas station 235
ATF (automatic transmission fluid) 244
AUDIO menu 128
Selecting radio station 129
Auto-dimming for rear view mirror 160
Automatic central locking
Activating/deactivating (control
system) 141Automatic climate control
Deactivating 170
Automatic headlamp mode 111
Automatic locking when driving 98
Automatic transmission 148
Accelerator position 153
Emergency operation (Limp Home
Mode) 153
Fluid level 244
Gear ranges 150
Gear selector lever position 148, 151
Gear shifting malfunctions 153
Kickdown 153
Manual shifting 149
One-touch gearshifting 149
Transmission fluid 244B
BabySmart
TM
Airbag deactivation system 74, 381
Compatible child seats 74, 381
Self-test 75
Backup lamps 334
Bulbs 334
Replacing bulbs 342
Bar 271
BAS 80, 82, 381
Messages in display 298
Batteries
SmartKey (replacing) 331
Batteries, SmartKey
Check lamp 95
Checking 95
Battery box
Fuse box in 360
Battery discharged
Jump starting 354
Battery, vehicle 247, 351
Charging 351
Disconnecting 352
Messages in display 302, 303
Reconnecting 353
Page 389 of 416
 276
Blocking rear door window operation 78
B-pillar 366
Brake assist system (BAS) 381
Brake fluid 237, 376
Brake lamp bulbs, left and right 334
Brake lamp")
389 Index
Bead 271
Block heater (Canada only) 276
Blocking rear door window operation 78
B-pillar 366
Brake assist system (BAS) 381
Brake fluid 237, 376
Brake lamp bulbs, left and right 334
Brake lamp, high mounted 334
Brake pads
Message in display 303
Brakes 217
Warning lamp 290, 291
Break-in period 214
Brush guard* 329
Lowering 330
Raising and securing 330
Bulbs, replacing
Additional turn signals 334
Backup lamps 334, 342
Brake lamps 334, 341
Front fog lamps 334, 338
Front lamps 333, 334
Front turn signal lamps 334, 339
High and low beam 336High beam lamps 334
High mounted brake lamp 334
License plate lamps 334, 342
Low beam lamps 334
Parking lamps 334, 336
Rear fog lamp 334, 342
Rear turn signal lamps 334
Side marker lamps 334, 340
Standing lamps 334, 336
Tail lamp unit 334, 341C
CAC (Customer Assistance Center) 381
Calling up
Maintenance service indicator 278
Range (distance to empty) 145
CAN system 381
Capacities
Fuels, coolants, lubricants, etc. 374
Cargo area see Cargo compartment
Cargo compartment
Tailgate 97, 98
Tie-down rings 189
Cargo compartment cover 182
Installing 183
Removing 183
Cargo tie-down rings 189
Catalytic converter 232
CD changer 322
CD player
Operating 130
Center console 28
AIRBAG OFF indicator lamp 295
Lower part 29
Upper part 28
Page 394 of 416

394 IndexEngine oil level see Oil level
Enlarged cargo compartment 183
ESP 25, 80, 84, 382
Messages in display 300
Switching off 86
Switching on 87
Synchronizing 300
Warning lamp 293
ETD 62, 71, 382
Safety guidelines 66
Exterior lamp switch 110
Exterior lamps
Delayed shut-off 139
Exterior rear view mirrors
Adjusting 41
Parking position for 143F
Fahrenheit
Setting temperature units 135
Fastening the seat belts 43
Fine adjustment
Cruise control 178
First aid kit 321
Flat tire 346
Lowering the vehicle 350
Mounting the spare wheel 347
Spare wheel 323
Flexible Service System (FSS, Canada
vehicles) 382
Fog lamp, rear 114, 334
Fog lamps, front 113
Messages in display 313
4-ETS 80, 83
Front airbags 67
Front axle differential lock
Switching on 159
Front fog lamps
Replacing bulbs 334, 338Front lamps
Messages in display 312, 314
Replacing bulbs 334, 335
Switching on 110
Front seat head restraints
Installing 102
Removing 101
Front towing eye 359
Front turn signal lamp
Replacing bulbs 339
FSS (Flexible Service System, Canada
vehicles) 382
Fuel 236
Additives 377
Fuel reserve warning lamp 294
Gasoline additives 377
Premium unleaded gasoline 236,
374, 376
Refueling 235
Requirements 377
Reserve warning 25
Technical data 374
Page 396 of 416

396 IndexH
Hard plastic trim items
Cleaning 284
Hazard warning flasher 115
Head restraints 101
Power seats 39
Synchronizing 102
Headlamp cleaning system 245
Headlamps
Automatic control 111
Cleaning 282
Cleaning system 162, 245
Switching off 58
Switching on 51
Washer fluid 380
Washer system 380
Headlight switch-off delay see Delayed
switch-off, exterior lamps
Headliner
Cleaning 284
Heated seats 104
Heated steering wheel 211Height adjustment
Head restraints 39
Seat belts 48
Steering wheel 40
High beam flasher 52, 114
High beam headlamps
Messages in display 313
Replacing bulbs 334, 336
Switching on 114
High mounted brake lamp 334
Hood 238
Closing 239
Messages in display 311
Opening 238
Hydroplaning 220I
Identification labels 366
Certification label 366
Vehicle identification number
(VIN) 366
Ignition
Switching on 49
Ignition (Position in starter switch) 35
Immobilizer 88
Activating 88
Deactivating 88
Infant and child restraint systems 72
Installing 76
LATCH child seat anchors 77
Information
Button for Tele Aid 202
Inside rear view mirror
Auto-dimming 160
Installing
Cargo compartment cover 183
Infant and child restraint systems 76
Wiper blades 345
Instructions
Loading 187