Page 175 of 416

175 Controls in detail
Power tilt/sliding sunroof
Opening and closing the tilt/sliding
sunroof with the SmartKey
The power windows (
�page 171) will also
be opened or closed when you operate the
tilt/sliding sunroof with the SmartKey.
�
Aim transmitter eye at the driver’s door
handle.
The SmartKey must be in close proxim-
ity to the door handle.
Opening (Summer opening feature)
�
Press and hold buttonΠafter un-
locking the vehicle.
The windows and tilt/sliding sunroof
begin to open after approximately one
second.
�
Release transmit button to interrupt
procedure.Closing (Convenience closing feature)
�
Press and hold button‹ after lock-
ing the vehicle.
The windows and tilt/sliding sunroof
begin to close after approximately one
second.
�
Release transmit button to interrupt
procedure.
Make sure all side windows and the
tilt/sliding sunroof are properly closed be-
fore leaving the vehicle.
Warning!
G
Never operate the windows or tilt/sliding
sunroof if there is the possibility of anyone
being harmed by the opening or closing pro-
cedure.
In case the procedure causes potential dan-
ger, the procedure can be immediately halt-
ed by releasing the button on the SmartKey.
To reverse direction of movement,
pressŒ for opening or ‹ for closing.
Page 182 of 416
182 Controls in detailLoadingRoof rack
This vehicle is not intended to carry items
on its roof. Thus roof rails and any
roof-mounted devices must not be used.
Cargo compartment cover
1Rear seat bench cover
2Tailgate cover�
Pull cover1 out. Hook it into the
mountings on the rear seat bench.
�
Pull cover2 out. Hook it into the
mountings to the left and right of the
tailgate.Rolling up the cover
�
Grip the cover strap and remove it from
the mountings on both sides.
�
Guide it slowly back into place.
Warning!
G
Do not load items on the roof. It may cause
instability during some maneuvers which
could result in an accident.
Page 190 of 416

190 Controls in detailUseful featuresStorage compartments
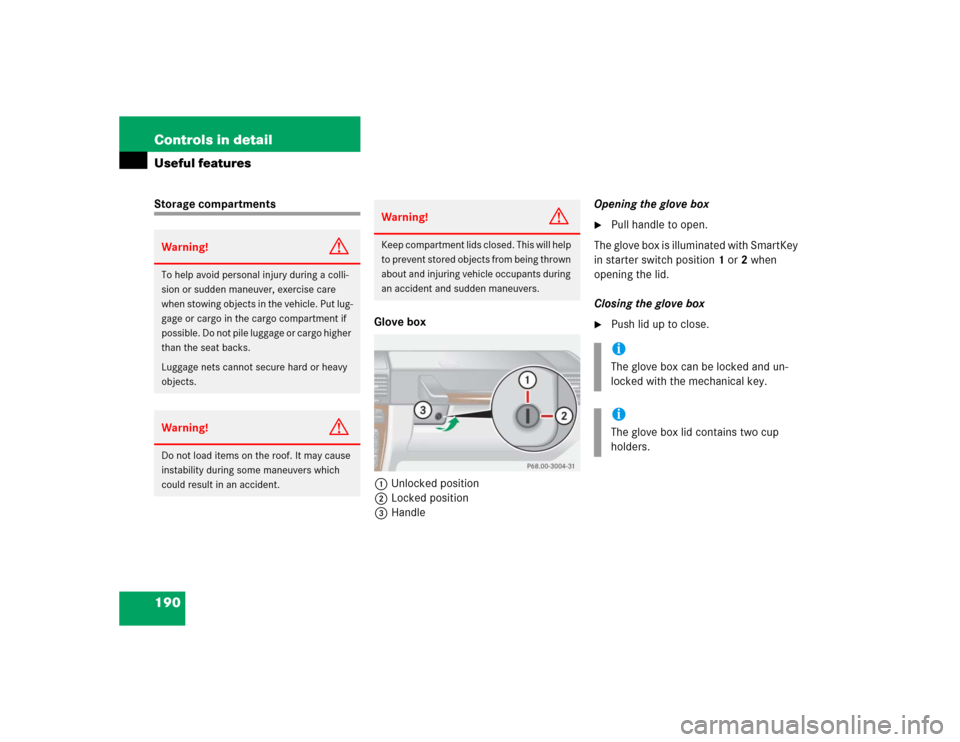
Glove box
1Unlocked position
2Locked position
3HandleOpening the glove box
�
Pull handle to open.
The glove box is illuminated with SmartKey
in starter switch position1 or2 when
opening the lid.
Closing the glove box
�
Push lid up to close.
Warning!
G
To help avoid personal injury during a colli-
sion or sudden maneuver, exercise care
when stowing objects in the vehicle. Put lug-
gage or cargo in the cargo compartment if
possible. Do not pile luggage or cargo higher
than the seat backs.
Luggage nets cannot secure hard or heavy
objects.Warning!
G
Do not load items on the roof. It may cause
instability during some maneuvers which
could result in an accident.
Warning!
G
Keep compartment lids closed. This will help
to prevent stored objects from being thrown
about and injuring vehicle occupants during
an accident and sudden maneuvers.
iThe glove box can be locked and un-
locked with the mechanical key.iThe glove box lid contains two cup
holders.
Page 223 of 416

223 Operation
Driving instructions
Passenger compartment
Off-road driving
Warning!
G
Always fasten items being carried as secure-
ly as possible.
In an accident, during hard braking or sud-
den maneuvers, loose items will be thrown
around inside the vehicle, and cause injury
to vehicle occupants unless the items are
securely fastened in the vehicle.
The rear cargo compartment is the preferred
place to carry objects. Always use partition
net when transporting cargo. Partition net
cannot secure hard or heavy objects. Al-
ways fasten items being carried as securely
as possible using the cargo tie-down rings in
the cargo compartment floor and fastening
material.
Do not load items on the roof. It may cause
instability during some maneuvers which
could result in an accident. This vehicle is
not intended to carry items on its roof. Thus
roof rails and roof mounted ski or bike hold-
ers must not be used.Warning!
G
Do not load items on the roof. It may cause
instability during some maneuvers which
could result in an accident.
Warning!
G
Drive slowly in unknown terrain. This will
make it easier to recognize unexpected ob-
stacles and avoid damage to the vehicle.
To help avoid the vehicle rolling over, never
turn it around on steep inclines. If the vehi-
cle cannot complete the attempted climb,
back it down in reverse gear.
Do not drive along the side of a slope (dan-
ger of vehicle rollover). If in doing so the ve-
hicle begins to show a tendency to roll,
immediately steer into a line of gravity
(straight up or downhill).
��
Page 224 of 416

224 OperationDriving instructionsRead this chapter carefully before you be-
gin off-road travel.
Familiarize yourself with the vehicle char-
acteristics and gear changing before you
attempt any difficult terrain off-road driv-
ing. We recommend that you start out with
easy off-road travel.Special driving features for off-road
driving
The following driving features are available
for specific kind of operation:
�
ABS (
�page 80)
�
ESP (
�page 84)
�
4-ETS (
�page 83)
�
Differential lock (
�page 156)
�
Transfer case (
�page 154)
Off-road driving rules
�
Engage the transfer case in position
LOW before driving under off-road con-
ditions (
�page 154).
�
If necessary activate differential locks
(�page 158).
The ABS, BAS and ESP are switched off
automatically when the differential
locks are activated.
�
Fasten items being carried as securely
as possible (
�page 187).
Never let the vehicle roll backwards in idle.
You may lose control of the vehicle if you
use only the brake.
Sand, dirt, mud and other material having
friction property can cause exceptional wear
and tear as well as brake failure.
Have the brakes checked for dirt build-up
and cleaned. There is otherwise a risk that
full braking power may not be available in an
emergency.
iWhenever driving in off-road mode, we
recommend:�
Keeping doors, tailgate, windows
and tilt/sliding sunroof closed.
�
Switching cruise control off.
!Observe the following during off-road
driving:�
Adjust vehicle speed to condition of
terrain. The more uneven, rutty and
steeper the terrain, the lower the
speed should be. Drive through wa-
ter slowly at an even speed, avoid-
ing a bow wave.
�
Be especially careful when driving
in unknown territory. It may be nec-
essary to get out of the vehicle and
scout the path you intend to take.
�
Watch out for obstacles, such as
rocks, holes, tree stumps and ruts.
��
Page 280 of 416

280 OperationVehicle careCleaning and care of the vehicle
While in operation, even while parked, your
vehicle is subjected to varying external in-
fluences which, if gone unchecked, can at-
tack the paintwork as well as the
underbody and cause lasting damage.Such damage is caused not only by ex-
treme and varying climatic conditions, but
also by:
�
Air pollution
�
Road salt
�
Tar
�
Gravel and stone chipping
To avoid paint damage, you should imme-
diately remove:
�
Grease and oil
�
Fuel
�
Coolant
�
Brake fluid
�
Bird droppings
�
Insects
�
Tree resins, etc.
Frequent washing reduces and/or elimi-
nates the aggressiveness and potency of
the above adverse influences.More frequent washings are necessary to
deal with unfavorable conditions:
�
Near the ocean
�
In industrial areas (smoke, exhaust
emissions)
�
During winter operation
You should check your vehicle from time to
time for stone chipping or other damage.
Any damage should be repaired as soon as
possible to prevent corrosion.
In doing so, do not neglect the underbody
of the vehicle. A prerequisite for a thor-
ough check is a washing of the underbody
followed by a thorough inspection. Dam-
aged areas need to be re-undercoated.
Your vehicle has been treated at the facto-
ry with a wax-base rustproofing in the body
cavities which will last for the lifetime of
the vehicle. Post-production treatment is
neither necessary nor recommended by
Mercedes-Benz because of the possibility
of incompatibility between materials used
in the production process and others ap-
plied later.
Warning!
G
Many cleaning products can be hazardous.
Some are poisonous, others are flammable.
Always follow the instructions on the partic-
ular container. Always open your vehicle’s
doors or windows when cleaning the inside.
Never use fluids or solvents that are not de-
signed for cleaning your vehicle.
Page 319 of 416

319 Practical hints
What to do if …
Display symbol
Display message
Possible cause
Possible solution
§
TC SHIFT
CANCELLED
The shift process in the transfer case was
canceled because of a malfunction.
�
Repeat the shift process (
�page 154).
TC SHIFT CONDITIONS
NOT FULFILLED
You have not met the shift conditions for
a selection process in the transfer case.
�
Repeat the shift process (
�page 154).
TRANSFER CASE
VISIT WORKSHOP!
The transfer case is malfunctioning.
�
Do not switch the transfer case on.
�
Visit an authorized Mercedes-Benz
Light Truck Center as soon as
possible.
K
CLOSE
SUNROOF!
You have opened the driver’s door with
the SmartKey removed from the starter
switch and the tilt/sliding sunroof open.
�
Close the tilt/sliding sunroof
(�page 173).
J
CLOSE
SUNROOF!
You have opened the driver’s door with
the SmartKey removed from the starter
switch and the tilt/sliding sunroof open.
�
Close the tilt/sliding sunroof
(�page 173).
L
TELE AID
DRIVE TO WORKSHOP!
One or more main functions of the Tele
Aid system are malfunctioning.
�
Have the Tele Aid system checked by
an authorized Mercedes-Benz Light
Truck Center.
ì
FUNCTION
NOT AVAILABLE!
This display appears if button t or
s on the multifunction steering wheel
is pressed and the vehicle is not equipped
with a telephone.
Page 328 of 416
328 Practical hintsOpening/closing in an emergencyTilt/sliding sunroof
You can open or close the tilt/sliding sun-
roof manually in the case of power failure.
The tilt/sliding sunroof drive is located on
the left side (driver’s side) of the cargo
compartment behind the rear panel trim.
1Edge protection
2Rear panel trim�
Take the vehicle tool kit out from its
storage compartment (
�page 321).
�
Open the tailgate.
�
Remove edge protection1 from door
pillar.
�
Remove rear panel trim2.
3Key (vehicle tool kit)
4Screwdriver (vehicle tool kit)
�
Fit key3 into hexagon nut of drive.
�
Insert screwdriver4 into the key as a
lever.
�
Turn screwdriver4 clockwise to:�
slide sunroof closed
�
raise sunroof at the rear
�
Turn screwdriver4 counterclockwise
to:�
slide sunroof open
�
lower sunroof at the rear
iDo not disconnect electrical connec-
tors.