Page 242 of 416

242 OperationEngine compartmentChecking engine oil level with the oil
dipstick
When checking the oil level the vehicle
must�
be parked on level ground
�
be at normal operating temperature
�
have been stationary for at least five
minutes with the engine turned offTo check the engine oil level with the oil
dipstick, do the following:
�
Open the hood (
�page 238).
�
Pull out oil dipstick1 (
�page 243).
�
Wipe oil dipstick1 clean.
�
Fully insert oil dipstick1 into the
dipstick guide tube.
�
Pull out oil dipstick1 again after
approximately three seconds to obtain
accurate reading.
Oil dipstickThe oil level is correct when it is between
the lower (min) and upper (max) mark of
the oil dipstick.
�
If necessary, add engine oil.
For adding engine oil see (
�page 243).
For more information on engine oil, see the
“Technical data” section (
�page 374) and
(
�page 375).
For more information on messages in the
multifunction display concerning engine
oil, see the “Practical hints” section
(�page 309).
iThe engine oil level can be checked by
either the oil dipstick or via the multi-
function display in the instrument
cluster (
�page 240). The amount of
engine oil needed is shown more
precisely in the multifunction display.
iThe filling quantity between the upper
and lower marks on the oil dipstick is
approximately 2.1 US qt. (2.0 l).
Page 244 of 416
 and
(
�page 375).
Transmission flui")
244 OperationEngine compartment�
Screw oil filler cap2 back on filler
neck.
For more information on engine oil, see the
“Technical data” section (
�page 374) and
(
�page 375).
Transmission fluid level
The transmission fluid level does not need
to be checked. The transmission has a per-
manent supply of automatic transmission
fluid.
If you notice transmission fluid loss or gear
shifting malfunctions, have an authorized
Mercedes-Benz Light Truck Center check
the automatic transmission.Coolant level
The engine coolant is a mixture of water
and anticorrosion/antifreeze.
When checking the coolant level, �
the vehicle must be parked on level
ground.
�
the engine must be cool. The coolant
level should reach the COLD LEVEL
mark in the reservoir.
!Excess oil must be siphoned or drained
off. It could cause damage to the
engine and catalytic converter not
covered by the Mercedes-Benz Limited
Warranty.
Warning!
G
In order to avoid any possibly serious burns:�
Use extreme caution when opening the
hood if there are any signs of steam or
coolant leaking from the cooling system,
or if the coolant temperature display in-
dicates that the coolant is overheated.
�
Do not remove pressure cap on coolant
reservoir if coolant temperature is
above 158°F (70°C). Allow engine to
cool down before removing cap. The
coolant reservoir contains hot fluid and
is under pressure.
�
Using a rag, slowly open the cap approx-
imately
1/2turn to relieve excess pres-
sure. If opened immediately, scalding
hot fluid and steam will be blown out un-
der pressure.
�
Do not spill antifreeze on hot engine
parts. Antifreeze contains ethylene gly-
col which may burn if it comes into con-
tact with hot engine parts.
��
Page 306 of 416
.
Display symbol
Display message
Possi")
306 Practical hintsWhat to do if …
During severe operating conditions and
stop-and-go city traffic, the coolant tem-
perature may rise close to 248°F (120°C).
Display symbol
Display message
Possible cause
Possible solution
Ï
COOLANT
STOP, ENGINE OFF!
The coolant is too hot.
�
Stop the vehicle and turn off the en-
gine.
�
Only start the engine again after the
message disappears. You could other-
wise damage the engine.
Warning!
G
Driving when your engine is badly overheat-
ed can cause some fluids which may have
leaked into the engine compartment to
catch fire. You could be seriously burned.
Steam from an overheated engine can cause
serious burns and can occur just by opening
the hood. Stay away from the engine if you
see or hear steam coming from it.
Turn off the engine, get out of the vehicle
and do not stand near the vehicle until the
engine has cooled down.
!The engine should not be operated with
the coolant temperature above 248°F
(120°C). Doing so may cause serious
engine damage which is not covered by
the Mercedes-Benz Limited Warranty.
Page 311 of 416
311 Practical hints
What to do if …
Display symbol
Display message
Possible cause
Possible solution
A
RESERVE FUEL
GO TO GAS STATION
The fuel level has dropped below the re-
serve mark.
�
Refuel at the next gas station
(�page 235).
CHECK GAS CAP
SEE OPERATOR’S MANUAL
A loss of pressure has been detected in
the fuel system. The fuel cap may not be
closed properly or the fuel system may be
leaky.
�
Check the fuel cap (
�page 235).
If it is not closed properly:
�
Close the fuel cap.
If it is closed properly:
�
Have the fuel system checked by an
authorized Mercedes-Benz Light Truck
Center.
Y
HOOD OPEN!
You are driving with the hood open.
�
Close the hood (
�page 239).
I
REMOVE KEY!
You have forgotten to remove the
SmartKey.
�
Remove the SmartKey from the starter
switch.
REPLACE KEY
DRIVE TO WORKSHOP!
No additional code available for
SmartKey.
�
Visit an authorized Mercedes-Benz
Light Truck Center.
Page 344 of 416
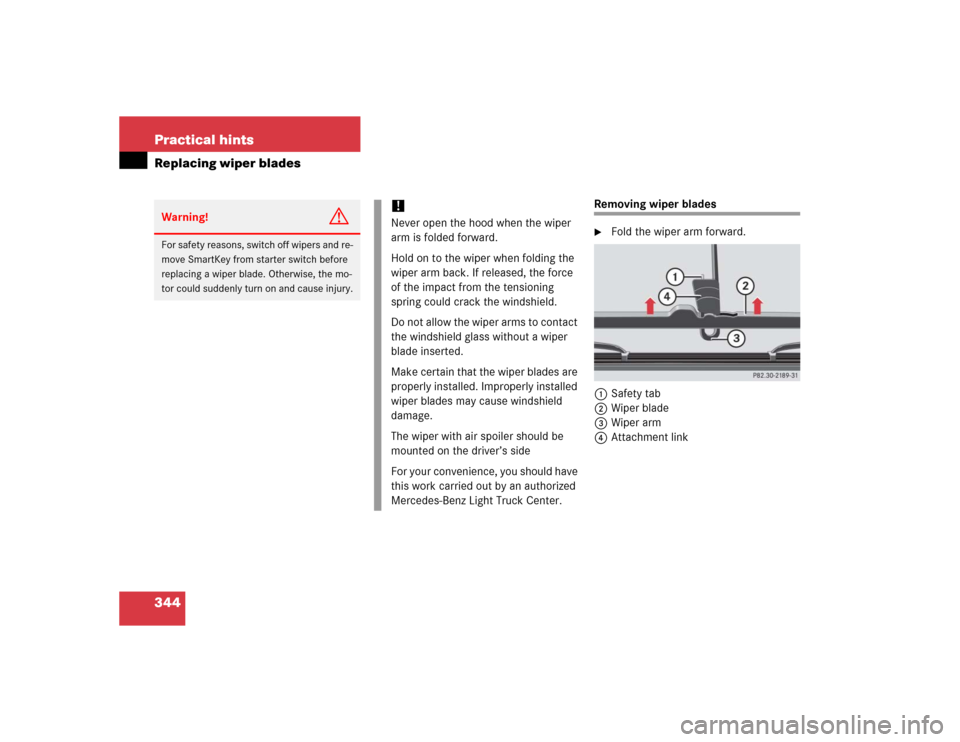
344 Practical hintsReplacing wiper blades
Removing wiper blades�
Fold the wiper arm forward.
1Safety tab
2Wiper blade
3Wiper arm
4Attachment link
Warning!
G
For safety reasons, switch off wipers and re-
move SmartKey from starter switch before
replacing a wiper blade. Otherwise, the mo-
tor could suddenly turn on and cause injury.
!Never open the hood when the wiper
arm is folded forward.
Hold on to the wiper when folding the
wiper arm back. If released, the force
of the impact from the tensioning
spring could crack the windshield.
Do not allow the wiper arms to contact
the windshield glass without a wiper
blade inserted.
Make certain that the wiper blades are
properly installed. Improperly installed
wiper blades may cause windshield
damage.
The wiper with air spoiler should be
mounted on the driver’s side
For your convenience, you should have
this work carried out by an authorized
Mercedes-Benz Light Truck Center.
Page 393 of 416

393 Index
Driving
General instructions 43, 216
In winter 221
Problems 55
Safety systems 80
Through standing water 222
Driving abroad 232
Driving and safety systems
4-ETS 83
ABS 80
BAS 82
EBB 84
ESP 84
Driving instructions 216
Passenger compartment 223
Driving off 218
Driving systems 176
Cruise control 176
Driving safety systems 80
Driving through water 227E
Easy-entry/exit feature 100
Activating 142
EBB 80, 84
Electrical fuses 360
Electrical outlet 196
Electrical system
Technical data 372
Electronic Brake Booster (EBB) 84
Electronic Stability Program see ESP
Electronic Traction System (ETS) 83
Emergency call system 198
Emergency calls
Initiating an emergency call 201
With Tele Aid 199
Emergency operation (Limp Home
Mode) 153
Emergency operations
Closing tilt/sliding sunroof 328
Locking the vehicle 326
Opening tilt/sliding sunroof 328
Remote door unlock 205
Unlocking the tailgate 325
Unlocking the vehicle 325
Emergency tensioning device see ETD
Emission control 233Emission control information label 366
Ending
A call (telephone) 146
Engine
Compartment 238
Message in display 292
Starting with SmartKey 49
Technical data 368
Turning off with SmartKey 58
Engine air filter
Messages in display 308
Engine cleaning 282
Engine compartment 238
Hood 238
Engine malfunction indicator
lamp 25, 292
Engine number 382
Engine oil 239, 375
Adding 243
Additives 376
Checking level 239
Consumption 239
Display messages 310
Messages in display 241, 309
Oil dipstick 243
Viscosity 382
Page 396 of 416

396 IndexH
Hard plastic trim items
Cleaning 284
Hazard warning flasher 115
Head restraints 101
Power seats 39
Synchronizing 102
Headlamp cleaning system 245
Headlamps
Automatic control 111
Cleaning 282
Cleaning system 162, 245
Switching off 58
Switching on 51
Washer fluid 380
Washer system 380
Headlight switch-off delay see Delayed
switch-off, exterior lamps
Headliner
Cleaning 284
Heated seats 104
Heated steering wheel 211Height adjustment
Head restraints 39
Seat belts 48
Steering wheel 40
High beam flasher 52, 114
High beam headlamps
Messages in display 313
Replacing bulbs 334, 336
Switching on 114
High mounted brake lamp 334
Hood 238
Closing 239
Messages in display 311
Opening 238
Hydroplaning 220I
Identification labels 366
Certification label 366
Vehicle identification number
(VIN) 366
Ignition
Switching on 49
Ignition (Position in starter switch) 35
Immobilizer 88
Activating 88
Deactivating 88
Infant and child restraint systems 72
Installing 76
LATCH child seat anchors 77
Information
Button for Tele Aid 202
Inside rear view mirror
Auto-dimming 160
Installing
Cargo compartment cover 183
Infant and child restraint systems 76
Wiper blades 345
Instructions
Loading 187
Page 401 of 416

401 Index
N
Navigation system
Operating 130
See separate COMAND operating
instructions
Night security illumination 113
Setting 139
Normal occupant weight 272O
Occupant distribution 272
Occupant safety 62
Airbags 63
Children in the vehicle 72
Fastening the seat belt 43
Infant and child restraint systems 72
LATCH child seat anchors 77
Seat belts 43, 66
Odometer, main 25
Off-road driving 223
Checklist 225
Crossing obstacles 228
Driving through water 227
Returning 230
Rules 224
Special driving features 224
Steep terrain 226
Oil
Adding 243
Consumption 239
Dipstick 239
Oil dipstick 243
Viscosity 382Oil level
Checking 237
One-touch gearshifting 149
Canceling gear range limit 150
Downshifting 149
Upshifting 149
Opening
Ashtray 194
Doors from the inside 96
Fuel filler flap 235
Fuel filler flap manually 326
Glove box 190
Hood 238
Side windows 171
Tailgate 97, 98
Tilt/sliding sunroof 173, 328
Tilt/sliding sunroof in an
emergency 328
Tilt/sliding sunroof with
SmartKey 175
Windows 171
Windows with SmartKey 172