Page 76 of 506

automatically turns the front passenger
front air bag on or off based on the classi-
fie")
74 Safety and SecurityOccupant safety
Occupant Classification System
The Occupant Classification System (OCS)
automatically turns the front passenger
front air bag on or off based on the classi-
fied occupant weight category determined
by weight sensor readings from the front
passenger seat.
Occupants must sit properly belted in a
nearly upright position with their back
against the seat backrest and feet on the
floor to be correctly classified. If the occu-
pant's weight is transferred to another
object in the vehicle (e.g. by leaning on
armrests), the OCS may not be able to
properly approximate the occupant’s
weight category.
Warning!
G
Infants and small children should never
share a seat belt with another occupant.
During an accident, they could be crushed
between the occupant and seat belt.
A child’s risk of serious or fatal injuries is
significantly increased if the child restraints
are not properly secured in the vehicle and
the child is not properly secured in the child
restraint.
Children too big for a toddler restraint must
ride in seats using regular seat belts. Posi-
tion shoulder belt across chest and shoul-
der, not face or neck. A booster seat may be
necessary to achieve proper belt positioning
for children from 41 lbs until they reach a
height where a lap/shoulder belt fits proper-
ly without a booster.
When the child restraint is not in use, re-
move it from the vehicle or secure it with the
seat belt to prevent the child restraint from
becoming a projectile in the event of an ac-
cident.
Do not leave children unattended in the ve-
hicle, even if the children are secured in a
child restraint system. Unsupervised chil-
dren in a child restraint system may use ve-
hicle equipment and may cause an accident
and/or serious personal injury.
iThe system does not deactivate the
front passenger side impact air bag,
the window curtain air bag and the
emergency tensioning device.
Page 81 of 506

79 Safety and Security
Occupant safety
Self-test Occupant Classification Sys-
tem
After turning the SmartKey in the starter
switch to position1 or2 or pressing the
KEYLESS-GO* start/stop button once or
twice, the 75 indicator lamp1
located in the center console illuminates. If
an adult occupant is properly sitting on the
front passenger seat and the system sens-
es the occupant as being an adult, the
75 indicator lamp will illuminate
and go out after approximately six sec-
onds.
If the seat is not occupied and the system
senses the front passenger seat as being
empty, the 75 indicator lamp will
illuminate and not go out. For more information, see the “Practical
hints” section (
�page 374).
�
Do not place objects under and / or
around the front passenger seat.
�
Do not hang anything from or attach any
items to the seats.
�
Do not stuff objects such as books be-
tween the middle console and the front
passenger seat.
�
Do not move the front passenger seat
backwards against stiff objects.
�
Sit properly belted in a nearly upright
position with your back against the seat
backrest.
�
Do not lean on the armrests or lift your-
self from the seat by using the handle
over the door as this may cause the OCS
to be unable to correctly approximate
the occupant weight category.
�
Only have the seat repaired or replaced
by an authorized Mercedes-Benz Cen-
ter.
�
Read and observe all warnings in this
chapter.
Warning!
G
If the indicator lamp should not illuminate,
the system is not functioning. You must see
an authorized Mercedes-Benz Center before
seating any child on the front passenger
seat.Warning!
G
Never place anything between seat cushion
and child seat (e.g. pillow), since it reduces
the effectiveness of the Occupant Classifi-
cation System. The bottom of the child seat
must make full contact with the passenger
seat cushion. An incorrectly mounted child
seat could cause injuries to the child in case
of an accident, instead of increasing protec-
tion for the child.
Follow the manufacturer’s instructions for
installation of child seats.
Page 256 of 506
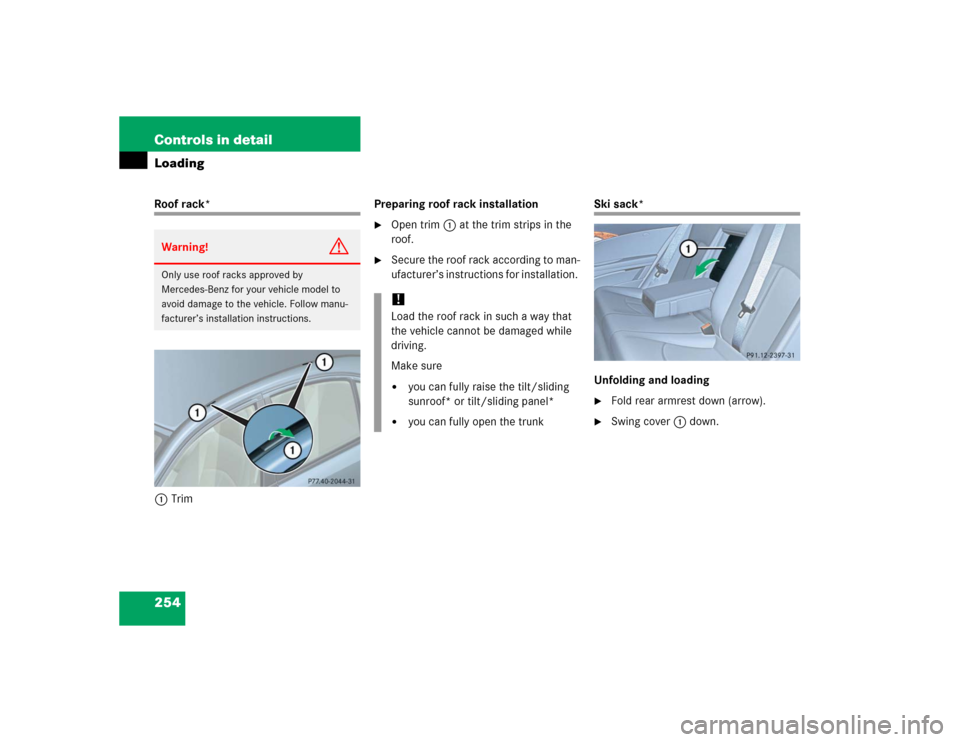
254 Controls in detailLoadingRoof rack*
1TrimPreparing roof rack installation
�
Open trim1 at the trim strips in the
roof.
�
Secure the roof rack according to man-
ufacturer’s instructions for installation.
Ski sack*
Unfolding and loading�
Fold rear armrest down (arrow).
�
Swing cover1 down.
Warning!
G
Only use roof racks approved by
Mercedes-Benz for your vehicle model to
avoid damage to the vehicle. Follow manu-
facturer’s installation instructions.
!Load the roof rack in such a way that
the vehicle cannot be damaged while
driving.
Make sure�
you can fully raise the tilt/sliding
sunroof* or tilt/sliding panel*
�
you can fully open the trunk
Page 257 of 506
255 Controls in detail
Loading
�
Open hook and loop strap1.
�
Pull ski sack into passenger compart-
ment and unfold.
�
From trunk, slide skis into ski sack.
�
Wrap strap around ski sack and rear
armrest.
�
Close clasp (arrows) and pull strap
tight to firmly secure skis.
Warning!
G
The ski sack is designed for up to four pairs
of skis. Do not load the ski sack with other
objects.
Always fasten the ski sack securely. In an
accident, an unfastened ski sack can cause
injury to vehicle occupants.
��
Page 265 of 506
263 Controls in detail
Useful features
Storage compartment in the center
console (no CD changer* installed)
1Opening/closing button�
Press button1 to open.
The control panel swings out upward
and the storage compartment extends
out.
�
Press button1 to close.
Storage space under center armrest
(Vehicles with cup holders in the center
console)
1Storage compartment
2Storage trayOpening storage tray
�
Pull handle2.
Opening storage compartment
�
Pull handle1.
iPrior to closing the glove box, close the
compartment for glasses first.
iNever place any medications in the
storage compartment. If there is a pow-
er failure, the storage compartment
cannot be opened.
Page 266 of 506
264 Controls in detailUseful featuresStorage compartment in the rear cen-
ter console�
Briefly press the top of the compart-
ment.
It extends automatically.Ruffled storage bags
Ruffled storage bags are located on the
back of the front seats.Storage compartment in the rear arm-
rest
�
Press the handle upward and fold the
rear armrest up.
Warning!
G
The ruffled storage bag is intended for stor-
ing light-weight items only.
Heavy objects, objects with sharp edges or
fragile objects may not be transported in the
ruffled storage bag.
The ruffled storage bag cannot protect
transported goods in the event of an acci-
dent.
Page 267 of 506
 or in the
center armrest (
�pag")
265 Controls in detail
Useful features
Cup holders
Depending on production date, your vehi-
cle is equipped with cup holders in either
the center console (
�page 265) or in the
center armrest (
�page 266).
Cup holder in the center console
�
Briefly press the marking in the back of
the cover.
The cover opens.
�
Briefly press marking on the cup hold-
er.
The cup holder extends automatically.
Warning!
G
In order to help prevent spilling liquids on
vehicle occupants, only use containers that
fit into the cup holder. Use lids on open con-
tainers and do not fill containers to a height
where the contents, especially hot liquids,
could spill during braking, vehicle maneu-
vers, or in an accident.
When not in use, keep the cup holder
closed. An open cup holder may cause injury
to you or others when contacted during
braking, vehicle maneuvers, or in an acci-
dent.
Keep in mind that objects placed in the cup
holder may come loose during braking, vehi-
cle maneuvers, or in an accident and be
thrown around in the vehicle interior. Ob-
jects thrown around in the vehicle interior
may cause an accident and/or serious per-
sonal injury.
iThe cup holder can be removed for
cleaning. Clean the cup holder only
with clear, lukewarm water. Make sure
to insert the cup holder in the guides
when reinstalling it.
��
Page 268 of 506
266 Controls in detailUseful features1Left cup holder
2Right cup holder
Removing cup holder�
Take out the cup holder.
Using two fingers in the horizontal slot
at the upper rear side of the cup holder,
lift cup holder upwards to remove.Storage compartment with cup holder
in the center armrest
The storage compartment in the center
armrest contains a removable dual cup
holder.
Opening storage compartment
1Cover
�
Slide cover1 in direction of arrow2.
Cup holder in the center armrest3Dual cup holder
4Telephone* compartment
Closing storage compartment�
Slide cover1 back.iThe cup holder can be removed to in-
crease storage space and for cleaning.
Clean the cup holder only with clear,
lukewarm water.
Make sure to insert the cup holder in
the guides when reinstalling it
(�page 267).
��