Page 141 of 506

139 Controls in detail
Lighting
Interior lighting in the front
1Left front reading lamp on/off
2Rear interior lighting on/off
3Automatic control on/off
4Front interior lighting on/off
5Right front reading lamp on/off
6Ambient lighting
7Interior lighting
8Front reading lampThe controls are located in the overhead
control panel.
Automatic control
Activating
�
Press automatic control switch3.
The Interior lighting switches on in
darkness, when you:�
unlock the vehicle
�
remove the SmartKey from the
starter switch
�
open a door
�
open the trunk
The interior lighting switches off automati-
cally following an adjustable time delay.For more information, see “Setting interior
lighting delayed shut-off” (
�page 165).
Deactivating
�
Press automatic control switch3
again.
The interior lighting remains switched
off in darkness, even when you:�
unlock the vehicle
�
remove the SmartKey from the
starter switch
�
open a door
�
open the trunk
iLeaving an interior light switch in the
ON position for extended periods of
time with the engine turned off could
result in a discharged battery.
iIf the door remains open, the interior
lamps switch off automatically after ap-
proximately five minutes.
Page 142 of 506

140 Controls in detailLightingManual control
Front interior lighting�
Press front interior lighting switch4.
The front interior lighting switches on.
�
Press front interior lighting switch4
again.
The front interior lighting switches off.
Rear interior lighting
�
Press rear interior lighting switch2.
The rear interior lighting switches on.
�
Press rear interior lighting switch2
again.
The rear interior lighting switches off.Front reading lamps
The front reading lamps are located in low-
er edge of the interior rear view mirror.
�
Press front reading lamp
switch1or5 to switch on the de-
sired front reading lamp.
�
Press front reading lamp
switch1or5 again to switch off the
respective front reading lamp.
Door entry lamps
For better orientation in the dark, the cor-
responding door entry lamps will switch on
in darkness when you open a door and the
automatic control is activated.
The door entry lamps will switch off when
the corresponding door is closed.
iThe setting selected for the interior
lighting is used for the trunk lighting as
well.
If the trunk lid remains open, the trunk
lighting switches off automatically after
approximately ten minutes.
iIf you turn the SmartKey in the starter
switch to position0 and switch off the
headlamps, the door entry lamps will
remain lit for approximately five min-
utes.
Page 143 of 506
141 Controls in detail
Lighting
Interior lighting in the rear
The overhead control panel is located
above the rear seat bench.
1Ambient lighting switch, to brighten
2Rear reading lamp
3Rear reading lamp on/off
4Rear interior lamp
5Ambient lighting
6Ambient lighting switch, to dimRear reading lamps
�
Press desired rear reading lamp
switch3 to switch on the correspond-
ing rear reading lamp.
�
Press respective rear reading lamp
switch3 again to switch off the corre-
sponding rear reading lamp.
Ambient lighting
�
Press ambient lighting switch1or6
repeatedly until ambient lighting5
has reached the desired intensity.
You can switch the ambient lighting on and
off, using the Control system
(
�page 165).
Trunk lamp
The trunk lamp switches on if the trunk lid
is opened.
If the trunk lid remains open, the trunk
lighting switches off automatically after ap-
proximately ten minutes.
Page 158 of 506

156 Controls in detailControl systemThe table below shows what settings can
be changed within the various menus. De-
tailed instructions on making individual
settings can be found on the following pag-
es.INSTRUMENT CLUSTER
TIME/DATE
LIGHTING
VEHICLE
CONVENIENCE
DYNAMIC SEAT*
Select temperature dis-
play mode
Synchronizing the
time
Set daytime running
lamp mode
(USA only)
Set automatic lock-
ing
Activate easy-en-
try/exit feature
Set level for dynam-
ic seat, driver
Select speedometer dis-
play mode
Set time (hours)
Set locator lighting
Limiting opening
height of trunk lid*
Set SmartKey-
dependency
Set level for dynam-
ic seat, passenger
Select language
Set time (minutes)
Ambient lighting
Set parking position
for exterior rear
view mirror
Select display (speed dis-
play or outside tempera-
ture) for status line
Set date (month)
Exterior lamps de-
layed shut-off
Select display (speed dis-
play or outside tempera-
ture) for basic display
Set date (day)
Interior lighting de-
layed shut-off
Tire pressure unit dis-
play*
Set date (year)
Page 168 of 506

166 Controls in detailControl systemVehicle submenu
Access the
Vehicle
submenu via the
Set-
tings
menu. Use the
Vehicle
submenu to
make general vehicle settings. The follow-
ing functions are available:Setting automatic locking
Use this function to activate or deactivate
the automatic central locking. With the au-
tomatic central locking system activated,
the vehicle is centrally locked at vehicle
speeds of approximately 9 mph
(15 km / h).
�
Move the selection marker with
theæ orç button to the
Vehi-
cle
submenu.
�
Press buttonj ork repeatedly
until you see this message in the dis-
play:
Automatic door lock
.
The selection marker is on the current
setting.
�
Press buttonæ orç to switch Automatic door lock
on or
off
.Limiting opening height of trunk lid*
Use this function to activate or deactivate
the limiting opening height of trunk lid.
�
Move the selection marker with
theæ orç button to the
Vehi-
cle
submenu.
�
Press buttonj ork repeatedly
until you see this message in the dis-
play:
Opening limiter Trunk lid
.
The selection marker is on the current
setting.
�
Press buttonæ orç to switch Opening limiter Trunk lid On
or
Off
.
Function
Page
Set automatic locking
166
Limiting opening height of trunk
lid*
166
Page 256 of 506
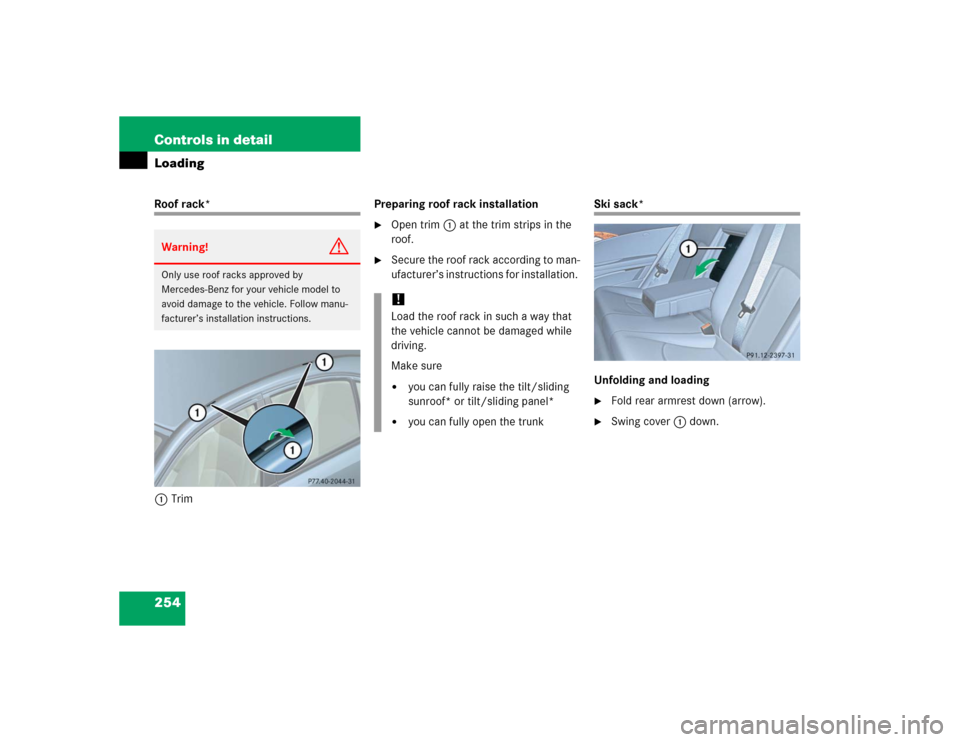
254 Controls in detailLoadingRoof rack*
1TrimPreparing roof rack installation
�
Open trim1 at the trim strips in the
roof.
�
Secure the roof rack according to man-
ufacturer’s instructions for installation.
Ski sack*
Unfolding and loading�
Fold rear armrest down (arrow).
�
Swing cover1 down.
Warning!
G
Only use roof racks approved by
Mercedes-Benz for your vehicle model to
avoid damage to the vehicle. Follow manu-
facturer’s installation instructions.
!Load the roof rack in such a way that
the vehicle cannot be damaged while
driving.
Make sure�
you can fully raise the tilt/sliding
sunroof* or tilt/sliding panel*
�
you can fully open the trunk
Page 257 of 506
255 Controls in detail
Loading
�
Open hook and loop strap1.
�
Pull ski sack into passenger compart-
ment and unfold.
�
From trunk, slide skis into ski sack.
�
Wrap strap around ski sack and rear
armrest.
�
Close clasp (arrows) and pull strap
tight to firmly secure skis.
Warning!
G
The ski sack is designed for up to four pairs
of skis. Do not load the ski sack with other
objects.
Always fasten the ski sack securely. In an
accident, an unfastened ski sack can cause
injury to vehicle occupants.
��
Page 258 of 506
256 Controls in detailLoading�
Connect snap hook1 of front strap to
eye2 located on center tunnel in
front of rear seat bench.Unloading and folding
�
Loosen strap, open clasp by pressing
tabs together (arrows).
�
Unload skis.
�
Close flap in trunk.
�
Fold and flatten ski sack lengthwise
and place folded ski sack inside recess
of backrest.
�
Close ski sack compartment cover.
��