Page 405 of 506
403 Practical hints
What to do if …
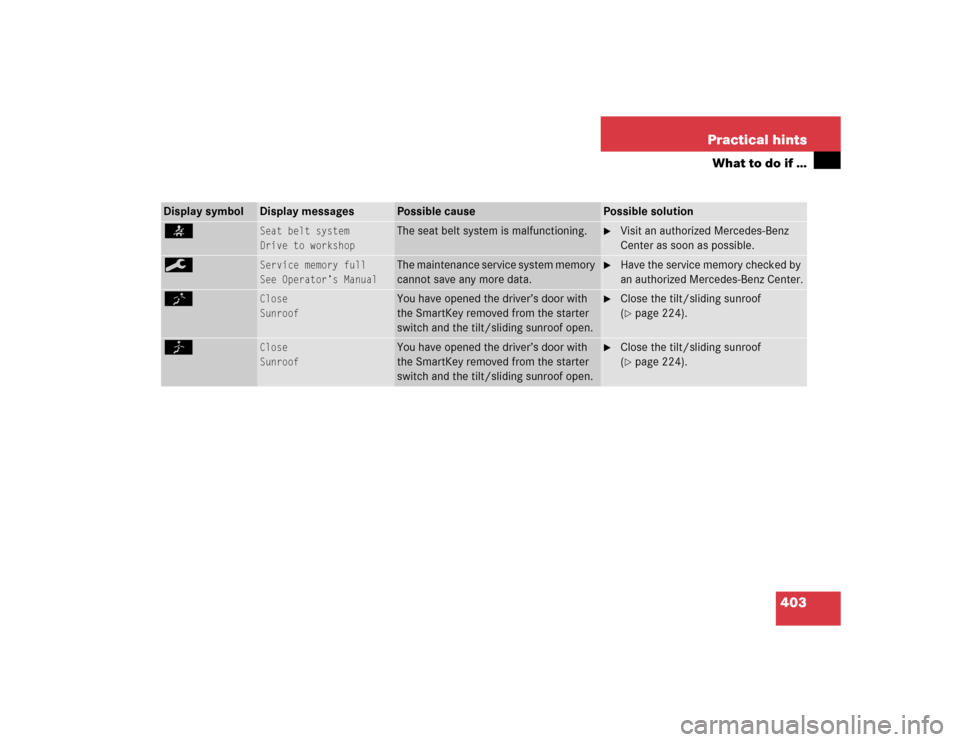
Display symbol
Display messages
Possible cause
Possible solution
<
Seat belt system
Drive to workshop
The seat belt system is malfunctioning.
�
Visit an authorized Mercedes-Benz
Center as soon as possible.
9
Service memory full
See Operator’s Manual
The maintenance service system memory
cannot save any more data.
�
Have the service memory checked by
an authorized Mercedes-Benz Center.
K
Close
Sunroof
You have opened the driver’s door with
the SmartKey removed from the starter
switch and the tilt/sliding sunroof open.
�
Close the tilt/sliding sunroof
(�page 224).
J
Close
Sunroof
You have opened the driver’s door with
the SmartKey removed from the starter
switch and the tilt/sliding sunroof open.
�
Close the tilt/sliding sunroof
(�page 224).
Page 412 of 506
410 Practical hintsUnlocking/locking in an emergencyUnlocking the vehicle
If you are unable to unlock the vehicle with
the SmartKey, open the driver’s door and
the trunk using the mechanical key.
1Mechanical key locking tab
2Mechanical key
�
Move locking tab1 in the direction of
the arrow and slide mechanical key2
out of the housing.Unlocking the driver’s door
3Unlocking
4Locking
�
Unlock the door with the mechanical
key. To do so, push the mechanical key
in the lock until it stops and turn it to
the left.
iUnlocking your vehicle with the me-
chanical key will trigger the anti-theft
alarm system. To cancel the alarm, do
one of the following:�
Press button Œ or ‹ on the
SmartKey.
�
Insert the SmartKey in the starter
switch.
�
Press the KEYLESS-GO* start/stop
button (
�page 35).
Page 413 of 506
 is required to open the trunk lid.
If you are unable to unlock the trunk with")
411 Practical hints
Unlocking/locking in an emergency
Unlocking the trunk
A minimum height clearance of 5.90 ft
(1.80 m) is required to open the trunk lid.
If you are unable to unlock the trunk with
the SmartKey or KEYLESS-GO*, open the
trunk with the mechanical key.
The handle is located above the rear li-
cense plate recess.
1Unlocking in an emergency
2Handle�
Insert the mechanical key into the
trunk lid lock.
�
Turn the mechanical key counterclock-
wise to position1 and hold it in this
position.
�
Pull trunk lid handle2 and lift the
trunk lid.
Locking the vehicle
If you are unable to lock the vehicle with
the SmartKey, lock it with the mechanical
key as follows:�
Close the passenger doors and the
trunk.
�
Press the central locking switch in the
cockpit (
�page 119).
�
Check to see whether the locking
knobs on the passenger doors are still
visible. If necessary, push them down
manually.
�
Slide mechanical key2 out of the
SmartKey.
�
Lock the driver’s door with the me-
chanical key (
�page 411).
�
Check if the trunk is locked.
!Always make sure there is sufficient
overhead clearance.iUnlocking your vehicle with the me-
chanical key will trigger the anti-theft
alarm system. To cancel the alarm, do
one of the following:�
Press buttonŒ or‹ on the
SmartKey.
�
Insert the SmartKey in the starter
switch.
Vehicles with KEYLESS-GO*:
�
Grasp the outside door handle.
�
Press the start/stop button.
Page 416 of 506
414 Practical hintsOpening/closing in an emergencyPower tilt/sliding sunroof* or panora-ma roof with power tilt/sliding panel*
You can open or close the tilt/sliding sun-
roof or tilt/sliding panel manually should
an electrical malfunction occur.
The tilt/sliding sunroof or tilt/sliding panel
drive is located behind lens1 of the inte-
rior overhead light.
1Cover�
Remove the SmartKey from the starter
switch.
�
Press on cover1 in direction of the ar-
row to release it.2Hole
3Crank
�
Take crank3 out of the glove box.
�
Insert crank3 through hole2.
�
Turn crank3 clockwise to:�
slide roof panel/sunroof closed
�
raise roof panel/sunroof at the rear
�
Turn crank3 counterclockwise to:�
slide roof panel/sunroof open
�
lower roof panel/sunroof at the
rear
iTurn crank3 slowly and smoothly.
The tilt/sliding sunroof or tilt/sliding
panel must be synchronized after being
operated manually (
�page 225) or
(
�page 229).
Page 417 of 506

415 Practical hints
Replacing SmartKey batteries
�Replacing SmartKey batteries
If the batteries in the SmartKey are dis-
charged, the vehicle can no longer be
locked or unlocked. It is recommended to
have the batteries replaced at an autho-
rized Mercedes-Benz Center.
Batteries contain materials that can harm
the environment if disposed of improperly.
Recycling of batteries is the preferred
method of disposal. Many states require
sellers of batteries to accept old batteries
for recycling.
SmartKey
Replacement batteries: Lithium, type
CR 2025 or equivalent.�
Remove the mechanical key1
(�page 410).
1Mechanical key
2Battery compartment
�
Insert the mechanical key1 in side
opening and push gray slide.
Battery compartment2 is unlatched.
�
Pull battery compartment2 out of the
housing in direction of arrow.
�
Remove the batteries.
Warning!
G
Keep the batteries out of reach of children.
If a battery is swallowed, seek medical help
immediately.
iWhen inserting the batteries, make
sure they are clean and free of lint.iWhen replacing batteries, always re-
place both batteries.
The required replacement batteries are
available at any Mercedes-Benz Cen-
ter.
Page 418 of 506
416 Practical hintsReplacing SmartKey batteries3Battery
4Contact spring�
Using a lint-free cloth, insert new bat-
teries under the contact spring with the
plus (+) side facing up.
�
Return battery compartment into hous-
ing until it locks into place.
SmartKey with KEYLESS-GO*
Replacement batteries: Lithium, type
CR 2025 or equivalent.�
Remove mechanical key (
�page 410).
1Battery
2Tilt battery up
3Mechanical key
�
Insert the mechanical key3 in side
opening and push grey slide.
Battery compartment is unlatched.
�
Pull battery compartment out of the
housing in direction of arrow.
�
Using mechanical key3 apply pres-
sure to position2.
Battery1 tilts up slightly.
�
Pull out batteries1 in direction of ar-
row.
�
Using a lint-free cloth, insert new bat-
teries with the plus (+) side facing up.
�
Return battery compartment into hous-
ing until it locks into place.
Page 425 of 506
423 Practical hints
Replacing wiper blades
�Replacing wiper blades
Removing wiper blades�
Turn SmartKey in starter switch to
position1.
�
Turn combination switch to wiper
settingII (
�page 51).
�
With wiper arm in the vertical position,
turn SmartKey in starter switch to
position0.
�
Fold the wiper arm forward until it
snaps into place.
�
Turn the wiper blade at a right angle to
wiper arm.
�
Slide the wiper blade sideways out of
the retainer.
!The windshield wipers must be in a ver-
tical position before folding them away
from the windshield. They could other-
wise damage the hood.
Warning!
G
For safety reasons, switch off wipers and re-
move SmartKey from starter switch (vehi-
cles with KEYLESS-GO*: make sure the
vehicle's on-board electronics have status
0) before replacing a wiper blade. Other-
wise, the wiper motor could suddenly turn
on and cause injury.
Page 432 of 506

430 Practical hintsFlat tire�
Screw air hose 4 onto the tire valve.
�
Insert electrical plug 3 into vehicle ci-
gar lighter socket.
�
Turn the SmartKey in the ignition to
position1.
or
�
Press the KEYLESS-GO* start/stop
button on the gear selector lever once
without depressing the brake pedal.
�
Press I on electric air pump switch 2.
The electric air pump should now
switch on and inflate the tire.
�
Inflate the tire to approx. 51 psi
(3.5 bar).
This takes about five minutes for the
collapsible tire. Air hose 4 and union
nut5 can become hot duration infla-
tion. Exercise proper caution to avoid
burning yourself when using the equip-
ment.
�
Press 0 on electric air pump switch 2.
�
Turn the SmartKey in the ignition to
position0.
or
�
Press KEYLESS-GO* start/stop button
on the gear selector lever twice without
depressing the brake pedal.
The electric air pump should now be
switched off.
�
If the tire inflation pressure is above
51 psi (3.5 bar), release excess tire in-
flation pressure using the vent screw.
�
Detach the electric air pump.
�
Stow electrical plug 3 and air hose 4
behind flap 1 and place the air pump
back in the trunk.
!Do not operate the air pump longer
than eight minutes without interrup-
tion. Otherwise it may overheat.
You may operate the air pump again af-
ter it has cooled off.
Warning!
G
Follow recommend inflation pressures.
Do not overinflate tires. Overinflating tires
can result in sudden deflation (blowout) be-
cause they are more likely to become punc-
tured or damaged by road debris, potholes,
etc.
Do not underinflate tires. Underinflated tires
wear unevenly, adversely affect handling
and fuel economy, and are more likely to fail
from being overheated.
��