Page 410 of 498
408 Practical hintsReplacing bulbsFront lamps Bi-Xenon*-type
1Bulb socket for turn signal lamp
2Housing cover for high beam flasher,
parking and standing lamp
3Housing cover for Bi-Xenon* headlamp4Bulb holder for high beam flasher bulb
5Bulb socket for parking and standing
lamp bulbHigh beam bulb for high beam flasher
�
Turn housing cover2 counterclock-
wise and remove it.
�
Turn bulb holder4 with the bulb coun-
terclockwise and remove it.
�
Pull the bulb at its socket out of bulb
holder4.
�
Insert the new bulb so that its socket
locates in the recess of bulb holder4
and is level to it.
�
Reinsert bulb holder4 with the bulb in
the lamp and turn clockwise.
�
Align housing cover2 and turn it
clockwise.
Warning!
G
Do not remove the cover
3
for the Bi-Xe-
non* headlamp. Because of high voltage in
xenon lamps, it is dangerous to replace the
bulb or repair the lamp and its components.
We recommend that you have such work
done by a qualified technician.
Page 411 of 498

409 Practical hints
Replacing bulbs
Front turn signal lamp bulb�
Turn bulb socket1 counterclockwise
and remove it.
�
Press gently onto the bulb and turn
counterclockwise out of bulb
socket1.
�
Press the new bulb gently into bulb
socket1 and turn clockwise until it
engages.
�
Place bulb socket1 back into the
lamp and turn it clockwise.Parking and standing lamp bulb
�
Turn housing cover2 counterclock-
wise and remove it.
�
Pull out bulb socket5 with the bulb.
�
Pull the bulb out of the bulb socket5.
�
Press the new bulb into bulb socket5.
�
Press bulb socket5 back into the
lamp.
�
Align housing cover2 and turn it
clockwise.Side marker lamp bulb
�
Carefully slide the lamp towards the
rear in direction of arrows.
�
Remove front end first.
�
Turn the bulb socket with the bulb
counterclockwise and remove it.
�
Pull the bulb out of the bulb socket.
�
Insert the new bulb into the bulb
socket.
�
Place the bulb socket back into the
lamp and turn it clockwise.
�
To reinstall the lamp, set rear end in the
bumper and let the front end engage.
Page 412 of 498
410 Practical hintsReplacing bulbsReplacing bulbs for rear lamps
Before you start to replace a bulb for a rear
lamp, do the following first:�
Turn the exterior lamp switch to
positionM (
�page 124).
Tail lamp unit
�
Open trunk lid.
�
Swing the trim panel covering the cor-
responding rear lights to the side.
1Tab
�
Press tabs1 together.
�
Remove the bulb carrier.
�
Press gently onto the respective bulb
and turn counterclockwise out of its
bulb socket.
�
Press the new bulb gently into its bulb
socket and turn clockwise until it
engages.
1Brake lamp
2Turn signal lamp
3Backup lamp
4Standing and side marker lamp
5Rear fog lamp (driver’s side)/tail
�
Reinstall the bulb carrier.
Let tabs1 engage.
�
Reinstall trim panel.License plate lamp
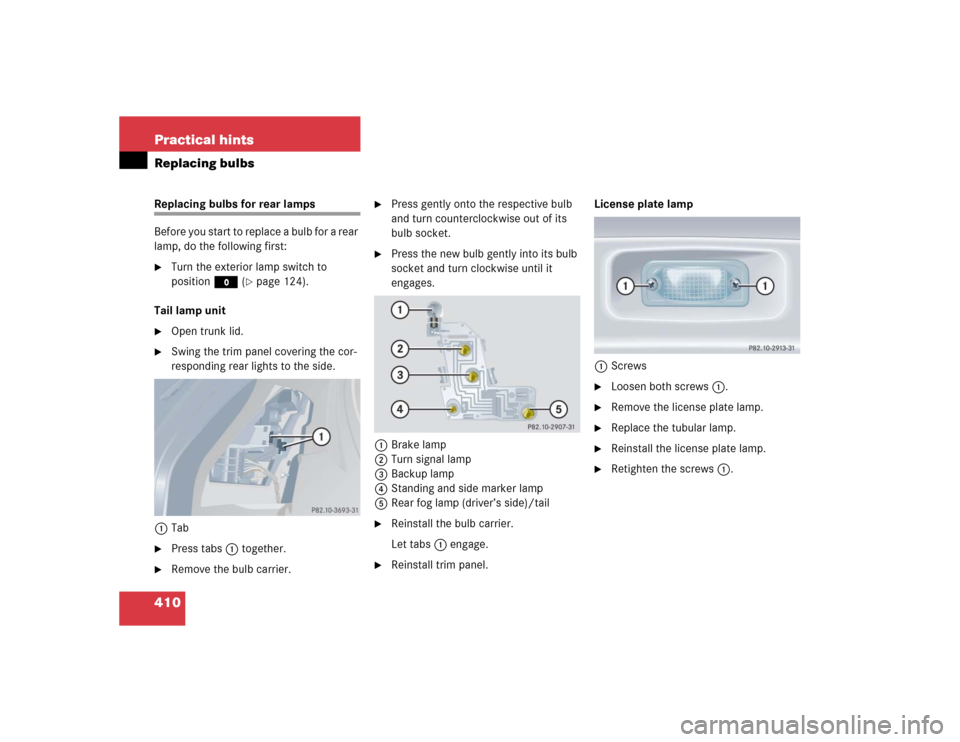
1Screws
�
Loosen both screws1.
�
Remove the license plate lamp.
�
Replace the tubular lamp.
�
Reinstall the license plate lamp.
�
Retighten the screws1.
Page 428 of 498

426 Practical hintsTowing the vehicleWarning!
G
Prior to towing the vehicle with all wheels on
the ground, make certain that the SmartKey
is in starter switch position
2.
If the SmartKey is left in starter switch posi-
tion
0 for an extended period of time, it can
no longer be turned in the switch. In this
case, the steering is locked. To unlock, re-
move SmartKey from starter switch and re-
insert.
If circumstances require towing the vehicle
with all wheels on the ground, always tow
with a tow bar if:
�
the engine will not run
�
there is a malfunction in the power sup-
ply or in the vehicle’s electrical system
as that will be necessary to adequately con-
trol the towed vehicle.
Warning!
G
With the engine not running, there is no
power assistance for the brake and steering
systems. In this case, it is important to keep
in mind that a considerably higher degree of
effort is necessary to brake and steer the ve-
hicle. Adapt your driving accordingly.iTo signal turns while being towed with
the hazard warning flasher in use,
switch on ignition and activate the
combination switch for the left or right
turn signal in the usual manner – only
the selected turn signal will operate.
Upon canceling the turn signal, the haz-
ard warning flasher will operate again.
!When towing the vehicle with all wheels
on the ground, please note the follow-
ing:
With the automatic central locking acti-
vated and the SmartKey in starter
switch position2, or KEYLESS-GO*
start/stop button in position2, the ve-
hicle doors lock if the left front wheel
as well as the right rear wheel are turn-
ing at vehicle speeds of approx. 9 mph
(15 km / h) or more.
Switch off the tow-away alarm
(�page 91).
To prevent the vehicle door locks from
locking, deactivate the automatic cen-
tral locking (
�page 158).
Towing of the vehicle should only be
done using the properly installed tow-
ing eye bolt. Never attach tow cable,
tow rope or tow rod to the vehicle chas-
sis, frame or suspension parts.
Page 460 of 498

The system automatically turns the
front passe")
458 Technical termsMultifunction steering wheel
Steering wheel with buttons for operat-
ing the control system.
OCS
(O
ccupant C
lassification S
ystem)
The system automatically turns the
front passenger front air bag on or off
based on the classified occupant size
category determined by weight sensor
readings from the seat.
Overspeed range
Engine speeds within the red marking
on the tachometer dial. Avoid this en-
gine speed range, as it may result in se-
rious engine damage that is not
covered by the Mercedes-Benz Limited
Warranty.Parktronic (Parking assist)*
System which uses visual and acoustic
signals to assist the driver during park-
ing maneuvers.
Poly-V-belt drive
Drives engine-components (alternator,
AC compressor, etc.) from the engine.
Power train
Collective term designating all compo-
nents used to generate and transmit
motive power to the drive axles, includ-
ing
�
engine
�
clutch/torque converter
�
transmission
�
transfer case
�
drive shaft
�
differential
�
axle shafts/axlesProgram mode selector switch
Used to switch the automatic transmis-
sion between standard operationS and
comfort operationC.
CLK 55 AMG with steering wheel gear-
shift control and manual shift program:
In addition toS andC (for standardS
or comfortC operation, see above) you
can use theM for manual shift
program.
Page 463 of 498

461 Index
A
ABS 25, 84, 455
Malfunction indicator lamp 354
Messages in display 365
Accelerator position,
automatic transmission 171
Accessory weight 338
Accident
In case of 54
Activating
Air conditioning (cooling) 192, 204
Air recirculation mode 190, 201
Anti-theft alarm system 90
Automatic climate control 195
Central locking (control system) 158
Charcoal filter 203
Climate control 185
Climate control system 187
Defrosting 189
Automatic climate control 200
Easy-entry/exit feature 159
Electric air pump 417
ESP 88Exterior headlamps 50
Exterior lamps 125
Exterior rear view
mirror parking position 180
Front and rear fog lamp 128
Hazard warning flasher 131
Headlamps 50
High beams 129
Ignition 34
Ignition with KEYLESS-GO* 36
Immobilizer 56, 89
Rear window defroster 183
Residual heat 205
Seat heating* 119
Seat ventilation* 120
Tow-away alarm 91, 92
Windshield wipers 52
Adding
Coolant 313
Engine oil 312
Additional turn signals 404
Adjustable air vents, rear
passenger compartment 193, 206Adjusting 37
Air distribution 188, 198
Air volume 199
Backrest tilt 38
Exterior rear view mirror 41
Head restraint height 38
Head restraint tilt 39
Instrument cluster illumination 134
Interior rear view mirror 41
Mirrors 41
Multicontour seat* 118
Seat cushion depth 118
Seat cushion tilt 38
Seat fore and aft adjustment 38
Seat height 38
Seats 37
Steering column in/out 41
Steering column up/down 41
Steering wheel 40
Aids for changing fuses 430
Page 466 of 498
 343")
464 IndexBattery, vehicle 314, 420
Charging 422
Disconnecting 421
Messages in display 373
Reconnecting 422
Reinstalling 422
Removing 421
Bead 338
Bi-Xenon headlamps* 455
Block heater (Canada only) 343
Blocking
Rear window operation 82
Bolts
For spare wheel 396
Brake assist system (BAS) 455
Brake fluid 450
Message in display 374
Brake lamp bulbs 405
Brake lamp, high mounted 405
Brake pads
Message in display 374
Brakes 296
Warning lamp 355
Break-in period 294Bulbs, replacing 404
Additional turn signals 404
Backup lamps 405
Brake lamps 405
Fog lamps 404
Front lamps 404
High beam (Bi-Xenon*) 404
High beam (Halogen) 404
High beam flasher (Bi-Xenon*) 404
High beam flasher (Halogen) 404
High mounted brake lamp 405
License plate lamps 405, 410
Low beam (Bi-Xenon*) 404
Low beam (Halogen) 404
Parking lamps 404, 405, 407, 409
Rear fog lamp 405, 410
Side marker lamps 404, 409
Standing lamps 404, 405, 407, 409
Tail lamp assemblies 405, 410
Turn signal lamps 404, 405
Button
Audio system 210C
CAC (Customer Assistance Center) 455
Calling up
Maintenance service indicator 345
Range (distance to empty) 162
CAN system 455
Canceling
Cruise control 257
Capacities
Fuels, coolants, lubricants, etc. 447
Cargo tie-down rings 271
Catalytic converter 303
CD changer* 225
CD operation 225
CD player
Operating 144
Center console 27
Front passenger front
air bag off indicator lamp 360
Lower part 28
Upper part 27
Centigrade
Setting temperature units 149
Page 468 of 498

466 IndexClimate control 184
Activating 185
Adjusting air distribution 188
Air recirculation mode 190
Deactivating 185
Defrosting 189
Rear window defroster 183
Clock 25, 152
Closing
Cup holder 275
Glove box 272
Hood 309
Power tilt/sliding sunroof* 251, 401
Power tilt/sliding sunroof*
with KEYLESS-GO* 250, 253
Power tilt/sliding sunroof*
with SmartKey 253
Side windows 248
Trunk 107
Windows 247
Windows
with KEYLESS-GO* 250, 253
Windows
with SmartKey 249Closing power tilt/sliding sunroof*
In an emergency 401
Cockpit 22, 455
Cockpit management
and data system (COMAND*) 456
Cold tire inflation pressure 338
Collapsible tire (CLK 55 AMG only) 394
Collapsible wheel chock 392
COMAND* see separate
operating instructions
Combination switch 129
High beam flasher 129
Turn signals 51
Windshield wipers 52
Comfort driving
Transmission program mode 170
Control and
operation of radio transmitters 302Control system 137, 456
AUDIO menu 143
Convenience submenu 158
Display digital speedometer 142
Functions 138, 141
Instrument
cluster submenu 149, 151
Lighting submenu 154
Menus 140, 141, 457
Multifunction display 137
Multifunction steering wheel 138
NAV menu 144
Operate CD player 144
Selecting radio system 143
Selecting satellite radio* system 143
Settings menu 146
Standard display menu 142
Submenus 139, 141
TEL* menu 162
Trip computer menu 160
Vehicle status
message memory menu 145
Vehicle submenu 158