Page 77 of 498

75 Safety and Security
Occupant safety
When the OCS senses that the front passen-
ger seat occupant is classified as being
heavier than the weight of a typical
12-month-old child seated in a standard
child restraint or as being a small individual
(such as a young teenager or a small adult),
the 56 indicator lamp will illuminate
for approximately six seconds when the en-
gine is started and then, depending on
occupant weight sensor readings from the
seat, remain illuminated or go out. With the
56 indicator lamp illuminated, the
front passenger front air bag is deactivated.
With the 56 indicator lamp out, the
front passenger front air bag is activated.
When the OCS senses that the front passen-
g e r s e a t o c c u p a n t i s c l a s s i f i e d a s a n a d u l t o r
someone larger than a small individual, the
56 indicator lamp will illuminate for
approximately six seconds when the engine
is started and then go out, indicating that
the front passenger front air bag is
activated.
If the 56 indicator lamp is illuminat-
ed, the front passenger front air bag is
deactivated and will not be deployed.
If the 56 indicator lamp is not illumi-
nated, the front passenger front air bag is
activated and will be deployed:�
in the event of certain frontal impacts
�
if impact exceeds a preset deployment
threshold
�
independently of the side impact air
bags.
If the front passenger front air bag is de-
ployed, the rate of inflation will be influ-
enced by:
�
the rate of relevant vehicle deceleration
as assessed by the air bag control unit
�
front passenger’s weight category as
identified by the Occupant Classification
System (OCS).
Warning!
G
According to accident statistics, children
are safer when properly restrained in the
rear seating positions than in the front seat-
ing position. Thus, we strongly recommend
that children be placed in the rear seats
whenever possible. Regardless of seating
position, children 12 years old and under
must be seated and properly secured in an
appropriate infant or child restraint
recommended for the size and weight of the
child.
The infant or child restraint must be properly
secured with the vehicle’s seat belt, the seat
belt and top tether strap, or lower anchors
and top tether strap, fully in accordance
with the child seat manufacturer’s instruc-
tions.
��
Page 112 of 498

110 Controls in detailLocking and unlockingAutomatic central locking
The doors and the trunk automatically lock
when the ignition is switched on and the
wheels are turning at vehicle speeds of
approximately 9 mph (15 km/h) or more.
You can open a locked door from the
inside. Open doors only when conditions
are safe to do so.
You can deactivate the automatic locking
mode using the control system, see “Set-
ting automatic locking” (
�page 158).
Locking and unlocking from the inside
You can lock or unlock the doors and the
trunk from inside using the central locking
or unlocking switch. This can be useful, for
example, if you want to lock the vehicle
before starting to drive.
You cannot lock or unlock the fuel filler flap
with the central locking or unlocking
switch.The switch is located in the center console.
1Central locking switch
2Central unlocking switch
iThe doors unlock automatically after an
accident if the force of the impact
exceeds a preset threshold.
To prevent the vehicle door locks from
locking, deactivate the automatic
central locking when the vehicle�
is pushed or towed
�
is on a test stand
Warning!
G
When leaving the vehicle, always remove the
SmartKey or SmartKey with KEYLESS-GO*
from the starter switch, take it with you, and
lock the vehicle. Do not leave children unat-
tended in the vehicle, or with access to an
unlocked vehicle. Unsupervised use of vehi-
cle equipment may cause an accident
and/or serious personal injury.
Page 132 of 498

The cornering fog lamps improve illumina-
tion of the road into which you are turning.
Cornering fog lamps will op")
130 Controls in detailLightingCornering fog lamps* (CLK 320 with Bi-Xenon* headlamps)
The cornering fog lamps improve illumina-
tion of the road into which you are turning.
Cornering fog lamps will operate with the
engine running and with�
the exterior lamp switch in
positionB (
�page 124)
or
�
the exterior lamp switch in
positionU (
�page 124)
or
�
the daytime running lamp mode
activated (
�page 126)Driving forward
Switching on cornering fog lamps
�
Depending on whether you are turning
left or right, switch on the left or right
turn signal (
�page 51).
The respective front fog lamp comes on
and illuminates the road into which you
are turning.Switching off cornering fog lamps
The combination switch for the turn signal
resets automatically after major steering
wheel movements. This will switch off the
cornering fog lamps if they where
activated by switching on the left or right
turn signal.
If the turn signal should stay on after mak-
ing the turn, the turn signal and cornering
fog lamps can be switched off by returning
the combination switch to its original
position.
iCornering fog lamps will only come on
in low ambient lighting conditions.
The cornering fog lamps function is not
available at a vehicle speed above
25 mph (40 km/h).
iThe cornering fog lamps will come on
automatically depending on the
steering angle, even if you did not
switch on either turn signal.
If the cornering fog lamps came on
automatically, they will also go out au-
tomatically depending on the steering
angle.
Page 134 of 498

132 Controls in detailLightingInterior lighting
The controls are located in the overhead
control panel.
1Rear interior lights
2Right front reading lamp
3Rocker switch for automatic control
system
4Left front reading lampActivating automatic control
�
Press rocker switch3 to center
position.
Interior lamps are switched on in dark-
ness, even when you:�
unlock the vehicle
�
open a door
�
remove the SmartKey from the
starter switch
The interior lamps are switched off after a
preset time, see “Setting interior lighting
delayed shut-off” (
�page 157).Deactivating automatic control
�
Press the = symbol on rocker
switch3.
The interior lighting remains switched
off in darkness, even when you:�
unlock the vehicle
�
open a door
�
remove the SmartKey from the
starter switch
iIf the door remains open, the interior
lamps switch off automatically after
approximately five minutes, when the
SmartKey is removed or in starter
switch position0.
An interior lamp switched on manually
does not go out automatically.
Page 136 of 498
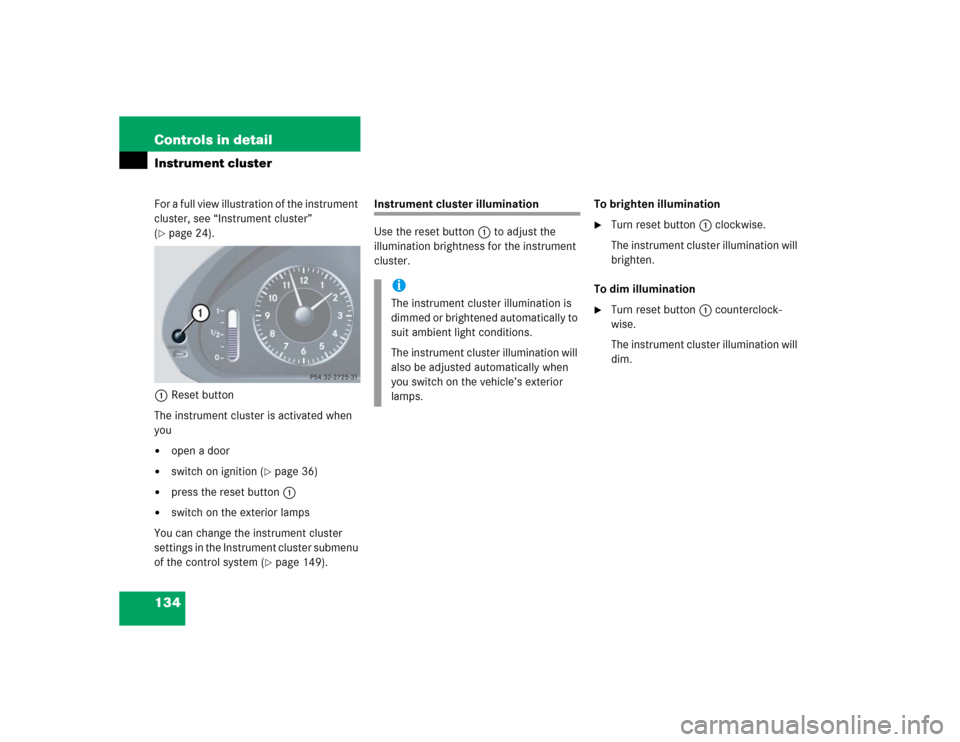
134 Controls in detailInstrument clusterFor a full view illustration of the instrument
cluster, see “Instrument cluster”
(�page 24).
1Reset button
The instrument cluster is activated when
you
�
open a door
�
switch on ignition (
�page 36)
�
press the reset button1
�
switch on the exterior lamps
You can change the instrument cluster
settings in the Instrument cluster submenu
of the control system (
�page 149).
Instrument cluster illumination
Use the reset button1 to adjust the
illumination brightness for the instrument
cluster.To brighten illumination
�
Turn reset button1 clockwise.
The instrument cluster illumination will
brighten.
To dim illumination
�
Turn reset button1 counterclock-
wise.
The instrument cluster illumination will
dim.
iThe instrument cluster illumination is
dimmed or brightened automatically to
suit ambient light conditions.
The instrument cluster illumination will
also be adjusted automatically when
you switch on the vehicle’s exterior
lamps.
Page 137 of 498
.
During severe operating condition")
135 Controls in detail
Instrument cluster
Coolant temperature indicator
The coolant temperature indicator is on
the right side in the instrument cluster
(�page 24).
During severe operating conditions, e.g.
stop-and-go traffic, the coolant tempera-
ture may rise close to 120°C.
The engine should not be operated with
the coolant temperature above 120°C.
Doing so may cause serious engine
damage which is not covered by the
Mercedes-Benz Limited Warranty.
Trip odometer�
Make sure you are viewing the stan-
dard display in the multifunction dis-
play (
�page 142).
�
If it is not displayed, press buttonè
orÿ on the multifunction steering
wheel repeatedly until the standard dis-
play appears (
�page 138).
�
Press and hold reset button on the in-
strument cluster (
�page 134) until the
trip odometer is reset.
Warning!
G
�
Driving when your engine is badly over-
heated can cause some fluids which
may have leaked into the engine com-
partment to catch fire. You could be se-
riously burned.
�
Steam from an overheated engine can
cause serious burns and can occur just
by opening the hood. Stay away from
the engine if you see or hear steam com-
ing from it.
Turn off the engine, get out of the vehicle
and do not stand near the vehicle until the
engine has cooled down.
iExcessive coolant temperature triggers
a warning in the multifunction display
(�page 376) and the red coolant warn-
ing lamp in the instrument cluster
comes on (
�page 357).
Page 143 of 498
141 Controls in detail
Control system
Menus, submenus and functions
Menu1
Menu2
Menu3
Menu4
Menu5
Menu6
Menu7
Commands/submenusStandard dis-
play
AUDIO
NAV*
Vehicle status
message memory
Settings
Trip computer
Telephone
(�page 142)
(�page 143)
(�page 144)
(�page 145)
(�page 146)
(�page 160)
(�page 162)
Digital speed-
ometer
Select radio
station
Activate route
guidance
Call up vehicle
malfunction, warning
and system status
messages stored in
memory
Reset to factory
settings
Fuel consumption
statistics after
start
Load phone
book
Call up mainte-
nance service
display
Select satellite
radio station*
(USA only)
Instrument clus-
ter submenu
Fuel consumption
statistics since the
last reset
Search for name
in phone book
Check engine
oil level
Operate CD
player
Time/Date sub-
menu
Call up range
Lighting
submenuVehicle submenuConvenience
submenu
Page 145 of 498

143 Controls in detail
Control system
AUDIO menu
The functions in the
Audio
menu operate
the audio equipment which you currently
have turned on.
If no audio equipment is currently turned
on, the message
Audio off
is shown in the
multifunction display.
The following functions are available:
Select radio station
�
Turn on the radio (
�page 210).
Vehicles with COMAND*: Refer to
separate operating instructions.
�
Press buttonè orÿ repeatedly
until the currently tuned station
appears in the multifunction display.1Waveband setting
2Station frequency
�
Press buttonk orj repeatedly
until the desired station is found.Select satellite radio station*
(USA only)
The satellite radio is treated as a radio
application.
�
Select satellite radio with the
corresponding soft key (SAT) in the
radio menu.
1SAT mode and preset number
2Setting for station selection using
memory
3Channel name or number
�
Press buttonk orj repeatedly
until the desired channel is found.
Function
Page
Select radio station
143
Select satellite radio station*
(USA only)
143
Operate CD player
144
iYou can only store new stations using
the corresponding feature on the radio
(�page 218).
Vehicles with COMAND*: Refer to
separate operating instructions.
You can also operate the radio in the
usual manner.