Page 381 of 498
379 Practical hints
What to do if …?
Display symbol
Display message
Possible cause
Possible solution
:
USA only:Add 1 qt. engine oil
at next refuelingCanada only:Add 1 liter engine oil
at next refueling
The engine oil level is too low.
�
Add engine oil (
�page 312) and check
the engine oil level (
�page 310).
Engine oil level
Reduce oil level!
You have added too much engine oil.
There is a risk of damaging the engine or
the catalytic converter.
�
Have oil siphoned or drained off. Ob-
serve all legal requirements with re-
spect to its disposal.
Engine oil level
Stop, engine off!
There is no oil in the engine. There is a
danger of engine damage.
�
Carefully bring the vehicle to a halt as
soon as possible.
�
Turn off the engine.
�
Add engine oil (
�page 312) and check
the engine oil level (
�page 310).
Page 382 of 498
 ap-
pears while the engine is running and at
operating temperature, the engine oil l")
380 Practical hintsWhat to do if …?When the message
Add 1 qt. engine oil
at next refueling (Canada:
1 liter
) ap-
pears while the engine is running and at
operating temperature, the engine oil level
has dropped to approximately the
minimum level.When this occurs, the warning will first
come on intermittently and then stay on if
the oil level drops further.
Visually check for oil leaks. If no obvious oil
leaks are noted, drive to the nearest ser-
vice station where the engine oil should be
topped to the required level with an
approved oil specified in the Factory
Approved Service Products pamphlet.
Display symbol
Display message
Possible cause
Possible solution
:
Engine oil
Visit workshop!
It may be that there is water in the engine
oil.
�
Have the engine oil checked.
Engine oil level
Visit workshop!
The engine oil has dropped to a critical
level.
�
Check the engine oil level
(�page 310) and add oil as required
(�page 312).
�
If you must add engine oil frequently,
have the engine checked for possible
leaks.
The measuring system is malfunctioning.
�
Have the measuring system checked
by an authorized Mercedes-Benz
Center.!The engine oil level warnings should
not be ignored. Extended driving with
the symbol displayed could result in
serious engine damage that is not
covered by the Mercedes-Benz Limited
Warranty.
Page 383 of 498

381 Practical hints
What to do if …?
Display symbol
Display message
Possible cause
Possible solution
A
Reserve fuel
The fuel level has dropped below the re-
serve mark.
�
Refuel at the next gas station
(�page 305).
Y
Hood open!
You are driving with the hood open.
�
Close the hood (
�page 309).
I
Remove key
You have forgotten to remove the
SmartKey.
�
Remove the SmartKey from the start-
er switch.
Replace key
No additional code available for SmartKey
or SmartKey with KEYLESS-GO*
�
Visit an authorized Mercedes-Benz
Center as soon as possible.
Key
Check battery!
The SmartKey with KEYLESS-GO* batter-
ies are discharged.
�
Change the batteries (
�page 402).
Key
not recognized!
The SmartKey with KEYLESS-GO* is not
recognized while the engine is running be-
cause�
the SmartKey is not in the vehicle
�
there is strong radio-frequency inter-
ference
�
Stop the vehicle as soon as it is safe to
do so.
�
Search for the SmartKey.
Otherwise the vehicle cannot be centrally
locked nor can the engine be started
again after the engine has been stopped.
The SmartKey with KEYLESS-GO* is mo-
mentarily not recognized.
�
Change the position of the SmartKey
in the vehicle.
�
Operate the vehicle with the SmartKey
in the starter switch if necessary.
Keyless Go
Check system
The KEYLESS-GO* system is malfunction-
ing.
�
Visit an authorized Mercedes-Benz
Center as soon as possible.
Page 384 of 498

382 Practical hintsWhat to do if …?Display symbol
Display message
Possible cause
Possible solution
I
Key recognized
in vehicle!
A SmartKey with KEYLESS-GO* left in the
vehicle was recognized while locking the
vehicle from the outside.
�
Take the SmartKey out of the vehicle.
Key
do not forget key
This display appears (for a maximum of
60 seconds) if the driver’s door is opened
with the engine shut off and no SmartKey
in the starter switch.
Message is only a reminder.
�
Insert SmartKey in the starter switch.
�
Take the SmartKey with
KEYLESS-GO* with you when leaving
the vehicle.
.
3rd brake lamp
The high mounted brake lamp is malfunc-
tioning.
�
Visit an authorized Mercedes-Benz
Center as soon as possible.
Brake lamp
Drive to workshop
Stop lamp illumination is delayed or lamp
is permanently on.
�
Visit an authorized Mercedes-Benz
Center as soon as possible.
Brake lamp, left
The left brake lamp is malfunctioning.
�
Visit an authorized Mercedes-Benz
Center as soon as possible.
Brake lamp, right
The right brake lamp is malfunctioning.
�
Visit an authorized Mercedes-Benz
Center as soon as possible.
Display malfunction
Visit workshop
The display for the lamps or the system is
malfunctioning.
�
Visit an authorized Mercedes-Benz
Center as soon as possible.
Front foglamp, left
The left front fog lamp is malfunctioning.
�
Replace the bulb as soon as possible.
Front foglamp, right
The right front fog lamp is malfunctioning.
�
Replace the bulb as soon as possible.
Page 414 of 498
.
�
Turn the steering w")
412 Practical hintsFlat tire
Preparing the vehicle�
Park the vehicle as far as possible from
moving traffic on a hard surface.
�
Turn on the hazard warning flasher
(�page 131).
�
Turn the steering wheel so that the
front wheels are in a straight ahead
position.
�
Set the parking brake (
�page 55).
�
Move the gear selector lever toP.
Vehicles with SmartKey:
�
Turn off the engine (
�page 56).
�
Remove the SmartKey from the starter
switch.Vehicles with SmartKey with
KEYLESS-GO*:
�
Turn off the engine by pressing the
KEYLESS-GO* start/stop button on the
gear selector lever once (
�page 57).
�
Open the driver’s door (this puts the ig-
nition in position0, same as with the
SmartKey removed from the starter
switch). The driver’s door then can be
closed again.
�
Have any passenger exit the vehicle at
a safe distance from the roadway.
Warning!
G
The dimensions of the spare wheel
(Minispare or collapsible tire) are different
from those of the road wheels. As a result,
the vehicle handling characteristics change
when driving with a spare wheel mounted.
Adapt your driving style accordingly.
The spare wheel is for temporary use only.
When driving with spare wheel mounted,
ensure proper tire pressure and do not ex-
ceed a vehicle speed of 50 mph (80 km/h).
Drive to the nearest Mercedes-Benz Center
as soon as possible to have the spare wheel
replaced with a regular road wheel.
Never operate the vehicle with more than
one spare wheel mounted.
iOpen door only when conditions are
safe to do so.
Page 416 of 498
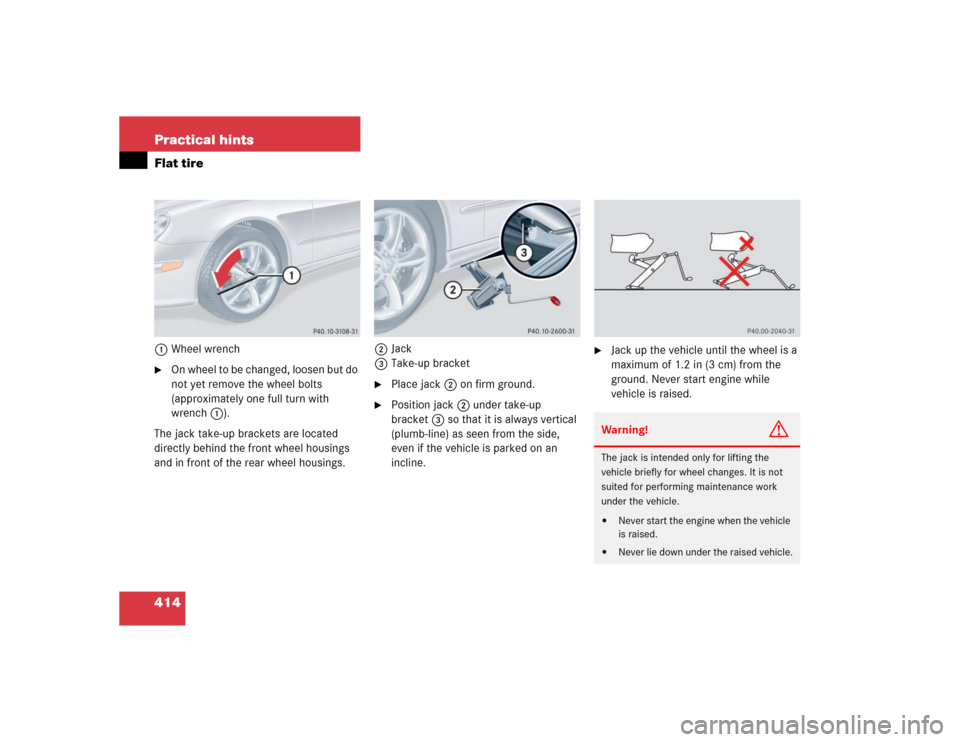
414 Practical hintsFlat tire1Wheel wrench�
On wheel to be changed, loosen but do
not yet remove the wheel bolts
(approximately one full turn with
wrench 1).
The jack take-up brackets are located
directly behind the front wheel housings
and in front of the rear wheel housings.2Jack
3Take-up bracket
�
Place jack2 on firm ground.
�
Position jack2 under take-up
bracket3 so that it is always vertical
(plumb-line) as seen from the side,
even if the vehicle is parked on an
incline.
�
Jack up the vehicle until the wheel is a
maximum of 1.2 in (3 cm) from the
ground. Never start engine while
vehicle is raised.Warning!
G
The jack is intended only for lifting the
vehicle briefly for wheel changes. It is not
suited for performing maintenance work
under the vehicle.�
Never start the engine when the vehicle
is raised.
�
Never lie down under the raised vehicle.
Page 422 of 498

420 Practical hintsBatteryThe battery is located in the engine
compartment on the right hand side.
1Clamps
Removing filter box:�
Release clamps1.
�
Remove filter box.
Installing filter box:
�
Insert filter box properly.
�
Secure it with clamps1.
Warning!
G
Failure to follow these instructions can re-
sult in severe injury or death.
Observe all safety instructions and
precautions when handling automotive
batteries (
�page 314).
Never lean over batteries while connecting,
you might get injured.
Battery fluid contains sulfuric acid. Do not
allow this fluid to come in contact with eyes,
skin or clothing. In case it does, immediately
flush affected area with water and seek
medical help if necessary.
A battery will also produce hydrogen gas,
which is flammable and explosive. Keep
flames or sparks away from battery, avoid
improper connection of jumper cables,
smoking, etc.
!Never loosen or detach battery termi-
nal clamps while the engine is running
or the SmartKey is in the starter switch.
Otherwise the alternator and other
electronic components could be se-
verely damaged.
Have the battery checked regularly by
an authorized Mercedes-Benz Center.
Refer to Maintenance Booklet for
maintenance intervals or contact an
authorized Mercedes-Benz Center for
further information.Warning!
G
Do not place metal objects on the battery as
this could result in a short circuit.
Use leak-proof battery only to avoid the risk
of acid burns in the event of an accident.
Page 423 of 498
421 Practical hints
Battery
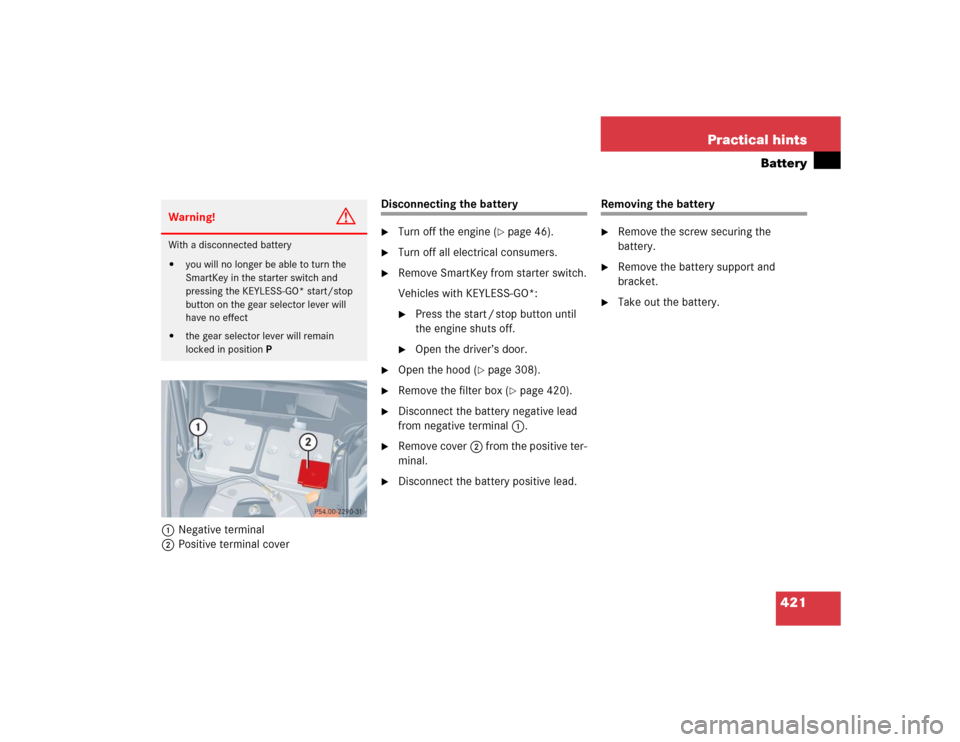
1Negative terminal
2Positive terminal cover
Disconnecting the battery�
Turn off the engine (
�page 46).
�
Turn off all electrical consumers.
�
Remove SmartKey from starter switch.
Vehicles with KEYLESS-GO*:�
Press the start / stop button until
the engine shuts off.
�
Open the driver’s door.
�
Open the hood (
�page 308).
�
Remove the filter box (
�page 420).
�
Disconnect the battery negative lead
from negative terminal1.
�
Remove cover2 from the positive ter-
minal.
�
Disconnect the battery positive lead.
Removing the battery�
Remove the screw securing the
battery.
�
Remove the battery support and
bracket.
�
Take out the battery.
Warning!
G
With a disconnected battery�
you will no longer be able to turn the
SmartKey in the starter switch and
pressing the KEYLESS-GO* start/stop
button on the gear selector lever will
have no effect
�
the gear selector lever will remain
locked in positionP