Page 158 of 498

156 Controls in detailControl systemSetting locator lighting
With the locator lighting feature activated
and the exterior lamp switch in
positionU, the following lamps will
switch on when the vehicle is unlocked
with the SmartKey during darkness:�
Parking lamps
�
Tail lamps
�
License plate lamps
�
Side marker lamps
�
Front fog lamps
The locator lighting switches off when the
driver’s door is opened.
If you do not open a door after unlocking
with the SmartKey the lamps will switch off
automatically after approximately
40 seconds.
To activate locator lighting:
�
Make sure the function surround light-
ing is set to
on, see (
�page 156).
�
Move the selection marker with
buttonæ orç to the
Lighting
submenu.
�
Press buttonj ork repeatedly
until the message
Function Surround
lighting
appears in the multifunction
display.
The selection marker is on the current
setting.
�
Press buttonæ orç to switch
the locator lighting function
On.
�
Turn the exterior lamp switch to
position U when exiting the vehicle
(�page 124).
The locator lighting feature is
activated.Setting night security illumination
(Headlamps delayed shut-off)
Use this function to set whether and how
long you would like the exterior lamps to
illuminate during darkness after exiting the
vehicle and all doors closed.
With the delayed shut-off feature activated
and the exterior lamp switch in
positionU before the engine is turned
off, the following lamps will switch on after
you have removed the SmartKey from the
starter switch:
�
Parking lamps
�
Tail lamps
�
License plate lamps
�
Side marker lamps
�
Front fog lamps
If you do not open a door after removing
the SmartKey from the starter switch, the
lamps will switch off automatically after
approximately 60 seconds.
Page 159 of 498

157 Controls in detail
Control system
�
Move the selection marker with
buttonæ orç to the
Lighting
submenu.
�
Press buttonj ork repeatedly
until the message
Headlamps delayed
shut-off
appears in the multifunction
display.
The selection marker is on the current
setting.
�
Pressæ orç to select the de-
sired lamp-on period.You can select:
�
0 s
, the delayed shut-off feature is
deactivated
�
15 s
, 30 s
, 45 s
or
60 s
, the delayed
shut-off feature is activated
�
Turn the exterior lamp switch to
position U before tuning off the
engine (
�page 124).
The headlamps delayed shut-off
feature is activated.
You can temporarily deactivate the de-
layed shut-off feature:
�
Before leaving the vehicle, turn the
SmartKey in the starter switch to
position0.
�
Then turn it to position2 and back
to0.
The delayed shut-off feature is
deactivated. It will reactivate as soon
as you reinsert the SmartKey in the
starter switch.Setting interior lighting delayed shut-off
Use this function to set whether and how
long you would like the interior lighting to
remain lit during darkness after you have
removed the SmartKey from the starter
switch.
�
Move the selection marker with
buttonæ orç to the
Lighting
submenu.
�
Press buttonj ork repeatedly
until the message
Interior lamp de-
layed shut-off appears in the
multifunction display.
The selection marker is on the current
setting.
�
Pressæ orç to select the de-
sired lamp-on time period.
iYou can reactivate this function within
ten minutes by opening a door.
��
Page 160 of 498

158 Controls in detailControl system
You can select:�
0 s
, the delayed shut-off feature is
deactivated.
�
5 s
, 10 s
, 15 s
or
20 s
, the interior
lighting delayed shut-off feature is
activated with the desired lamp-on
period.
Vehicle submenu
Access the
Vehicle
submenu via the
Settings
menu. Use the
Vehicle
submenu
to make general vehicle settings.
The following functions are available:Setting automatic locking
Use this function to activate or deactivate
the automatic central locking. With the
automatic central locking system
activated, the vehicle is centrally locked at
vehicle speeds of approximately 9 mph
(15 km/h).
�
Move the selection marker with
buttonæ orç to the
Vehicle
submenu.
�
Press buttonj ork repeatedly
until the message
Automatic door
lock
appears in the multifunction
display.
The selection marker is on the current
setting.
�
Press buttonæ orç to switch
the automatic central locking
on or
off
.Convenience submenu
Access the
Convenience
submenu via the
Settings
menu. Use the
Convenience
sub-
menu to change the settings for a number
of convenience features.
The following functions are available:
Function
Page
Setting automatic locking
158
Function
Page
Activating easy-entry/exit
feature
159
Setting key-dependency
160
Setting parking position for exte-
rior rear view mirror
160
��
Page 180 of 498
178 Controls in detailGood visibilityFor information on the windshield wipers,
see “Windshield wipers” (
�page 52).
Headlamp cleaning system*
The switch is located on the left side of the
dashboard.
1Headlamp washer switch
�
Switch on ignition (
�page 36).
�
Press switch1.
The headlamps are cleaned with a
high-pressure water jet.
For information on filling up the washer
reservoir, see “Windshield washer system
and headlamp cleaning system*”
(
�page 454).
Rear view mirrors
For more information on setting the rear
view mirrors, see “Mirrors” (
�page 41).
Auto-dimming rear view mirrors
The reflection brightness of the exterior
rear view mirror on the driver’s side and
the interior rear view mirror will respond
automatically to glare when
�
the ignition is switched on,
and
�
incoming light from headlamps falls on
the sensor in the interior rear view
mirror.
The rear view mirror will not react if
�
reverse gearR is engaged
�
the interior lighting is turned on
Page 182 of 498

180 Controls in detailGood visibilityActivating exterior rear view mirror
parking position
Follow these steps to activate the mirror
parking position so that the
passenger-side exterior rear view mirror
will be turned downward to the stored
position.
The buttons are located above the exterior
lamp switch.
1Driver’s side exterior rear view mirror
button
2Passenger-side exterior rear view
mirror button
�
Make sure you have stored a parking
position for the passenger-side exterior
rear view mirror (
�page 123).
�
Make sure the
Mirror adjustment
parking aid function
in the
Convenience
submenu of the control
system is switched to
on (�page 160).
�
Switch on ignition (
�page 36).
�
Press button2 for the passenger-side
exterior rear view mirror.
�
Place the gear selector lever in reverse
gearR.
The passenger-side exterior rear view
mirror will be turned downward to the
stored position.The exterior rear view mirror returns to its
previously stored driving position:
�
ten seconds after you put the gear se-
lector lever out of positionR
�
immediately once your vehicle exceeds
a speed of approx. 6 mph (10 km/h)
�
immediately when you press button1
for the driver’s side mirror.
Page 183 of 498
181 Controls in detail
Good visibility
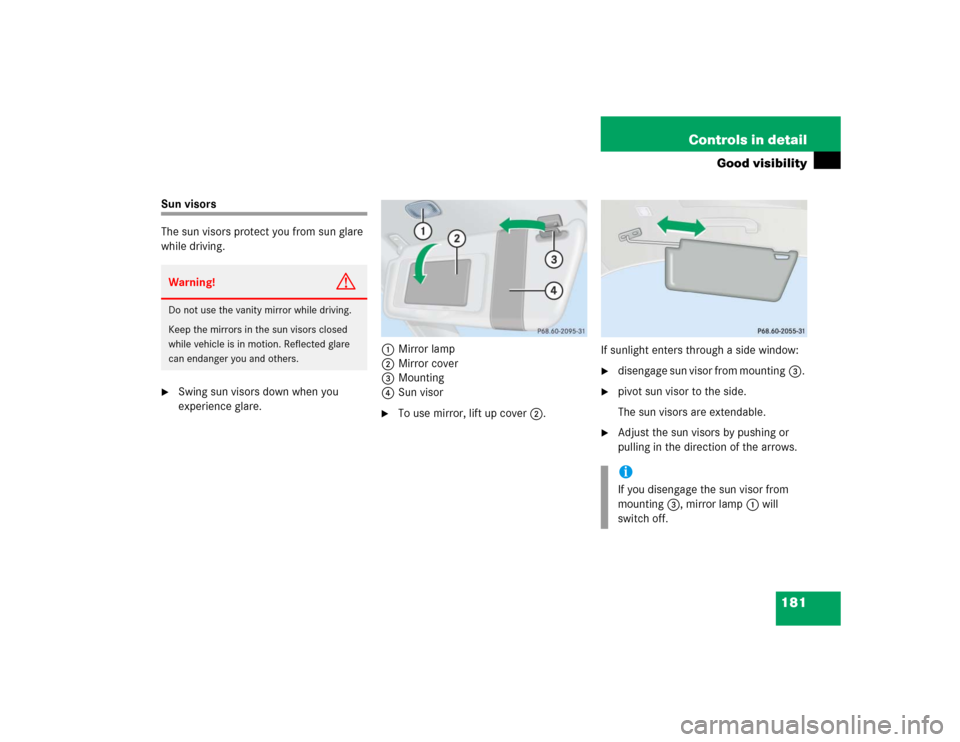
Sun visors
The sun visors protect you from sun glare
while driving.�
Swing sun visors down when you
experience glare.1Mirror lamp
2Mirror cover
3Mounting
4Sun visor
�
To use mirror, lift up cover2.If sunlight enters through a side window:
�
disengage sun visor from mounting3.
�
pivot sun visor to the side.
The sun visors are extendable.
�
Adjust the sun visors by pushing or
pulling in the direction of the arrows.
Warning!
G
Do not use the vanity mirror while driving.
Keep the mirrors in the sun visors closed
while vehicle is in motion. Reflected glare
can endanger you and others.
iIf you disengage the sun visor from
mounting3, mirror lamp1 will
switch off.
Page 185 of 498

183 Controls in detail
Good visibility
Rear window defroster
The rear window defroster uses a large
amount of power. To keep the battery
drain to a minimum, switch off the
defroster as soon as the rear window is
clear. The defroster is automatically
deactivated after approximately
6 to 17 minutes of operation depending on
the outside temperature.Activating
�
Press buttonF or1 in the
climate control panel (
�page 195) or
in automatic climate control panel
(
�page 195).
The indicator lamp on the button
comes on.
Deactivating
�
Press buttonF or1 again.
The indicator lamp on the button goes
out.
Warning!
G
Any accumulation of snow and ice should be
removed from the rear window before
driving. Visibility could otherwise be
impaired, endangering you and others.!If the rear window defroster switches
off too soon and the indicator lamp
starts flashing, this means that too
many electrical consumers are
operating simultaneously and there is
insufficient voltage in the battery. The
system responds automatically by
deactivating the rear window defroster.
As soon as the battery has sufficient
voltage, the rear window defroster
automatically switches on again.
Page 190 of 498
Increasing�
Turn temperature control2 or3
(�page 185) slightly to the right.
The climate control system will corre-
spondingly adjust the interior air t")
188 Controls in detailClimate control (CLK 320)Increasing�
Turn temperature control2 or3
(�page 185) slightly to the right.
The climate control system will corre-
spondingly adjust the interior air tem-
perature.
Decreasing
�
Turn temperature control2 or3
(�page 185) slightly to the left.
The climate control system will corre-
spondingly adjust the interior air tem-
perature.
Adjusting air distribution and volume
Use air distribution control4
(�page 185) to adjust the air distribution.
The following symbols are found on the
controls:
Use the air volume control1
(�page 185) to adjust the air volume. You
can select between six air volume speeds.Adjusting manually
�
Press buttonU (
�page 185).
The indicator lamp on the button goes
out.
�
Select any of the six air volume speeds
and the air distribution.
Adjusting automatically
�
Press buttonU (
�page 185).
The indicator lamp on the button
comes on. The temperature, air distri-
bution and volume are adjusted auto-
matically.
Symbol
Function
Z
Directs air to the windshield
and the side defroster vents
b
Directs air into the entire
vehicle interior
Y
Directs air to the footwells
a
Directs air through the center,
side and rear passenger
compartment air vents