Page 97 of 498

95 Controls in detail
Locking and unlocking
Warning!
G
When leaving the vehicle, always remove the
SmartKey from the starter switch, take it
with you, and lock the vehicle. Do not leave
children unattended in the vehicle, or with
access to an unlocked vehicle. It is possible
for children to open a locked door from the
inside, which could result in an accident
and/or serious injury.!To prevent possible malfunction, avoid
exposing the SmartKey to high levels of
electromagnetic radiation.
iUSA only:
This device complies with Part 15 of
the FCC Rules. Operation is subject to
the following two conditions:
(1) This device may not cause harmful
interference, and
(2) this device must accept any inter-
ference received, including interfer-
ence that may cause undesired
operation.
Any unauthorized modification to this
device could void the user’s authority
to operate the equipment.
iCanada only:
This device complies with RSS-210 of
Industry Canada. Operation is subject
to the following two conditions:
(1) This device may not cause interfer-
ence, and
(2) this device must accept any inter-
ference received, including interfer-
ence that may cause undesired
operation of the device.
Any unauthorized modification to this
device could void the user’s authority
to operate the equipment.iYou can also open and close the power
windows (
�page 249) and power
tilt/sliding sunroof* (
�page 253)
using the SmartKey.
Page 101 of 498

99 Controls in detail
Locking and unlocking
SmartKey with KEYLESS-GO*
Vehicles equipped with KEYLESS-GO come
with two SmartKeys with KEYLESS-GO,
each with remote control and a removable
mechanical key. The locking tabs for the
mechanical key portion of the two
SmartKeys are a different color to help dis-
tinguish each SmartKey unit.
The KEYLESS-GO function is integrated
into the SmartKey. On these vehicles, the
validity of the SmartKey with KEYLESS-GO
is checked every time you pull a door
handle.
If the SmartKey with KEYLESS-GO is valid,
your vehicle unlocks�
the doors
�
the trunk lid
�
the fuel filler flap
SmartKey with remote controls1‹ Lock button
2Š Opening button for trunk lid
3Mechanical key locking tab
4ΠUnlock button
5Battery check lamp
6Â Panic button (
�page 83)
For more information on using the
SmartKey buttons, see “SmartKey”
(
�page 94) iWhen the passenger outside door han-
dle is pulled, the vehicle is centrally un-
locked.
Warning!
G
When leaving the vehicle, always take the
SmartKey with KEYLESS-GO* with you, and
lock the vehicle. Do not leave children unat-
tended in the vehicle, or with access to an
unlocked vehicle. Unsupervised use of vehi-
cle equipment may cause an accident
and/or serious personal injury.!To prevent possible malfunction, avoid
exposing the SmartKey with
KEYLESS-GO to high levels of electro-
magnetic radiation.iYou can also open and close the power
windows (
�page 249) and power
tilt/sliding sunroof* (
�page 253) us-
ing the SmartKey.
Page 108 of 498
106 Controls in detailLocking and unlocking
Opening the trunk
Opening the trunk from outside
(vehicles without KEYLESS-GO*)
A minimum height clearance of 5.71 ft
(1.74 m) is required to open the trunk lid.
The handle is located in the rear license
plate recess.
1Handle
�
Pull on handle1.
The trunk lid unlocks and begins to
open.
The trunk can also be opened using
buttonŠ on the SmartKey or from its
inside in an emergency, see “Trunk lid
emergency release” (
�page 109).
iIf you open a door, the side windows on
that side of the vehicle will lower slight-
ly. The windows close again when you
close the door.
iThe vehicle must be unlocked.!The trunk lid swings open upwards au-
tomatically. Always make sure there is
sufficient overhead clearance.
Page 181 of 498

179 Controls in detail
Good visibility
Warning!
G
The auto-dimming function does not react if
incoming light is not aimed directly at sen-
sors in the interior rear view mirror.
The interior rear view mirror and the exterior
rear view mirror on the driver’s side do not
react, for example, if the rear window sun
shade* is in raised position.
Glare can endanger you and others.
Warning!
G
In the case of an accident, liquid electrolyte
may escape from the mirror housing if the
mirror glass breaks.
Electrolyte has an irritating effect. Do not
allow the liquid to come into contact with
eyes, skin, clothing, or respiratory system.
In case it does, immediately flush affected
area with water, and seek medical help if
necessary.!Electrolyte drops coming into contact
with the vehicle paint finish can be
completely removed only while in the
liquid state and by applying plenty of
water.
Warning!
G
Exercise care when using the passen-
ger-side exterior rear view mirror. The mirror
surface is convex (outwardly curved surface
for a wider field of view). Objects in mirror
are closer than they appear. Check your
interior rear view mirror or glance over your
shoulder before changing lanes.
Page 183 of 498
181 Controls in detail
Good visibility
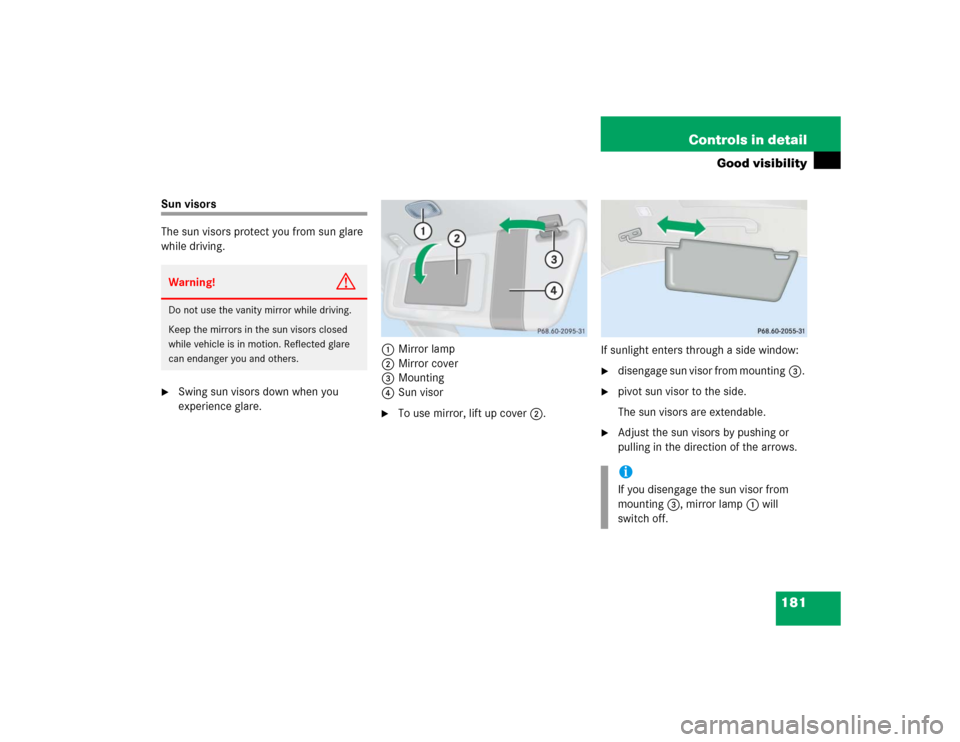
Sun visors
The sun visors protect you from sun glare
while driving.�
Swing sun visors down when you
experience glare.1Mirror lamp
2Mirror cover
3Mounting
4Sun visor
�
To use mirror, lift up cover2.If sunlight enters through a side window:
�
disengage sun visor from mounting3.
�
pivot sun visor to the side.
The sun visors are extendable.
�
Adjust the sun visors by pushing or
pulling in the direction of the arrows.
Warning!
G
Do not use the vanity mirror while driving.
Keep the mirrors in the sun visors closed
while vehicle is in motion. Reflected glare
can endanger you and others.
iIf you disengage the sun visor from
mounting3, mirror lamp1 will
switch off.
Page 184 of 498
.
Always raise the sunshade fully fo")
182 Controls in detailGood visibilityRear window sunshade*
The switch is located in the center console.
1Rear window sunshade switch�
Switch on ignition (
�page 36).
Always raise the sunshade fully for its sup-
port against the window frame.Raising the sunshade
�
Press switch1 briefly.
The sunshade is raised completely.
Stopping the raising procedure
�
Press switch1 again.
The sunshade stops.
Lowering the sunshade
�
Press switch1 briefly.
The sunshade is lowered completely.
Stopping the lowering procedure
�
Press switch1 again.
The sunshade stops.
!Make sure that the movement of the
rear window sunshade is not restricted
by objects on the rear window shelf.
Otherwise, the sunshade or the objects
could be damaged.
Warning!
G
When operating the rear window sunshade,
make sure there is no danger of anyone be-
ing harmed by the raising or lowering
procedure.
The raising or lowering procedure can be
immediately halted by briefly pressing the
switch
1
.
Briefly press switch
1
again to raise or low-
er the rear window sunshade completely.
Warning!
G
When leaving the vehicle, always remove the
SmartKey or SmartKey with KEYLESS-GO*
from the starter switch, take it with you, and
lock the vehicle. Do not leave children unat-
tended in the vehicle, or with access to an
unlocked vehicle. Unsupervised use of vehi-
cle equipment may cause an accident
and/or serious personal injury.
Page 185 of 498

183 Controls in detail
Good visibility
Rear window defroster
The rear window defroster uses a large
amount of power. To keep the battery
drain to a minimum, switch off the
defroster as soon as the rear window is
clear. The defroster is automatically
deactivated after approximately
6 to 17 minutes of operation depending on
the outside temperature.Activating
�
Press buttonF or1 in the
climate control panel (
�page 195) or
in automatic climate control panel
(
�page 195).
The indicator lamp on the button
comes on.
Deactivating
�
Press buttonF or1 again.
The indicator lamp on the button goes
out.
Warning!
G
Any accumulation of snow and ice should be
removed from the rear window before
driving. Visibility could otherwise be
impaired, endangering you and others.!If the rear window defroster switches
off too soon and the indicator lamp
starts flashing, this means that too
many electrical consumers are
operating simultaneously and there is
insufficient voltage in the battery. The
system responds automatically by
deactivating the rear window defroster.
As soon as the battery has sufficient
voltage, the rear window defroster
automatically switches on again.
Page 187 of 498
185 Controls in detail
Climate control (CLK 320)
Depending on production date, your vehi-
cle is equipped with either climate control
panel design A or B.Climate control panel design A
Climate control panel design B
Item
1
Left side air vent, adjustable
2
Thumbwheel for air volume control
for center air vents
3
Right side air vent, adjustable
4
Climate control panel
5
Right center air vent, adjustable
6
Thumbwheel for air volume control
for right side center air vent
7
Thumbwheel for air volume control
for left side center air vent
8
Left center air vent, adjustableiFor draft-free ventilation, move the
sliders for the side air vents1 and3
and center air vents5 and 8 to the
middle position.
Item
1
Air volume control
2
Left side temperature control
3
Right side temperature control
4
Air distribution control
5
Rear window defroster
6
AC cooling on/off (AC
OFF
or A/C)
7
Air distribution and air volume
(automatic mode)
8
Air recirculation
9
Defrosting

A minimum height clearance of 5.71 ft
(1.74 m) is required to open the tr")

Depending on production date, your vehi-
cle is equipped with either climate control
panel design A or B.Climate control panel design A
Climate contro")