Page 172 of 498

170 Controls in detailAutomatic transmission
Automatic shift program
The program mode selector switch is
located on the lower part of the center
console.
1Program mode selector switch
C Comfort For comfort driving
S Sport For standard driving
The current gear selector lever position
and the selected program mode (
C/S) are
indicated in the multifunction display
(
�page 166).
!Coasting the vehicle, or driving for any
other reason with gear selector lever
inN can result in transmission damage
that is not covered by the
Mercedes-Benz Limited Warranty.Warning!
G
Getting out of your vehicle with the gear
selector lever not fully engaged in positionP
is dangerous. Also, positionP alone is not
intended to or capable of preventing your
vehicle from moving, possibly hitting people
or objects.
Always set the parking brake in addition to
shifting to positionP (page 54).
When parked on an incline, turn the front
wheels towards the road curb.
Do not park this vehicle in areas where
combustible materials such as grass, hay or
leaves can come into contact with the hot
exhaust system, as these materials could be
ignited and cause a vehicle fire.
Warning!
G
When leaving the vehicle, always remove the
SmartKey or SmartKey with KEYLESS-GO*
from the starter switch, take it with you, and
lock the vehicle. Do not leave children unat-
tended in the vehicle, or with access to an
unlocked vehicle. Children could move the
gear selector lever from positionP, which
could result in an accident and/or serious
personal injury.
Page 178 of 498

176 Controls in detailAutomatic transmissionThe program mode selector switch is
located on the lower part of the center
console.
1Program mode selector switch
M Manual For manual gear shifting
C Comfort For comfort driving
S Sport For standard driving
The current gear selector lever position
and the selected program mode (
M/C/S)
are indicated in the multifunction display
(
�page 166).Activating manual shift program
�
Press program mode selector
switch1 repeatedly until the
M for
manual program modeM appears in
the multifunction display.
The transmission switches to the
manual program modeM. Automatic
shifting is switched off. The gear range
is not limited.
You can change the gears manually when
the gear selector lever is in positionD. You
can upshift or downshift through the gears
in succession.Downshifting
�
Briefly press the gear selector lever to
the left in theD-direction
(�page 167).
or
�
Press button1 on the left side of the
steering wheel (
�page 174).
The transmission shifts to the next
lower gear.
Warning!
G
On slippery road surfaces, never downshift
in order to obtain braking action. This could
result in drive wheel slip and reduced
vehicle control. Your vehicle’s ABS will not
prevent this type of loss of control.iWhen you brake or stop, the transmis-
sion shifts down to a gear from which
you can easily accelerate or take off.
Page 184 of 498
.
Always raise the sunshade fully fo")
182 Controls in detailGood visibilityRear window sunshade*
The switch is located in the center console.
1Rear window sunshade switch�
Switch on ignition (
�page 36).
Always raise the sunshade fully for its sup-
port against the window frame.Raising the sunshade
�
Press switch1 briefly.
The sunshade is raised completely.
Stopping the raising procedure
�
Press switch1 again.
The sunshade stops.
Lowering the sunshade
�
Press switch1 briefly.
The sunshade is lowered completely.
Stopping the lowering procedure
�
Press switch1 again.
The sunshade stops.
!Make sure that the movement of the
rear window sunshade is not restricted
by objects on the rear window shelf.
Otherwise, the sunshade or the objects
could be damaged.
Warning!
G
When operating the rear window sunshade,
make sure there is no danger of anyone be-
ing harmed by the raising or lowering
procedure.
The raising or lowering procedure can be
immediately halted by briefly pressing the
switch
1
.
Briefly press switch
1
again to raise or low-
er the rear window sunshade completely.
Warning!
G
When leaving the vehicle, always remove the
SmartKey or SmartKey with KEYLESS-GO*
from the starter switch, take it with you, and
lock the vehicle. Do not leave children unat-
tended in the vehicle, or with access to an
unlocked vehicle. Unsupervised use of vehi-
cle equipment may cause an accident
and/or serious personal injury.
Page 195 of 498
193 Controls in detail
Climate control (CLK 320)
Rear passenger compartment adjustable air vents
The air conditioning for the rear passenger
compartment is controlled via the climate
control panel (
�page 185).The air vents for the rear passenger
compartment are located in the rear
center console.
1Thumbwheel for air volume control for
center air vents
2Left center air vent
3Right center air ventAdjusting air distribution
�
Push the slide for the left center
vent2 or right center vent3 to the
left, right, up or down.
The air flow is directed in the corre-
sponding direction.
Adjusting air volume
�
Turn thumbwheel1 t o t h e l e f t o r r i g h t .
The air volume is increased or
decreased.
iThe temperature at the center air vents
for the rear passenger
compartment2 and3 is the same as
at the dashboard center air vents.
iFor draft-free ventilation, push
slides2 and3 upward.
Page 208 of 498
206 Controls in detailAutomatic climate control (CLK 500/CLK 55 AMG)Rear passenger compartment adjustable air vents
The air conditioning for the rear passenger
compartment is controlled via the auto-
matic climate control panel (
�page 195).The air vents for the rear passenger
compartment are located in the rear
center console.
1Thumbwheel for air volume control for
center air vents
2Left center air vent
3Right center air ventAdjusting air distribution
�
Push the slide for the left center
vent2 or right center vent3 to the
left, right, up or down.
The air flow is directed in the corre-
sponding direction.
Adjusting air volume
�
Turn thumbwheel1 t o t he l e f t o r r i g h t .
The air volume is increased or de-
creased.
iThe temperature at the center air vents
for the rear passenger
compartment2 and3 i s t h e s a m e a s
at the dashboard center air vents.
iFor draft-free ventilation, push
slides2 and3 upward.
Page 265 of 498

263 Controls in detail
Driving systems
Switching the Parktronic system
on/off
The Parktronic system can be switched off
manually.
The Parktronic switch is located in the up-
per part of the center console (
�page 27).
1Parktronic switch
2Indicator lamp
Switching off the Parktronic system
�
Press Parktronic switch1.
Indicator lamp2 comes on.Switching on the Parktronic system
�
Press Parktronic switch1 again.
Indicator lamp2 goes out.
Parktronic system malfunction
If only the red distance segments illumi-
nate and a acoustic warning sounds, there
is a malfunction in the Parktronic system.
The Parktronic system will automatically
switch off after 20 seconds and the indica-
tor lamp in the Parktronic switch comes
on.
�
Have the Parktronic system checked
by an authorized Mercedes-Benz
Center as soon as possible.If only the red distance segments illumi-
nate and no acoustic warning sounds, the
Parktronic system sensors are dirty or
there is an interference from other radio or
ultrasonic signals. The Parktronic system
will automatically switch off after 20 sec-
onds and the indicator lamp in the Park-
tronic switch comes on.
�
Switch off the ignition.
�
Clean the Parktronic system sensors
(�page 350).
�
Switch on the ignition.
or
�
Check the Parktronic system operation
at another location to rule out interfer-
ence from outside radio or ultrasonic
signals.
iThe Parktronic system is automatically
switched on when the ignition is
switched on (
�page 36).
Page 278 of 498
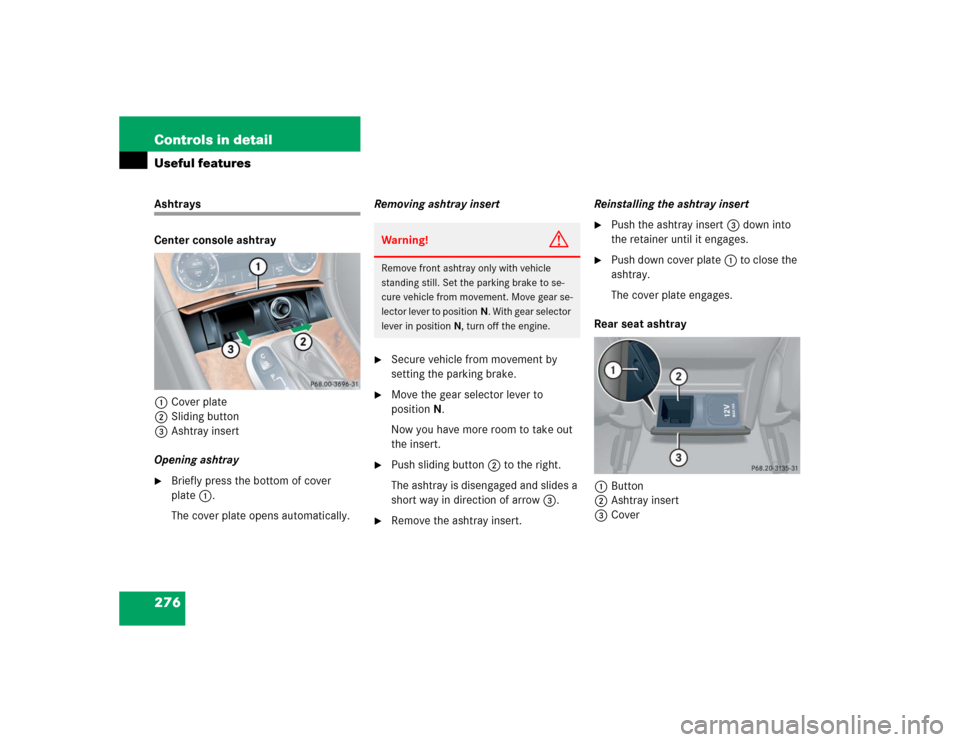
276 Controls in detailUseful featuresAshtrays
Center console ashtray
1Cover plate
2Sliding button
3Ashtray insert
Opening ashtray�
Briefly press the bottom of cover
plate1.
The cover plate opens automatically.Removing ashtray insert
�
Secure vehicle from movement by
setting the parking brake.
�
Move the gear selector lever to
positionN.
Now you have more room to take out
the insert.
�
Push sliding button2 to the right.
The ashtray is disengaged and slides a
short way in direction of arrow3.
�
Remove the ashtray insert.Reinstalling the ashtray insert
�
Push the ashtray insert 3 down into
the retainer until it engages.
�
Push down cover plate 1 to close the
ashtray.
The cover plate engages.
Rear seat ashtray
1Button
2Ashtray insert
3Cover
Warning!
G
Remove front ashtray only with vehicle
standing still. Set the parking brake to se-
cure vehicle from movement. Move gear se-
lector lever to positionN. With gear selector
lever in positionN, turn off the engine.
Page 362 of 498
360 Practical hintsWhat to do if …?Lamp in center consoleProblem
Possible cause
Suggested solution
56
The front passenger front air bag
off indicator lamp illuminates
and remains illuminated with the
weight of a typical adult or some-
one larger than a small individual
on the front passenger seat.
The system is malfunctioning.
�
Have the system checked as soon as
possible by an authorized
Mercedes-Benz Center.
�
Also note any messages in the multi-
function display and follow corrective
steps (
�page 368).
Warning!
G
If the 56 lamp illuminates and re-
mains illuminated with the weight of a typi-
cal adult or someone larger than a small
individual on the front passenger seat, do
not have any passenger use the front
passenger seat until the system has been
repaired.

Rear passenger compartment adjustable air vents
The air conditioning for the rear passenger
compartment is controlled via the climate
control panel (")
Rear passenger compartment adjustable air vents
The air conditioning for the rear passenger
compartment is controlled via the auto-")