Page 269 of 498

267 Controls in detail
Loading
Removal of ski sack
You can remove the ski sack for cleaning
or drying.
1Button
2Ski sack frame
3Flap�
Open trunk lid.
�
Press button1.
The flap3 opens downward.
�
Press button1 firmly until ski sack
frame2 is released.
�
Pull ski sack frame2 with ski sack
out.Installing the ski sack
Install the ski sack in the reverse order.
�
Push ski sack frame2 with ski sack
inward until the ski sack frame snaps
into place.
�
Close flap3.
�
Close trunk lid.
Split rear bench seat
To expand the cargo area, you can fold
down the left and right rear seat backrests.
The two sections can be folded down sep-
arately.
Warning!
G
Never drive vehicle with trunk open while
the ski sack is removed. Deadly carbon
monoxide (CO) gases may enter vehicle in-
terior, resulting in unconsciousness and
death.iTo prevent unauthorized persons from
access to the trunk, always close the
flap.
Warning!
G
When expanding the luggage compartment,
always fold the seat cushions fully forward.
Unless you are transporting cargo, the back-
rests must remain properly locked in the up-
right position.
In an accident, during hard braking or sud-
den maneuvers, loose items will be thrown
around inside the vehicle, and cause injury
to vehicle occupants unless the items are
securely fastened in the vehicle.
Always use the cargo tie down rings
(�page 271).
Page 270 of 498
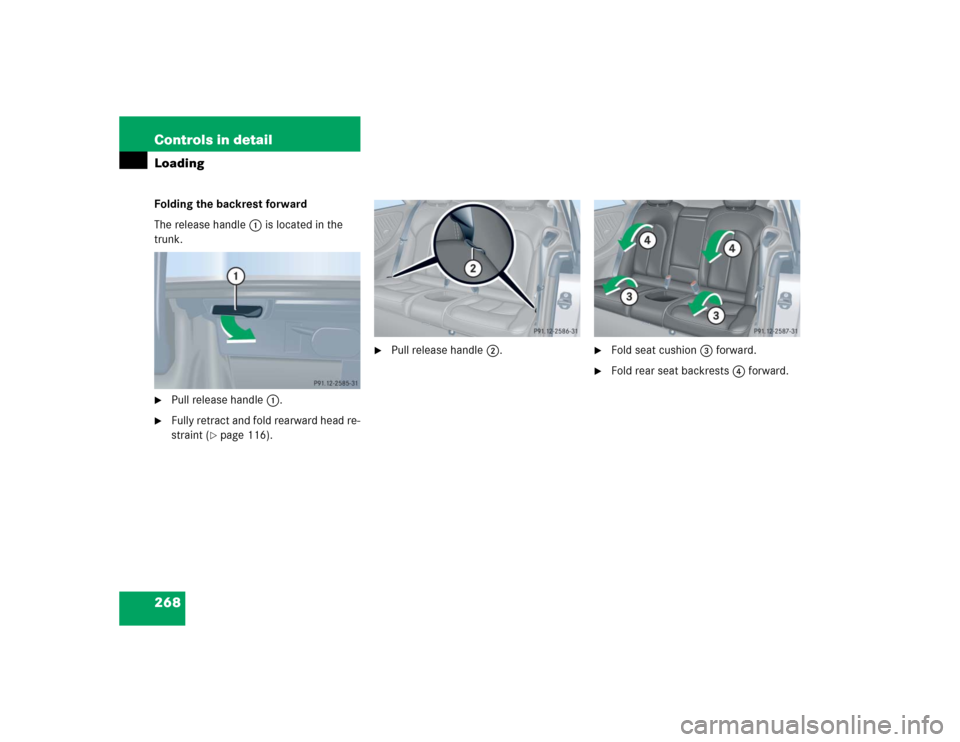
268 Controls in detailLoadingFolding the backrest forward
The release handle1 is located in the
trunk.�
Pull release handle1.
�
Fully retract and fold rearward head re-
straint (
�page 116).
�
Pull release handle2.
�
Fold seat cushion3 forward.
�
Fold rear seat backrests4 forward.
Page 401 of 498
399 Practical hints
Unlocking/locking in an emergency
2Locking�
Insert the mechanical key into the
driver’s door lock until it stops.
�
Turn the mechanical key clockwise to
position2.
The driver’s door is locked.
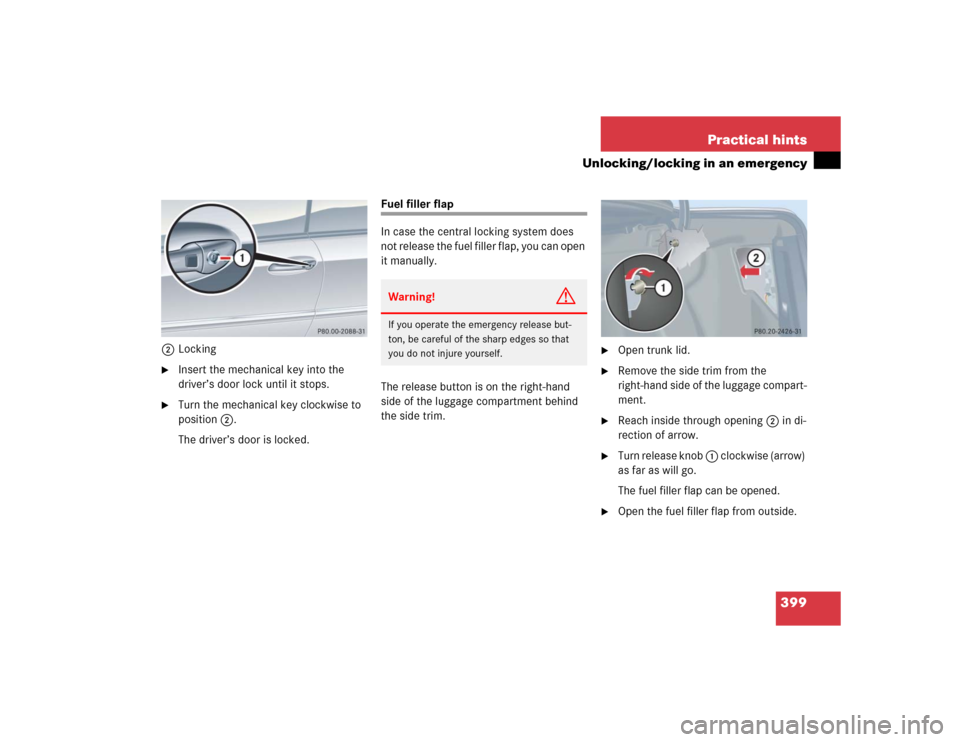
Fuel filler flap
In case the central locking system does
not release the fuel filler flap, you can open
it manually.
The release button is on the right-hand
side of the luggage compartment behind
the side trim.
�
Open trunk lid.
�
Remove the side trim from the
right-hand side of the luggage compart-
ment.
�
Reach inside through opening2 in di-
rection of arrow.
�
Turn release knob 1 clockwise (arrow)
as far as will go.
The fuel filler flap can be opened.
�
Open the fuel filler flap from outside.
Warning!
G
If you operate the emergency release but-
ton, be careful of the sharp edges so that
you do not injure yourself.
Page 419 of 498
.
1Flap
2On/off switch
3Electrical plug
4Air hose with pressure gauge and vent
screw
5Union nut
�
Open flap 1")
417 Practical hints
Flat tire
�
Take the electric air pump out of the
trunk (
�page 391).
1Flap
2On/off switch
3Electrical plug
4Air hose with pressure gauge and vent
screw
5Union nut
�
Open flap 1 on electric air pump.
�
Pull out electrical plug 3 and air hose
with pressure gauge 4.
�
Remove the valve cap from the
collapsible tire valve.
�
Screw air hose 4 onto the collapsible
tire valve.
�
Insert electrical plug 3 into vehicle
cigarette lighter socket.
�
Turn the SmartKey in the starter switch
to position1.
�
Press I on electric air pump switch 2.
The electric air pump should now
switch on and inflate the collapsible
tire.
�
Inflate the tire to approximately 36 psi
(2.5 bar).
This takes about five minutes for the
collapsible tire. Air hose 4 and union
nut5 can become hot duration infla-
tion. Exercise proper caution to avoid
burning yourself when using the equip-
ment.
�
Press 0 on electric air pump switch 2.
�
Turn the SmartKey in the starter switch
to position0.
�
If the tire pressure is above 36 psi
(2.5 bar), release excess tire pressure
using the vent screw.!Do not operate the electric air pump
longer than six minutes without inter-
ruption. Otherwise it may overheat.
You may operate the electric air pump
again after it has cooled off.
��
Page 489 of 498

CLK 320/CLK 500 427
CLK 55 AMG 428
Installing 427
Installing (CLK 55 AMG) 428
Towing the vehicle 425
Tracking services
For stolen vehicle 286
Traction 171,")
487 Index
Towing eye bolt (vehicle tool kit)
CLK 320/CLK 500 427
CLK 55 AMG 428
Installing 427
Installing (CLK 55 AMG) 428
Towing the vehicle 425
Tracking services
For stolen vehicle 286
Traction 171, 340, 460
Transmission see Automatic transmission
Traveling abroad 302
Tread 340
Tread depth 318
Tread depth (tires) 342
Treadwear indicators 340
Trip computer 160
Trip odometer
Resetting 135Trunk
Auxiliary fuse box 432
Closing 107
Lock button, KEYLESS-GO* 103
Message in display 388
Opening 106
Opening from inside vehicle 107
Tie-down rings 271
Trunk lid 106
Trunk lock 398
Unlocking with KEYLESS-GO* 104
Unlocking with SmartKey 98
Trunk lid emergency release 109
Turn signal lamps
Replacing bulbs 405
Turn signals 51
Additional in mirrors 404
Cleaning lenses 349
Front bulbs 404
Front bulbs (Bi-Xenon*) 409
Front bulbs (Halogen) 407
Indicator lamps 25
Rear bulbs 405, 410
Replacing bulbs 404
Turning off
Engine 56U
Uniform Tire Quality
Grading Standards 340
Units
Setting speedometer units 149
Setting temperature units 149
Unlocking 32, 94
Driver’s door in an emergency 397
Fuel filler flap 305
Gear selector lever manually 400
Global 96
Global with KEYLESS-GO* 101
In an emergency 397
Selective setting 96, 102
Trunk lid with KEYLESS-GO* 104
Trunk lid with SmartKey 98
Vehicle in an emergency 286
With KEYLESS-GO* 33
With the SmartKey 32