Page 254 of 498
.
Opening and closing the power
tilt/sliding sunroof
�
To open, close, raise, or lower the
tilt/sliding sunroof, mov")
252 Controls in detailPower tilt/sliding sunroof*
�
Switch on ignition (
�page 36).
Opening and closing the power
tilt/sliding sunroof
�
To open, close, raise, or lower the
tilt/sliding sunroof, move the sunroof
switch to resistance point in the
required direction of arrows1 to4.
Release the sunroof switch when the
tilt/sliding sunroof has reached the
desired position.Fully opening (Express-open) and
closing (Express-close) the power
tilt/sliding sunroof
�
To open or close the tilt/sliding
sunroof, move the sunroof switch past
the resistance point in the required
direction of arrow3 or4 and
release.
The tilt/sliding sunroof opens or closes
completely.
Stopping the power tilt/sliding sunroof
during Express-operation
�
Move the sunroof switch in any
direction.
When leaving the vehicle, always remove the
SmartKey or SmartKey with KEYLESS-GO*
from the starter switch, take it with you, and
lock the vehicle. Do not leave children
unattended in the vehicle, or with access to
an unlocked vehicle. Unsupervised use of
vehicle equipment can cause an accident
and/or serious personal injury.!To avoid damaging the seals, do not
transport any objects with sharp edges
which can stick out of the tilt/sliding
sunroof.
Do not open the tilt/sliding sunroof if
there is snow or ice on the roof, as this
could result in malfunctions.
The tilt/sliding sunroof can be opened
or closed manually should an electrical
malfunction occur (
�page 401).
iYou can also open or close the tilt/slid-
ing sunroof using the:�
SmartKey (summer opening/con-
venience feature) (
�page 249)
�
button, in the control panel of
the climate control (
�page 185) or
automatic climate control
(
�page 195)
�
buttone in the control panel of
the automatic climate control
(�page 195)
iIf the movement of the tilt/sliding
sunroof is blocked during the closing
procedure, the tilt/sliding sunroof will
stop and re-open slightly.
��
Page 300 of 498
 are required by
law. These indicators are located in six
places on the tread circumference and be-
come visible at a tread depth of")
298 OperationDriving instructions
TiresTreadwear indicators (TWI) are required by
law. These indicators are located in six
places on the tread circumference and be-
come visible at a tread depth of approxi-
mately
1/16 in (1.6 mm), at which point the
tire is considered worn and should be re-
placed.
The treadwear indicator appears as a solid
band across the tread.
Warning!
G
To reduce the risk of personal injury as a re-
sult of inadvertent vehicle movement, be-
fore turning off the engine and leaving the
vehicle always:�
Keep right foot firmly on brake pedal.
�
Firmly depress parking brake pedal.
�
Move the gear selector lever to
positionP.
�
Slowly release brake pedal.
�
When parked on an incline, turn front
wheels towards the road curb.
�
Turn the SmartKey in the starter switch
to position0 and remove the SmartKey
from the starter switch, or press
KEYLESS-GO* start/stop button
(vehicles with KEYLESS-GO*).
�
Take the SmartKey or the SmartKey with
KEYLESS-GO* with you and lock the
vehicle when leaving.
Warning!
G
If you feel a sudden significant vibration or
ride disturbance, or you suspect that possi-
ble damage to your vehicle has occurred,
you should turn on the hazard warning flash-
ers, carefully slow down, and drive with cau-
tion to an area which is a safe distance from
the road.
Inspect the tires and the vehicle underbody
for possible damage. If the vehicle or tires
appear unsafe, have it towed to the nearest
Mercedes-Benz Center or tire dealer for re-
pairs.
Warning!
G
Although the applicable federal motor
vehicle safety laws consider a tire to be
worn when the treadwear indicators (TWI)
become visible at approximately
1/16in
(1.6 mm), we recommend that you do not al-
low your tires to wear down to that level. As
tread depth approaches
1/8in (3 mm), the
adhesion properties on a wet road are
sharply reduced.
Depending upon the weather and/or road
surface (conditions), the tire traction varies
widely.
Page 307 of 498

305 Operation
At the gas station
�At the gas station
Refueling
The fuel filler flap is located on the
right-hand side of the vehicle towards the
rear. Locking/unlocking the vehicle with
the SmartKey or the SmartKey with
KEYLESS-GO* automatically locks/un-
locks the fuel filler flap.1To open the fuel filler flap
2To insert the fuel filler cap
�
Turn the engine off�
by turning the SmartKey to
position0. Remove the SmartKey
from the starter switch.
�
by pressing the KEYLESS-GO*
start/stop button. Open the driv-
er’s door (with driver’s door open,
starter switch is now in position0,
same as with SmartKey removed
from starter switch).
�
Open the fuel filler flap by pushing at
the point indicated by the arrow 1.
The fuel filler flap springs open.
�
Turn fuel cap counterclockwise and
hold on to it until possible pressure is
released.
�
Take off cap and set it in direction of
arrow 2 in the recess on the fuel filler
flap.
To prevent fuel vapors from escaping
into open air, fully insert filler nozzle
unit.
�
Only fill your tank until the filler nozzle
unit cuts out – do not top up or
overfill.
Warning!
G
Gasoline is highly flammable and poisonous.
It burns violently and can cause serious inju-
ry. Whenever you are around gasoline, avoid
inhaling fumes and skin contact, extinguish
all smoking materials. Never allow sparks,
flame or smoking materials near gasoline!
Failure to remove the fuel cap slowly could
result in personal injury.
��
Page 374 of 498
372 Practical hintsWhat to do if …?Display
Display message
Possible cause
Possible solution
P
Selector lever
in park position
You have turned off the engine with the
KEYLESS-GO* start/stop button in gear
selector lever positionN and opened the
driver’s door.
or
You have attempted to switch off the en-
gine with the KEYLESS-GO* start/stop
button while the gear selector lever was in
positionR orD.
�
Place the gear selector lever in
positionP.
Please
shift to
P or N
You have attempted to start the engine
with the KEYLESS-GO* start/stop button
while the gear selector lever was in
positionR orD.
�
Place the gear selector lever in
positionP or N.
Page 375 of 498
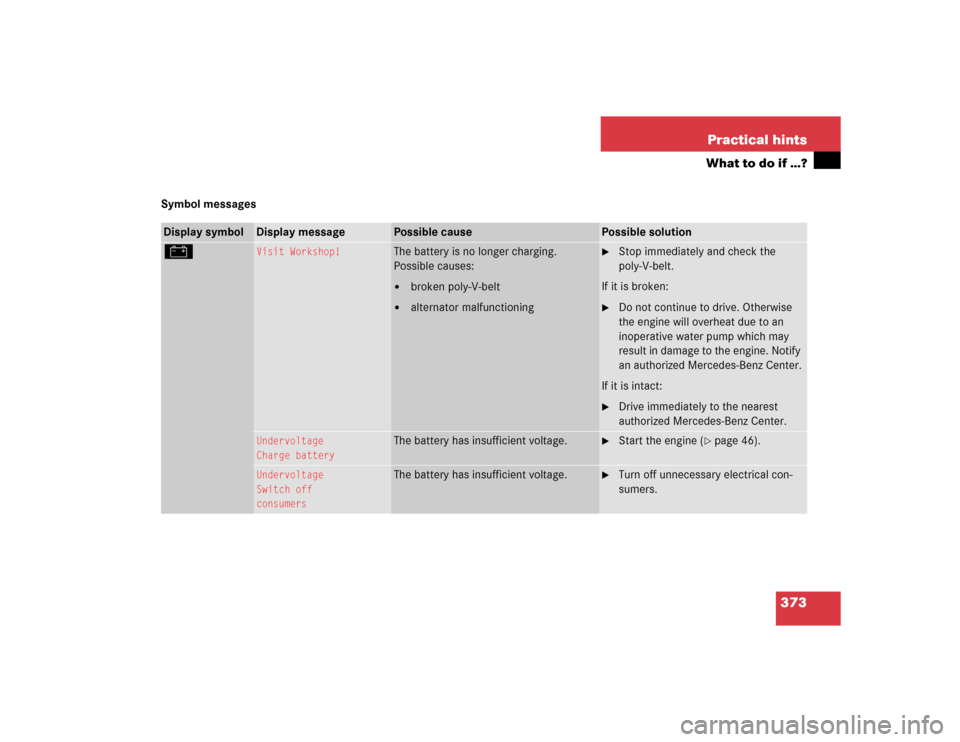
373 Practical hints
What to do if …?
Symbol messagesDisplay symbol
Display message
Possible cause
Possible solution
#
Visit Workshop!
The battery is no longer charging.
Possible causes:�
broken poly-V-belt
�
alternator malfunctioning
�
Stop immediately and check the
poly-V-belt.
If it is broken:
�
Do not continue to drive. Otherwise
the engine will overheat due to an
inoperative water pump which may
result in damage to the engine. Notify
an authorized Mercedes-Benz Center.
If it is intact:
�
Drive immediately to the nearest
authorized Mercedes-Benz Center.
Undervoltage
Charge battery
The battery has insufficient voltage.
�
Start the engine (
�page 46).
Undervoltage
Switch off
consumers
The battery has insufficient voltage.
�
Turn off unnecessary electrical con-
sumers.
Page 378 of 498
.
Display symbol
Display message
Poss")
376 Practical hintsWhat to do if …?
During severe operating conditions and
stop-and-go city traffic, the coolant tem-
perature may rise close to 248°F (120°C).
Display symbol
Display message
Possible cause
Possible solution
•
Coolant
Stop, engine off!
The coolant is too hot.
�
Stop the vehicle and turn off the en-
gine.
�
Only start the engine again after the
message disappears. You could other-
wise damage the engine.
Warning!
G
Driving when your engine is badly overheat-
ed can cause some fluids which may have
leaked into the engine compartment to
catch fire. You could be seriously burned.
Steam from an overheated engine can cause
serious burns and can occur just by opening
the hood. Stay away from the engine if you
see or hear steam coming from it.
Turn off the engine, get out of the vehicle
and do not stand near the vehicle until the
engine has cooled down.
!The engine should not be operated with
the coolant temperature above 248°F
(120°C). Doing so may cause serious
engine damage which is not covered by
the Mercedes-Benz Limited Warranty.
Page 383 of 498

381 Practical hints
What to do if …?
Display symbol
Display message
Possible cause
Possible solution
A
Reserve fuel
The fuel level has dropped below the re-
serve mark.
�
Refuel at the next gas station
(�page 305).
Y
Hood open!
You are driving with the hood open.
�
Close the hood (
�page 309).
I
Remove key
You have forgotten to remove the
SmartKey.
�
Remove the SmartKey from the start-
er switch.
Replace key
No additional code available for SmartKey
or SmartKey with KEYLESS-GO*
�
Visit an authorized Mercedes-Benz
Center as soon as possible.
Key
Check battery!
The SmartKey with KEYLESS-GO* batter-
ies are discharged.
�
Change the batteries (
�page 402).
Key
not recognized!
The SmartKey with KEYLESS-GO* is not
recognized while the engine is running be-
cause�
the SmartKey is not in the vehicle
�
there is strong radio-frequency inter-
ference
�
Stop the vehicle as soon as it is safe to
do so.
�
Search for the SmartKey.
Otherwise the vehicle cannot be centrally
locked nor can the engine be started
again after the engine has been stopped.
The SmartKey with KEYLESS-GO* is mo-
mentarily not recognized.
�
Change the position of the SmartKey
in the vehicle.
�
Operate the vehicle with the SmartKey
in the starter switch if necessary.
Keyless Go
Check system
The KEYLESS-GO* system is malfunction-
ing.
�
Visit an authorized Mercedes-Benz
Center as soon as possible.
Page 384 of 498

382 Practical hintsWhat to do if …?Display symbol
Display message
Possible cause
Possible solution
I
Key recognized
in vehicle!
A SmartKey with KEYLESS-GO* left in the
vehicle was recognized while locking the
vehicle from the outside.
�
Take the SmartKey out of the vehicle.
Key
do not forget key
This display appears (for a maximum of
60 seconds) if the driver’s door is opened
with the engine shut off and no SmartKey
in the starter switch.
Message is only a reminder.
�
Insert SmartKey in the starter switch.
�
Take the SmartKey with
KEYLESS-GO* with you when leaving
the vehicle.
.
3rd brake lamp
The high mounted brake lamp is malfunc-
tioning.
�
Visit an authorized Mercedes-Benz
Center as soon as possible.
Brake lamp
Drive to workshop
Stop lamp illumination is delayed or lamp
is permanently on.
�
Visit an authorized Mercedes-Benz
Center as soon as possible.
Brake lamp, left
The left brake lamp is malfunctioning.
�
Visit an authorized Mercedes-Benz
Center as soon as possible.
Brake lamp, right
The right brake lamp is malfunctioning.
�
Visit an authorized Mercedes-Benz
Center as soon as possible.
Display malfunction
Visit workshop
The display for the lamps or the system is
malfunctioning.
�
Visit an authorized Mercedes-Benz
Center as soon as possible.
Front foglamp, left
The left front fog lamp is malfunctioning.
�
Replace the bulb as soon as possible.
Front foglamp, right
The right front fog lamp is malfunctioning.
�
Replace the bulb as soon as possible.