Page 131 of 498
129 Controls in detail
Lighting
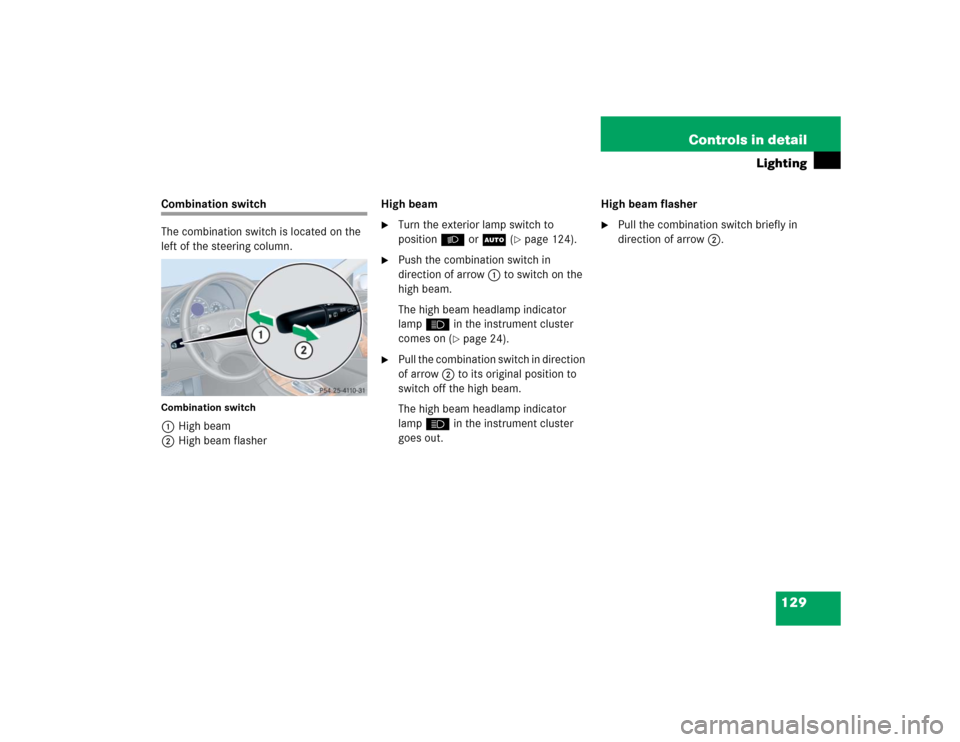
Combination switch
The combination switch is located on the
left of the steering column.Combination switch1High beam
2High beam flasherHigh beam
�
Turn the exterior lamp switch to
positionB orU (
�page 124).
�
Push the combination switch in
direction of arrow1 to switch on the
high beam.
The high beam headlamp indicator
lampA in the instrument cluster
comes on (
�page 24).
�
Pull the combination switch in direction
of arrow2 to its original position to
switch off the high beam.
The high beam headlamp indicator
lampA in the instrument cluster
goes out.High beam flasher
�
Pull the combination switch briefly in
direction of arrow2.
Page 365 of 498
363 Practical hints
What to do if …?
On the pages that follow, you will find a
compilation of the most important warning
and malfunction messages that may
appear in the display.
For your convenience the messages are
divided into two sections:�
Text messages (
�page 364)
�
Symbol messages (
�page 373)
iSwitching on the ignition causes all
instrument cluster lamps (except low
beam headlamp indicator lamp, high
beam headlamp indicator lamp, and
turn signal indicator lamps unless acti-
vated) as well as the multifunction dis-
play to come on. Make sure the lamps
and the multifunction display are in
working order before starting your jour-
ney.
Page 385 of 498

383 Practical hints
What to do if …?
Display symbol
Display message
Possible cause
Possible solution
.
High beam, left
The left high beam lamp is malfunction-
ing.
�
Replace the bulb as soon as possible.
High beam, right
The right high beam lamp is malfunction-
ing.
�
Replace the bulb as soon as possible.
Lamp sensor
Drive to workshop
The lamp sensor is malfunctioning. The
headlamps switch on automatically.
�
In the control system, set lamp opera-
tion to manual (
�page 155).
�
Switch on headlamps using the exteri-
or lamp switch.
�
Visit an authorized Mercedes-Benz
Center as soon as possible.
License plate lamp,
left
The left license plate lamp is malfunction-
ing.
�
Replace the bulb as soon as possible.
License plate lamp,
right
The right license plate lamp is malfunc-
tioning.
�
Replace the bulb as soon as possible.
Low beam, left
The left low beam lamp is malfunctioning.
Halogen headlamp:�
Replace the bulb as soon as possible.
Bi-Xenon* headlamp:
�
Visit an authorized Mercedes-Benz
Center as soon as possible.
Page 406 of 498

404 Practical hintsReplacing bulbsSafe vehicle operation depends on proper
exterior lighting and signaling. It is there-
fore essential that all bulbs and lamp
assemblies are in good working order at all
times.
Correct headlamp adjustment is extremely
important. Have headlamps checked and
readjusted at regular intervals and when a
bulb has been replaced. See an authorized
Mercedes-Benz Center for headlamp ad-
justment.
Bulbs Front lamps
iIf the headlamps or front fog lamps are
fogged up on the inside as a result of
high humidity, driving the vehicle a
distance with the lights on should clear
up the fogging.iBack-up bulbs will be brought into use
when lamps malfunction. Observe the
messages in the multifunction display
(�page 382).
Lamp
Type
1
Additional turn signal
lamps
LED
2
Turn signal lamp
1156 NA
3
Halogen headlamp:
Low beam
Bi-Xenon* headlamp:
Low and high beam
1
1Vehicles with Bi-Xenon headlamps* do not replace
the Bi-Xenon bulbs yourself.
H7 (55 W)
D2S-35 W
4
Halogen headlamp:
High beam/high beam
flasher
Bi-Xenon* headlamp:
High beam flasher
H7 (55 W)
H7 (55 W)
Parking and standing
lamps
W 5 W
5
Fog lamp
HB4 (51 W)
Cornering fog lamp*
H7 (55 W)
6
Side marker lamp
W 5 W
Page 408 of 498
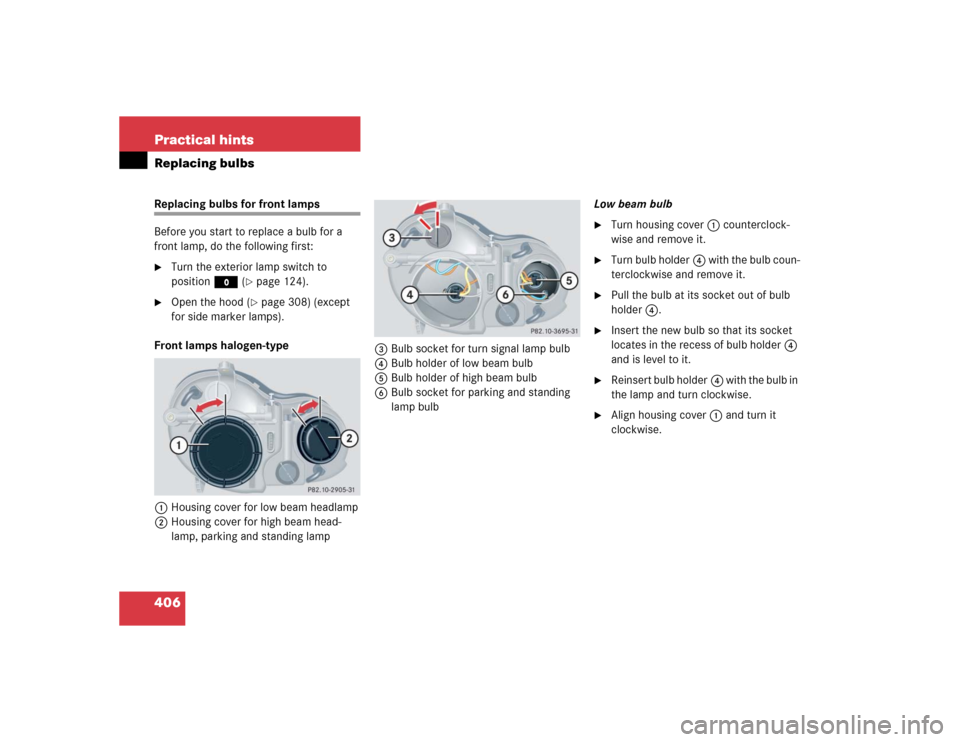
406 Practical hintsReplacing bulbsReplacing bulbs for front lamps
Before you start to replace a bulb for a
front lamp, do the following first:�
Turn the exterior lamp switch to
positionM (
�page 124).
�
Open the hood (
�page 308) (except
for side marker lamps).
Front lamps halogen-type
1Housing cover for low beam headlamp
2Housing cover for high beam head-
lamp, parking and standing lamp3Bulb socket for turn signal lamp bulb
4Bulb holder of low beam bulb
5Bulb holder of high beam bulb
6Bulb socket for parking and standing
lamp bulbLow beam bulb
�
Turn housing cover1 counterclock-
wise and remove it.
�
Turn bulb holder4 with the bulb coun-
terclockwise and remove it.
�
Pull the bulb at its socket out of bulb
holder4.
�
Insert the new bulb so that its socket
locates in the recess of bulb holder4
and is level to it.
�
Reinsert bulb holder4 with the bulb in
the lamp and turn clockwise.
�
Align housing cover1 and turn it
clockwise.
Page 409 of 498

407 Practical hints
Replacing bulbs
High beam bulb�
Turn housing cover2 counterclock-
wise and remove it.
�
Turn bulb holder5 with the bulb coun-
terclockwise and remove it.
�
Pull the bulb at its socket out of bulb
holder5.
�
Insert the new bulb so that its socket
locates in the recess of bulb holder5
and is level to it.
�
Reinsert bulb holder5 with the bulb in
the lamp and turn clockwise.
�
Align housing cover2 and turn it
clockwise.Front turn signal lamp bulb
�
Turn bulb socket3 counterclockwise
and remove it.
�
Press gently onto the bulb and turn
counterclockwise out of bulb
socket3.
�
Press the new bulb gently into bulb
socket3 and turn clockwise until it
engages.
�
Place bulb socket3 back into the
lamp and turn it clockwise.Parking and standing lamp bulb
�
Turn housing cover2 counterclock-
wise and remove it.
�
Pull out bulb socket6 with the bulb.
�
Pull the bulb out of the bulb socket6.
�
Press the new bulb into bulb socket6.
�
Press bulb socket6 back into the
lamp.
�
Align housing cover2 and turn it
clockwise.
Page 410 of 498
408 Practical hintsReplacing bulbsFront lamps Bi-Xenon*-type
1Bulb socket for turn signal lamp
2Housing cover for high beam flasher,
parking and standing lamp
3Housing cover for Bi-Xenon* headlamp4Bulb holder for high beam flasher bulb
5Bulb socket for parking and standing
lamp bulbHigh beam bulb for high beam flasher
�
Turn housing cover2 counterclock-
wise and remove it.
�
Turn bulb holder4 with the bulb coun-
terclockwise and remove it.
�
Pull the bulb at its socket out of bulb
holder4.
�
Insert the new bulb so that its socket
locates in the recess of bulb holder4
and is level to it.
�
Reinsert bulb holder4 with the bulb in
the lamp and turn clockwise.
�
Align housing cover2 and turn it
clockwise.
Warning!
G
Do not remove the cover
3
for the Bi-Xe-
non* headlamp. Because of high voltage in
xenon lamps, it is dangerous to replace the
bulb or repair the lamp and its components.
We recommend that you have such work
done by a qualified technician.
Page 457 of 498

Prevents the wheels from locking up
during braking so that the vehicle can
continue to be steered.
Alignment bolt
Metal pin with thread. The center")
455 Technical terms
ABS
(A
ntilock B
rake S
ystem)
Prevents the wheels from locking up
during braking so that the vehicle can
continue to be steered.
Alignment bolt
Metal pin with thread. The centering
pin is an aid used when changing a tire
to align the wheel with the wheel hub.BAS
(B
rake A
ssist S
ystem)
System for potentially reducing braking
distances in emergency braking situa-
tions. The system is activated when it
senses an emergency based on how
fast the brake is applied.
Bi-Xenon headlamps*
Headlamps which use an electric arc as
the light source and produce a more in-
tense light than filament headlamps.
Bi-Xenon headlamps produce low
beam and high beam.CAC
(C
ustomer A
ssistance C
enter)
Mercedes-Benz customer service cen-
ter, which can help you with any ques-
tions about your vehicle and provide
assistance in the event of a break-
down.
CAN system
(C
ontroller A
rea N
etwork)
Data bus network serving to control ve-
hicle functions such as door locking or
windshield wiping.
Cockpit
All instruments, switches, buttons and
indicator/warning lamps in the passen-
ger compartment needed for vehicle
operation and monitoring.