Page 406 of 498

404 Practical hintsReplacing bulbsSafe vehicle operation depends on proper
exterior lighting and signaling. It is there-
fore essential that all bulbs and lamp
assemblies are in good working order at all
times.
Correct headlamp adjustment is extremely
important. Have headlamps checked and
readjusted at regular intervals and when a
bulb has been replaced. See an authorized
Mercedes-Benz Center for headlamp ad-
justment.
Bulbs Front lamps
iIf the headlamps or front fog lamps are
fogged up on the inside as a result of
high humidity, driving the vehicle a
distance with the lights on should clear
up the fogging.iBack-up bulbs will be brought into use
when lamps malfunction. Observe the
messages in the multifunction display
(�page 382).
Lamp
Type
1
Additional turn signal
lamps
LED
2
Turn signal lamp
1156 NA
3
Halogen headlamp:
Low beam
Bi-Xenon* headlamp:
Low and high beam
1
1Vehicles with Bi-Xenon headlamps* do not replace
the Bi-Xenon bulbs yourself.
H7 (55 W)
D2S-35 W
4
Halogen headlamp:
High beam/high beam
flasher
Bi-Xenon* headlamp:
High beam flasher
H7 (55 W)
H7 (55 W)
Parking and standing
lamps
W 5 W
5
Fog lamp
HB4 (51 W)
Cornering fog lamp*
H7 (55 W)
6
Side marker lamp
W 5 W
Page 407 of 498

405 Practical hints
Replacing bulbs
Rear lamps
Notes on bulb replacement
�
Only use 12 volt bulbs of the same type
and with the specified watt rating.
�
Switch lights off before changing a bulb
to prevent short circuits.
�
Always use a clean lint-free cloth when
handling bulbs.
�
Your hands should be dry and free of oil
and grease.
�
If the newly installed bulb does not
come on, visit an authorized
Mercedes-Benz Center.
�
Have the LEDs and bulbs for the follow-
ing lamps replaced by an authorized
Mercedes-Benz Center.�
Additional turn signal lamps in the
exterior rear view mirrors
�
High mounted brake lamp
�
Bi-Xenon* lamps
�
Front fog lamps
Lamp
Type
7
High mounted brake
lamp
LED
8
Brake lamp
P 21 W
9
Turn signal lamp
P 21 W
a
Tail, parking and stand-
ing lamp, side marker
P 21/4 W
W 5 W
b
Backup lamp
P 21 W
c
License plate lamps
C 5 W
d
Rear fog lamp, driver’s
side
P 21/4 W
Warning!
G
Keep bulbs out of reach of children.
Bulbs and bulb sockets can be very hot. Al-
low the lamp to cool down before changing
a bulb.
Halogen lamps contain pressurized gas. A
bulb can explode if you:�
touch or move it when hot
�
drop the bulb
�
scratch the bulb
Wear eye and hand protection.
Because of high voltage in Xenon lamps, it is
dangerous to replace the bulb or repair the
lamp and its components. We recommend
that you have such work done by a qualified
technician.
iHave the headlamp adjustment
checked regularly.
Page 408 of 498
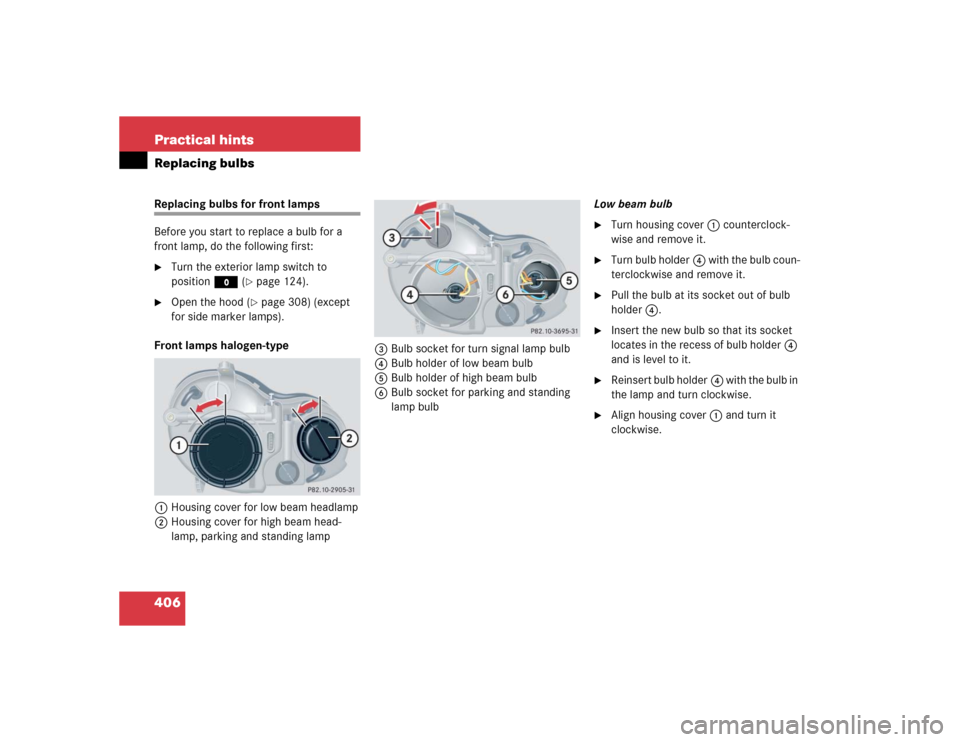
406 Practical hintsReplacing bulbsReplacing bulbs for front lamps
Before you start to replace a bulb for a
front lamp, do the following first:�
Turn the exterior lamp switch to
positionM (
�page 124).
�
Open the hood (
�page 308) (except
for side marker lamps).
Front lamps halogen-type
1Housing cover for low beam headlamp
2Housing cover for high beam head-
lamp, parking and standing lamp3Bulb socket for turn signal lamp bulb
4Bulb holder of low beam bulb
5Bulb holder of high beam bulb
6Bulb socket for parking and standing
lamp bulbLow beam bulb
�
Turn housing cover1 counterclock-
wise and remove it.
�
Turn bulb holder4 with the bulb coun-
terclockwise and remove it.
�
Pull the bulb at its socket out of bulb
holder4.
�
Insert the new bulb so that its socket
locates in the recess of bulb holder4
and is level to it.
�
Reinsert bulb holder4 with the bulb in
the lamp and turn clockwise.
�
Align housing cover1 and turn it
clockwise.
Page 409 of 498

407 Practical hints
Replacing bulbs
High beam bulb�
Turn housing cover2 counterclock-
wise and remove it.
�
Turn bulb holder5 with the bulb coun-
terclockwise and remove it.
�
Pull the bulb at its socket out of bulb
holder5.
�
Insert the new bulb so that its socket
locates in the recess of bulb holder5
and is level to it.
�
Reinsert bulb holder5 with the bulb in
the lamp and turn clockwise.
�
Align housing cover2 and turn it
clockwise.Front turn signal lamp bulb
�
Turn bulb socket3 counterclockwise
and remove it.
�
Press gently onto the bulb and turn
counterclockwise out of bulb
socket3.
�
Press the new bulb gently into bulb
socket3 and turn clockwise until it
engages.
�
Place bulb socket3 back into the
lamp and turn it clockwise.Parking and standing lamp bulb
�
Turn housing cover2 counterclock-
wise and remove it.
�
Pull out bulb socket6 with the bulb.
�
Pull the bulb out of the bulb socket6.
�
Press the new bulb into bulb socket6.
�
Press bulb socket6 back into the
lamp.
�
Align housing cover2 and turn it
clockwise.
Page 410 of 498
408 Practical hintsReplacing bulbsFront lamps Bi-Xenon*-type
1Bulb socket for turn signal lamp
2Housing cover for high beam flasher,
parking and standing lamp
3Housing cover for Bi-Xenon* headlamp4Bulb holder for high beam flasher bulb
5Bulb socket for parking and standing
lamp bulbHigh beam bulb for high beam flasher
�
Turn housing cover2 counterclock-
wise and remove it.
�
Turn bulb holder4 with the bulb coun-
terclockwise and remove it.
�
Pull the bulb at its socket out of bulb
holder4.
�
Insert the new bulb so that its socket
locates in the recess of bulb holder4
and is level to it.
�
Reinsert bulb holder4 with the bulb in
the lamp and turn clockwise.
�
Align housing cover2 and turn it
clockwise.
Warning!
G
Do not remove the cover
3
for the Bi-Xe-
non* headlamp. Because of high voltage in
xenon lamps, it is dangerous to replace the
bulb or repair the lamp and its components.
We recommend that you have such work
done by a qualified technician.
Page 411 of 498

409 Practical hints
Replacing bulbs
Front turn signal lamp bulb�
Turn bulb socket1 counterclockwise
and remove it.
�
Press gently onto the bulb and turn
counterclockwise out of bulb
socket1.
�
Press the new bulb gently into bulb
socket1 and turn clockwise until it
engages.
�
Place bulb socket1 back into the
lamp and turn it clockwise.Parking and standing lamp bulb
�
Turn housing cover2 counterclock-
wise and remove it.
�
Pull out bulb socket5 with the bulb.
�
Pull the bulb out of the bulb socket5.
�
Press the new bulb into bulb socket5.
�
Press bulb socket5 back into the
lamp.
�
Align housing cover2 and turn it
clockwise.Side marker lamp bulb
�
Carefully slide the lamp towards the
rear in direction of arrows.
�
Remove front end first.
�
Turn the bulb socket with the bulb
counterclockwise and remove it.
�
Pull the bulb out of the bulb socket.
�
Insert the new bulb into the bulb
socket.
�
Place the bulb socket back into the
lamp and turn it clockwise.
�
To reinstall the lamp, set rear end in the
bumper and let the front end engage.
Page 412 of 498
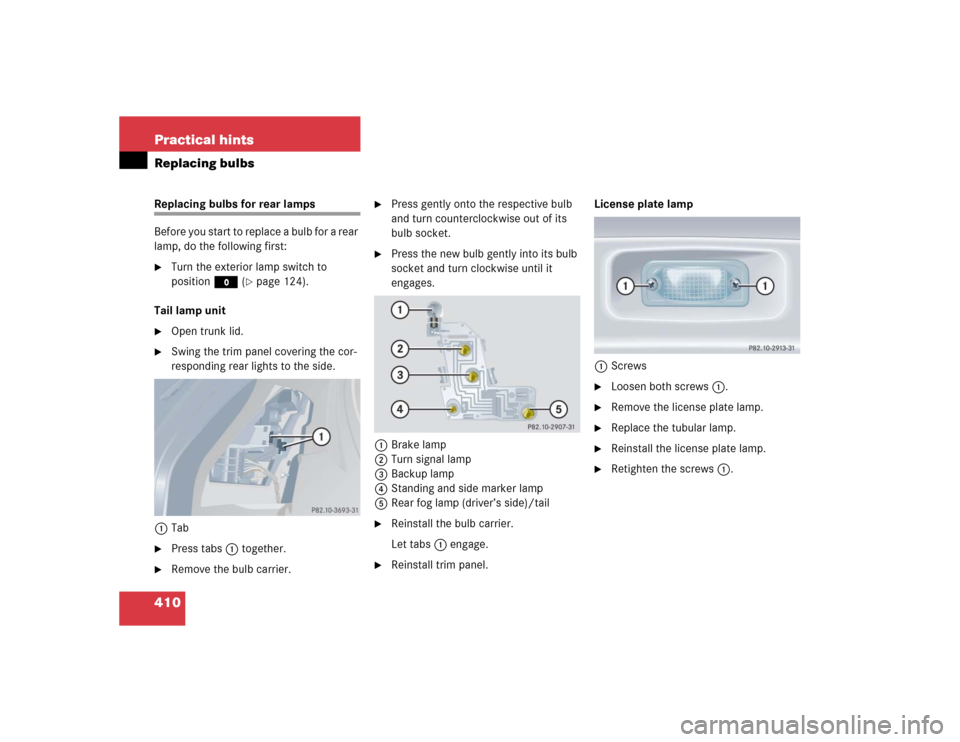
410 Practical hintsReplacing bulbsReplacing bulbs for rear lamps
Before you start to replace a bulb for a rear
lamp, do the following first:�
Turn the exterior lamp switch to
positionM (
�page 124).
Tail lamp unit
�
Open trunk lid.
�
Swing the trim panel covering the cor-
responding rear lights to the side.
1Tab
�
Press tabs1 together.
�
Remove the bulb carrier.
�
Press gently onto the respective bulb
and turn counterclockwise out of its
bulb socket.
�
Press the new bulb gently into its bulb
socket and turn clockwise until it
engages.
1Brake lamp
2Turn signal lamp
3Backup lamp
4Standing and side marker lamp
5Rear fog lamp (driver’s side)/tail
�
Reinstall the bulb carrier.
Let tabs1 engage.
�
Reinstall trim panel.License plate lamp
1Screws
�
Loosen both screws1.
�
Remove the license plate lamp.
�
Replace the tubular lamp.
�
Reinstall the license plate lamp.
�
Retighten the screws1.
Page 465 of 498
 158
Automatic climate control 194
Activating 195
Adjusting air distribution 198
Air rec")
463 Index
Auto-dimming rear view mirrors 178
Automatic central locking
Activating/deactivating
(control system) 158
Automatic climate control 194
Activating 195
Adjusting air distribution 198
Air recirculation mode 201
Deactivating 195
Defrosting 200
Rear window defroster 183
Setting the temperature 197
Automatic headlamp mode 125
Automatic lighting control
Activating 132
Deactivating 132
Automatic locking when driving 110
Automatic shift program 170
Automatic time change
(Daylight Saving Time
(DST) summer/winter) 153Automatic transmission 165
Accelerator position 171
Comfort program mode 170
Emergency operation
(Limp Home Mode) 177
Fluid level 312
Gear ranges 168
Gear selector lever 165
Gear selector lever position 165, 169
Gear shifting malfunctions 177
Kickdown 171
Manual shifting 167
One-touch gearshifting 167
Program mode selector switch 170
Starting the engine 47
Transmission fluid 312
Auxiliary fuse box 432B
Backrest
Folding forward 268
Folding rearward 269
Backup lamp 405, 410
Bulbs 405
Back-up lamps
Bulbs 404
Bar 338
BAS 85, 455
Messages in display 366
Batteries, SmartKey
Check lamp 97, 102
Checking 97, 103
Replacing 402
Batteries, SmartKey with KEYLESS-GO*
Check lamp 97, 102
Checking 97, 103
Replacing 403
Battery discharged
Jump starting 423