Page 238 of 442
236 Controls in detailLoading6Strap�
Tighten strap6 by pulling at the loose
end (arrow) until the skis in the ski sack
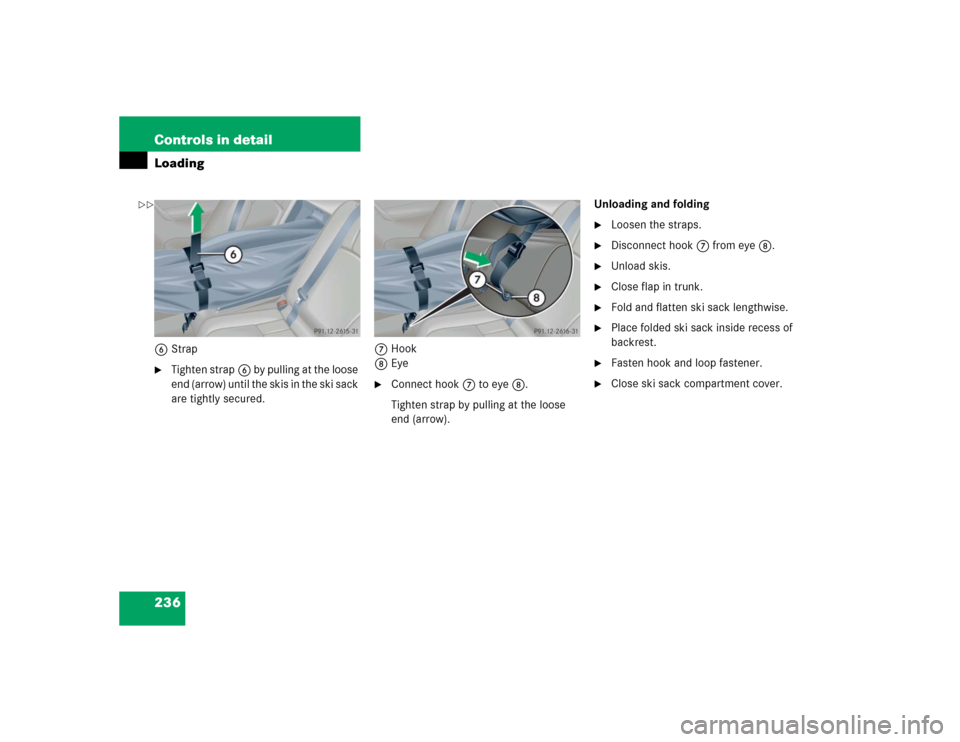
are tightly secured.7Hook
8Eye
�
Connect hook7 to eye8.
Tighten strap by pulling at the loose
end (arrow).Unloading and folding
�
Loosen the straps.
�
Disconnect hook7 from eye8.
�
Unload skis.
�
Close flap in trunk.
�
Fold and flatten ski sack lengthwise.
�
Place folded ski sack inside recess of
backrest.
�
Fasten hook and loop fastener.
�
Close ski sack compartment cover.
��
Page 239 of 442

237 Controls in detail
Loading
Removing the ski sack
You can remove the ski sack for cleaning
or drying.
1Button
2Ski sack frame
3Flap�
Open trunk lid.
�
Press button1.
The flap3 opens downward.
�
Press button1 firmly until ski sack
frame2 is released.
�
Pull ski sack frame2 with ski sack
out.Installing the ski sack
Install the ski sack in the reverse order.
�
Push ski sack frame2 with ski sack
inward until the ski sack frame snaps
into place.
�
Close flap3.
�
Close trunk lid.
Split rear bench seat*
To expand the cargo area, you can fold
down the left and right rear seat backrests.
The two sections can be folded down
separately.
Warning!
G
Never drive vehicle with trunk open while
the ski sack is removed. Deadly carbon
monoxide (CO) gases may enter vehicle in-
terior, resulting in unconsciousness and
death.iTo prevent unauthorized persons from
accessing the trunk, always close the
flap.
Warning!
G
When expanding the luggage area, always
fold the seat cushions fully forward.
Unless you are transporting cargo, the
backrests must remain properly locked in
the upright position.
In an accident, during hard braking or
sudden maneuvers, loose items will be
thrown around inside the vehicle, and cause
injury to vehicle occupants unless the items
are securely fastened in the vehicle.
Always use the cargo tie down rings*
(�page 240).
Page 241 of 442

239 Controls in detail
Loading
If the backrest is not locked into position,
a red indicator3 will be visible.�
Check for secure locking by pushing
and pulling on the backrest.
Loading instructions
The total load weight including vehicle oc-
cupants and luggage/cargo should not ex-
ceed the vehicle capacity weight indicated
on the corresponding label located on the
driver’s door pillar.
The handling characteristics of a fully load-
ed vehicle depend greatly on the load dis-
tribution. It is therefore recommended to
load the vehicle according to the illustra-
tions shown, with the heaviest items being
placed towards the front of the vehicle.
Warning!
G
If a red indicator is visible with the backrest
up, then the backrest is not properly locked
into position.
Always lock backrest in its upright position
when rear seat bench is occupied, cargo is
being carried in the trunk, or the extended
cargo compartment is not in use. Check for
secure locking by pushing and pulling on the
backrest.
In an accident, during hard braking or sud-
den maneuvers, loose items will be thrown
around inside the vehicle, and cause injury
to vehicle occupants unless the items are
securely fastened in the vehicle.
To help avoid personal injury during a
collision or sudden maneuver, exercise care
when transporting cargo.iTo prevent unauthorized persons from
access to the trunk, always lock
backrest in its upright position.
Page 242 of 442

240 Controls in detailLoadingAlways place items being carried against
front or rear seat backrests, and fasten
them as securely as possible.
The heaviest portion of the cargo should al-
ways be kept as low as possible since it in-
fluences the handling characteristics of
the vehicle.
Cargo tie-down rings*
The four cargo tie-down rings are located
in the trunk.Cargo tie-down rings�
Carefully secure cargo by applying
even load on all rings with rope
sufficient strength to hold down the
cargo.
Always follow loading instructions
(�page 239).
Warning!
G
Always fasten items being carried as secure-
ly as possible.
In an accident, during hard braking or sud-
den maneuvers, loose items will be thrown
around inside the vehicle and can cause in-
jury to vehicle occupants unless the items
are securely fastened in the vehicle.
To help avoid personal injury during a colli-
sion or sudden maneuver, exercise care
when transporting cargo.
Never drive vehicle with trunk open. Deadly
carbon monoxide (CO) gases may enter ve-
hicle interior resulting in unconsciousness
and death.iThe trunk is the preferred place to carry
objects.
The enlarged cargo area should only be
used for items which do not fit in the
trunk alone.
Page 243 of 442
241 Controls in detail
Useful features
�Useful features
Storage compartments Glove box
1Glove box lid release
2Glove box
Opening the glove box
�
Pull lid release1.
The glove box lid opens downward.
Closing the glove box
�
Push lid up to close.1Unlocking
2Locking
Locking the glove box
�
Insert mechanical key (
�page 337)
into the glove box lock and turn it to
position2.
Unlocking the glove box
�
Turn mechanical key in the glove box
lock to position1.
Warning!
G
To help avoid personal injury during a colli-
sion or sudden maneuver, exercise care
when stowing objects in the vehicle. Put lug-
gage or cargo in the trunk if possible. Do not
pile luggage or cargo higher than the seat
backs. Do not place anything on the shelf
below the rear window.
Luggage nets cannot secure hard or heavy
objects.
Keep compartment lids closed. This will help
to prevent stored objects from being thrown
about and injuring vehicle occupants during
an accident.
Page 247 of 442

245 Controls in detail
Useful features
Opening cup holder�
Briefly press the front of cup holder1.
The cup holder slides out slightly.
�
Pull out the cup holder until it stops.
Closing cup holder
�
Slide cup holder1 in until it engages.
Parcel net in front passenger footwell
A small convenience parcel net is located
in the front passenger footwell. It is for
small and light items, such as road maps,
mail, etc.
Ashtrays
Center console ashtray
1Cover plate
2Sliding button
3Ashtray insert�
Briefly press the bottom of cover
plate1.
The cover plate opens automatically.Removing ashtray insert
�
Secure vehicle from movement by
setting the parking brake.
�
Move the gear selector lever to
positionN (manual transmission:
second gear).
Now you have more room to take out
the ashtray insert.
�
Push sliding button2 to the right.
The ashtray insert3 slides out
slightly.
�
Remove the ashtray insert.
Warning!
G
Do not place heavy or fragile objects, or ob-
jects having sharp edges, in the parcel net.
In an accident, during hard braking or sud-
den maneuvers, they could be thrown
around inside the vehicle, and cause injury
to vehicle occupants.
Warning!
G
Remove front ashtray only with vehicle
standing still. Set the parking brake to
secure vehicle from movement. Move gear
selector lever to positionN (manual trans-
mission: second gear). With gear selector
lever in positionN (manual transmission:
second gear) turn off the engine.
Page 274 of 442

272 OperationDriving instructionsPassenger compartmentDriving abroad
Abroad, there is an extensive
Mercedes-Benz service network at your
disposal. If you plan to drive into areas
which are not listed in the index of your
Mercedes-Benz Center directory, you
should request pertinent information from
an authorized Mercedes-Benz Center.Control and operation of radio
transmitters
COMAND*, radio and telephone*Telephones* and two-way radios
Radio transmitters, such as a portable
telephone or a citizens band unit should
only be used inside the vehicle if they are
connected to an antenna that is installed
on the outside of the vehicle.
Refer to the radio transmitter operation
instructions regarding use of an external
antenna.
Warning!
G
Always fasten items being carried as
securely as possible.
In an accident, during hard braking or sud-
den maneuvers, loose items will be thrown
around inside the vehicle, and cause injury
to vehicle occupants unless the items are
securely fastened in the vehicle.
The trunk is the preferred place to carry
objects.
Warning!
G
Please do not forget that your primary
responsibility is to drive the vehicle safely.
Only operate the COMAND (Cockpit
Management and Data System), radio or
telephone
1 if road, weather and traffic
conditions permit.
Bear in mind that at a speed of just 30 mph
(approximately 50 km/h), your vehicle is
covering a distance of 44 feet
(approximately 14 m) every second.
1Observe all legal requirements
Warning!
G
Never operate radio transmitters equipped
with a built-in or attached antenna (i.e. with-
out being connected to an external antenna)
from inside the vehicle while the engine is
running. Doing so could lead to a malfunc-
tion of the vehicle’s electronic system,
possibly resulting in an accident and
personal injury.
Page 331 of 442
329 Practical hints
Where will I find ...?
�Where will I find ...?
First aid kit
The first aid kit is located in the trunk on
the left side secured by a hook and loop
fastener.
1First aid kit
2Hook and loop fastener�
Unfasten hook and loop fastener2.
�
Remove first aid kit1.
Vehicle tool kit
The vehicle tool kit is located in the storage
compartment underneath the trunk floor.
The following is included:�
Towing eye bolt
�
Wheel wrench
�
Alignment bolt
�
Vehicle jack
�
Spare wheel bolts
�
Spare fuses
�
Valve extractor (C 55 AMG only)
�
Protective wrap (C 55 AMG only)
�
Collapsible wheel chock
�
A pair of gloves Removing the vehicle tool kit (except
C55AMG)
�
Lift up trunk floor cover and engage
trunk floor handle in upper edge of
trunk.
1Retaining screw
2Storage well casing
�
Loosen retaining screw1 by turning it
counterclockwise.
�
Remove storage well casing2.
iCheck expiration dates and contents
for completeness at least once a year
and replace missing/expired items.
��