Page 106 of 442
104 Controls in detailSeatsMulticontour seats*
This multicontour seat has a movable seat
cushion and inflatable air cushions built
into the backrest to provide additional
lumbar and side support.
The seat cushion movement, backrest
cushion height and curvature can be
continuously varied with switches on the
side of the seat after switching on ignition.
1Seat cushion depth
2Backrest bottom
3Backrest center
4Backrest side bolster adjustment
�
Switch on ignition (
�page 33).
Seat cushion depth
�
Adjust the seat cushion depth to the
length of your upper leg using
switch1.
Backrest contour
�
Adjust the contour of the backrest to
the desired position using switches2
and3.
Backrest side bolsters
�
Adjust the backrest side bolsters so
that they provide good lateral support
using switch4.
Page 161 of 442

159 Controls in detail
Automatic transmission*
Gear ranges
With the gear selector lever in positionD,
you can limit the transmission’s gear range
by pressing the gear selector lever to the
left (D-), and reverse the gear range limit
by pressing the gear selector lever to the
right (D+).
The selected gear range appears in the
multifunction display (
�page 157). If you
press on the accelerator when the engine
has reached its rpm limit, the transmission
will upshift beyond any gear range limit
selected.
Effect
é
The transmission shifts through
fourth gear only.
è
The transmission shifts through
third gear only.
With this selection you can use
the braking effect of the engine.
Effect
ç
The transmission shifts through
second gear only.
Allows the use of engine’s
braking power when driving:�
on steep downgrades
�
in mountainous regions
�
under extreme operating
conditions
æ
The transmission operates in
first gear only.
For maximum use of engine’s
braking effect on very steep or
lengthy downgrades.
Page 238 of 442
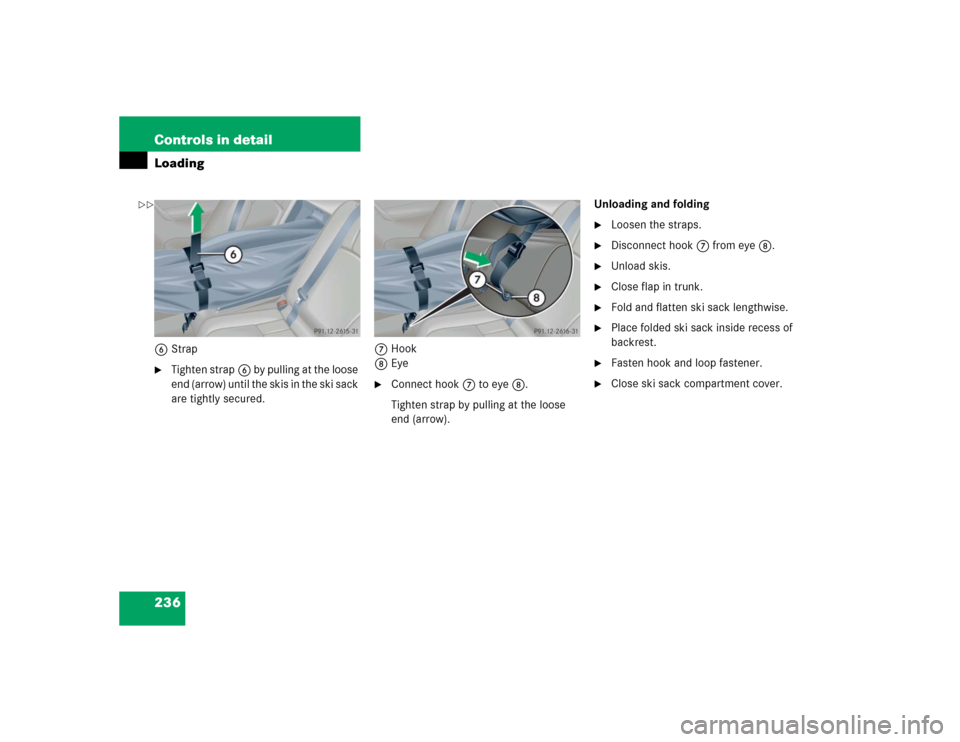
236 Controls in detailLoading6Strap�
Tighten strap6 by pulling at the loose
end (arrow) until the skis in the ski sack
are tightly secured.7Hook
8Eye
�
Connect hook7 to eye8.
Tighten strap by pulling at the loose
end (arrow).Unloading and folding
�
Loosen the straps.
�
Disconnect hook7 from eye8.
�
Unload skis.
�
Close flap in trunk.
�
Fold and flatten ski sack lengthwise.
�
Place folded ski sack inside recess of
backrest.
�
Fasten hook and loop fastener.
�
Close ski sack compartment cover.
��
Page 273 of 442

271 Operation
Driving instructions
Road salts and chemicals can adversely
affect braking efficiency. Increased pedal
force may become necessary to produce
the normal braking effect.
Depressing the brake pedal periodically
when traveling at length on salt-strewn
roads can bring road-salt-impaired braking
efficiency back to normal.
If the vehicle is parked after being driven
on salt-treated roads, the braking
efficiency should be tested as soon as
possible after driving is resumed.
For more information, see “Winter driving”
(
�page 290).
Standing water
Warning!
G
Make sure not to endanger any other road
users when carrying out these braking
maneuvers.
Warning!
G
If the vehicle becomes stuck in snow, make
sure snow is kept clear of the exhaust pipe
and from around the vehicle with the engine
running. Otherwise, deadly carbon monox-
ide (CO) gases may enter vehicle interior re-
sulting in unconsciousness and death.
To assure sufficient fresh air ventilation,
open a window slightly on the side of the
vehicle not facing the windWarning!
G
The outside temperature indicator is not
designed to serve as an ice-warning device
and is therefore unsuitable for that purpose.
Indicated temperatures just above the
freezing point do not guarantee that the
road surface is free of ice.
!Do not drive through flooded areas or
water of unknown depth. Before driving
through water, determine its depth.
Never accelerate before driving into
water. The bow wave could force water
into the engine and auxiliary equip-
ment, thus damaging them.
If you must drive through standing wa-
ter, drive slowly to prevent water from
entering the passenger compartment
or the engine compartment. Water in
these areas could cause damage to
electrical components or wiring of the
engine or transmission, or could result
in water being ingested by the engine
through the air intake causing severe
internal engine damage. Any such
damage is not covered by the
Mercedes-Benz Limited Warranty.
Page 294 of 442

292 OperationMaintenanceIn the “Operation” section you will find
detailed information on operating,
maintaining and caring for your vehicle.
We strongly recommend that you have
your vehicle serviced by an authorized
Mercedes-Benz Center, in accordance with
the Maintenance Booklet at the times
called for by the maintenance service
indicator display.
Failure to have the vehicle maintained in
accordance with the Maintenance Booklet
and maintenance service indicator at the
designated times /mileage will result in
vehicle damage not covered by the
Mercedes-Benz Limited Warranty.
The maintenance service indicator will
notify you when your next maintenance
service is due.Starting approximately one month before
your next maintenance service is due, one
of the following messages will appear in
the multifunction display while you are
driving or when you switch on the ignition
(example service A):
Service A in XX Days
Service A in XX Miles
(Km)
A Service due now
The type of maintenance service due is
indicated in the multifunction display:
9Minor service (A)
´Major service (B)
iVehicles equipped with FSS (F
lexible
S
ervice S
ystem) only (Canada
vehicles): The interval between
maintenance services depends on your
driving habits. A gentle driving style,
moderate engine speeds and the
avoidance of short-distance trips will
lengthen the interval between services.
Page 338 of 442
336 Practical hintsWhere will I find ...?In the case of a flat tire, you may
temporarily use the collapsible tire when
observing the following restrictions:�
Do not exceed a vehicle speed of
50 mph (80 km/h).
�
Drive to the nearest tire repair facility
to have the flat tire repaired or
replaced as appropriate.
�
Do not operate vehicle with more than
one collapsible tire mounted.
For more information, see “Rims and Tires”
(
�page 380).
Spare wheel bolts
1Wheel bolt for light alloy rims
2Wheel bolt for Minispare wheel,
collapsible tire, or other steel rims
(located in trunk with spare wheel)
!Wheel bolts2 must be used when
mounting the Minispare wheel,
collapsible tire, or other steel rims. The
use of any wheel bolts other than wheel
bolts2 for the Minispare wheel,
collapsible tire, or other steel rims will
physically damage the vehicle’s
brakes. Warning!
G
Make sure to use the original length wheel
bolts when remounting the original wheel
after it has been repaired.
Page 365 of 442

363 Practical hints
Jump starting
�Jump starting
If the battery is discharged, the engine can
be started with jumper cables and the
battery of another vehicle. Observe the
following:�
Jump starting should only be performed
when the engine and catalytic con-
verter are cold.
�
Do not start the engine if the battery is
frozen. Let the battery thaw out first.
�
Only jump start from batteries with the
same voltage rating (12 V). Jump
starting with a more powerful battery
could damage the vehicle’s electrical
system, which will not be covered by
the Mercedes-Benz Limited Warranty.
�
Only use jumper cables with sufficient
cross-section and insulated terminal
clamps.
�
Always make sure the jumper cables
are not on or near pulleys, fans, or oth-
er parts that move when an engine is
started or running.
Warning!
G
Failure to follow these directions will cause
damage to the electronic components, and
can lead to a battery explosion and severe
injury or death.
Never lean over batteries while connecting
or jump starting, you might get injured.
Battery fluid contains sulfuric acid. Do not
allow this fluid to come in contact with eyes,
skin or clothing. In case it does, immediately
flush affected area with water, and seek
medical help if necessary.
A battery will also produce hydrogen gas,
which is flammable and very explosive. Keep
flames or sparks away from battery, avoid
improper connection of jumper cables,
smoking, etc.
Attempting to jump start a frozen battery
can result in it exploding, causing personal
injury.
Read all instructions before proceeding.
!Jump starting may only be performed
on the battery installed in the engine
compartment.
Avoid repeated and lengthy starting
attempts.
Do not attempt to start the engine
using a battery quick charge unit.
If engine does not run after several
unsuccessful starting attempts, have it
checked at the nearest authorized
Mercedes-Benz Center.
Excessive unburned fuel generated by
repeated failed starting attempts may
damage the catalytic converter and
may present a fire risk.
Make sure the jumper cables do not
have loose or missing insulation.
Make sure the cable clamps do not
touch any other metal part while the
other end is still attached to a battery.
Page 387 of 442
385 Technical data
Main dimensions
�Main dimensions
Model
C 230 Kompressor
C240
C 240 4MATIC
C320
C 320 4MATIC
C230KompressorSport
C 320 Sport
C55AMG
Overall vehicle length
178.4 in (4 531 mm)
178.4 in (4 531 mm)
181.8 in (4 617 mm)
Overall vehicle width
68.0 in (1 728 mm)
68.0 in (1 728 mm)
68.7 in (1 744 mm)
Overall vehicle height
56.3 in (1 429 mm)
55.6 in (1 413 mm)
55.6 in (1 412 mm)
Wheelbase
106.9 in (2 715 mm)
106.9 in (2 715 mm)
106.9 in (2 715 mm)
Track, front
59.3 in (1 505 mm)
59.3in (1505mm)
59.3 in (1 507 mm)
Track, rear
58.1 in (1 476 mm)
58.1 in (1 476 mm)
58.0 in (1 474 mm)