Page 29 of 442
27 At a glance
Center console
�Center console
Upper part
Item
Page
1
Seat heating*, driver’s side
105
2
Rear window sunshade
switch*
172
3
ESP control switch
79
4
Hazard warning flasher
switch – switching on/off
114
5
Central locking switch
96
Central unlocking switch
96
6
Switch for folding back
rear seat head restraints
102
7
Tow-away alarm switch*
85
Anti-theft alarm system
indicator lamp*
84
Item
Page
8
Seat heating*, passenger
side
105
9
Front passenger front
air bag off indicator lamp
70,
308
a
Audio system,
183
orCOMAND* (see separate
operating instructions)
b
Climate control
174
Rear window defroster
173
Page 103 of 442

101 Controls in detailSeats
Installing front seat head restraints�
Press switch1 upwards and hold for
about five seconds.
�
Push head restraint down until it
engages.
�
Adjust head restraint to desired
position (
�page 38).
Rear seat head restraintsHead restraint height (rear outer seats)
1Release button
Raising:
�
Manually adjust the height of the head
restraint by pulling it upward.
If the head restraint is fully retracted,
push release button1 and pull the
head restraint out.
Lowering:
�
To lower the head restraint, push
release button1 and push down on
the head restraint.
Warning!
G
For safety reasons, always drive with the
rear head restraints in the upright position
when the rear seats are occupied.
Keep the area around head restraints clear
of articles (e.g. clothing) to not obstruct the
folding operation of the head restraints.
iAdjust the head restraint in such a way
that it is as close to the head as
possible.Warning!
G
For your protection, drive only with properly
positioned head restraints.
Adjust head restraint so that the center of
the head restraint supports the back of the
head at eye level. This will reduce the poten-
tial for injury to the head and neck in the
event of an accident or similar situation.
Do not drive the vehicle without the seat
head restraints. Head restraints are
intended to help reduce injuries during an
accident.
Page 104 of 442
102 Controls in detailSeatsFolding head restraints back with
release button
The rear seat head restraints can be folded
backward for increased visibility.
1Release button�
Push release button1.
The head restraint will fold backward.Folding head restraints back with
switch in the center console (rear outer
seats)
1Switch for rear seat head restraints
�
Start the engine (
�page 46).
�
Press switch1.
The rear seat head restraints will fold
backward.Placing head restraints upright
�
Pull the head restraint forward until it
locks into position.
iYou can also fold the rear outer seat
head restraints back using the switch
in the center console (
�page 102).
Warning!
G
Make sure the head restraints engage when
placing them upright. Otherwise their
protective function cannot be assured.
Page 236 of 442
234 Controls in detailLoadingRoof rack*
�
Only mount the roof rack between the
fastening points (see arrows).
�
Secure the roof rack according to
manufacturer’s instructions for
installation.
Ski sack* (Canada only)
1Handle
2Cover
3Armrest
Unfolding and loading�
Fold armrest3 down (arrow).
�
Pull handle1 and swing cover2
down.
Warning!
G
Only use roof racks approved by
Mercedes-Benz for your vehicle model to
avoid damage to the vehicle. Follow manu-
facturer’s installation instructions.
!Load the roof rack in such a way that
the vehicle cannot be damaged while
driving.
Make sure�
you can fully raise the tilt/sliding
sunroof*.
�
you can fully open the trunk.
Page 238 of 442
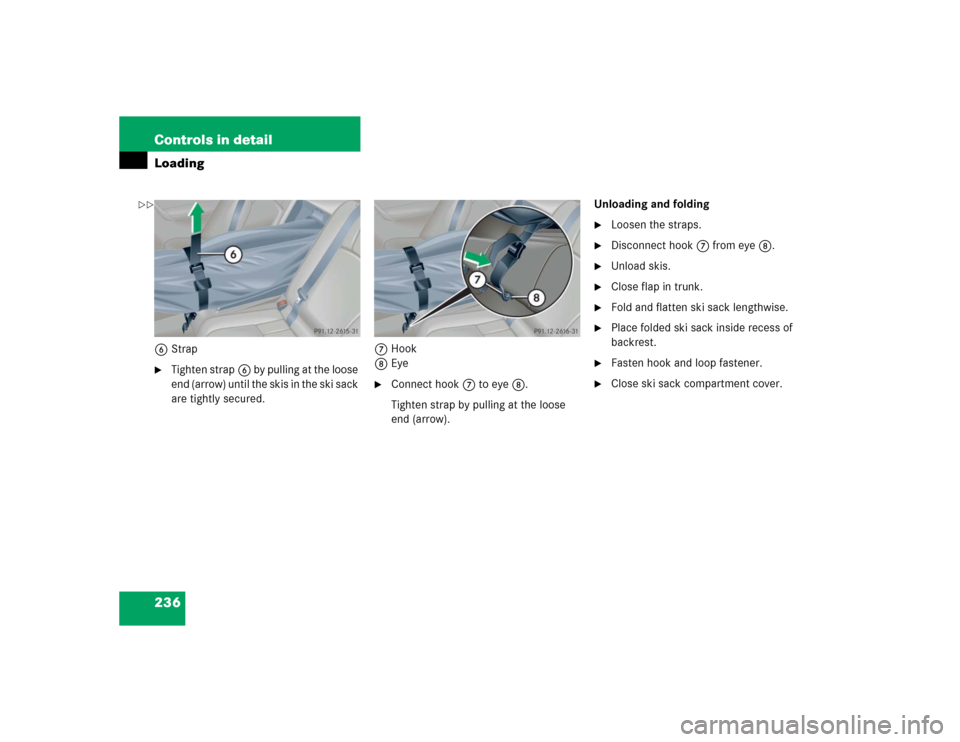
236 Controls in detailLoading6Strap�
Tighten strap6 by pulling at the loose
end (arrow) until the skis in the ski sack
are tightly secured.7Hook
8Eye
�
Connect hook7 to eye8.
Tighten strap by pulling at the loose
end (arrow).Unloading and folding
�
Loosen the straps.
�
Disconnect hook7 from eye8.
�
Unload skis.
�
Close flap in trunk.
�
Fold and flatten ski sack lengthwise.
�
Place folded ski sack inside recess of
backrest.
�
Fasten hook and loop fastener.
�
Close ski sack compartment cover.
��
Page 240 of 442
238 Controls in detailLoadingFolding the backrest forward
The release handle1 is located in the
trunk.�
Pull release handle1.
�
Fully retract and fold rearward head
restraints (
�page 102).
�
Pull release handle2.
�
Fold seat cushion3 forward.
�
Fold backrest4 forward.Returning the backrest to original
position
�
Fold backrest2 rearward until it
engages.
�
Fold seat cushion1 rearward until it
locks into position.
Page 300 of 442

298 OperationVehicle careWiper blades�
Fold wiper arms forward.
�
Clean the wiper blade inserts with a
clean cloth and detergent solution.Window cleaning
�
Fold wiper arms forward.
�
Use a window cleaning solution on all
glass surfaces.
An automotive glass cleaner is
recommended.Light alloy wheels
Mercedes-Benz approved Wheel Care
should be used for regular cleaning of the
light alloy wheels.
If possible, clean wheels once a week with
Mercedes-Benz approved Wheel Care,
using a soft bristle brush and a strong
spray of water.
Follow the instructions on container.
Instrument cluster
Use a gentle dishwashing detergent or
mild detergent for delicate fabrics as a
washing solution. Wipe with a cloth moist-
ened in lukewarm solution. Do not use
scouring agents.
Warning!
G
For safety reasons, switch off wipers and
remove SmartKey from starter switch
before cleaning the wiper blades, otherwise
the wiper motor might suddenly turn on and
cause injury.!Fold the windshield wiper arms back
onto the windshield before turning the
SmartKey in the starter switch.
Hold on to the wiper when folding the
wiper arm back. If released, the force
of the impact from the tensioning
spring could crack the windshield.
Warning!
G
For safety reasons, switch off wipers and
remove SmartKey from starter switch
before cleaning the windshield, otherwise
the wiper motor might suddenly turn on and
cause injury.!Fold the windshield wiper arms back
onto the windshield before turning the
SmartKey in the starter switch.
Hold on to the wiper when folding the
wiper arm back. If released, the force
of the impact from the tensioning
spring could crack the windshield.
iOnly use acid-free cleaning materials.
Acid may cause corrosion or damage
the clear coat.
Page 354 of 442

352 Practical hintsReplacing wiper bladesRemoving wiper blades�
Remove SmartKey from starter switch.
�
Fold wiper arm forward.
1Unlock
2Lock
�
Pull the tab in direction of arrow1 and
remove wiper blade.
Installing wiper blades�
Slide the wiper blade into the cutout on
the wiper arm (see arrows).
�
Slide the tab back in the direction of
arrow2 until it audibly engages.
�
Fold the wiper arm backward to rest on
the windshield. Make sure you hold on
to the wiper when folding the wiper arm
back.
Warning!
G
For safety reasons, remove SmartKey from
starter switch before replacing a wiper
blade. Otherwise the motor could suddenly
turn on and cause injury.
!Never open the hood when the wiper
arms are folded forward.
Hold on to the wiper when folding the
wiper arm back. If released, the force
of the impact from the tensioning
spring could crack the windshield.
Do not allow the wiper arms to contact
the windshield glass without a wiper
blade inserted.
Make certain that the wiper blades are
properly installed. Improperly installed
wiper blades may cause windshield
damage.
For your convenience, we recommend
that you have this work carried out by
an authorized Mercedes-Benz Center.