Page 148 of 426

146 Controls in detailControl system�
Press buttonæ orç to set
key-dependency
On or
Off
.
Setting parking position* for exterior
rear view mirror
Use the
Mirror set. parking aid
function
to select whether the passenger-side
exterior rear view mirror should be turned
downward during parking maneuvers when
reverse gearR is engaged. For additional
information, see “Activating exterior rear
view mirror parking position*”
(
�page 163).
�
Move the selection marker with
buttonæ orç to the Convenience
submenu.
�
Press buttonj ork repeatedly
until the message
Mirror set.
parking aid
appears in the
multifunction display.
The selection marker is on the current
setting.
�
Press buttonæ orç to switch
function
On or
Off
.
Trip computer menu
Use the trip computer menu to call up
statistical data on your vehicle.
The following information is available:Function
Page
Fuel consumption statistics after
start
147
Fuel consumption statistics
since last reset
147
Calling up range
(distance to empty)
148
��
Page 163 of 426
161 Controls in detail
Good visibility
�Good visibility
For information on the windshield wipers,
see “Windshield wipers” (
�page 50).
Headlamp cleaning system*
The switch is located on the left side of the
dashboard.
1Headlamp washer switch�
Switch on ignition (
�page 33).
�
Press switch1.
The headlamps are cleaned with a
high-pressure water jet.
For information on filling up the washer
reservoir, see “Windshield washer system
and headlamp cleaning system*”
(
�page 277).
Rear view mirrors
For more information on setting the rear
view mirrors, see “Mirrors” (
�page 41).
Interior rear view mirror, antiglare
position
1Lever
�
Tilt the mirror to the antiglare night
position by moving lever1 towards
the windshield.
The interior rear view mirror is dimmed.
Page 164 of 426

162 Controls in detailGood visibilityAutomatic antiglare rear view mirrors*
The reflection brightness of the exterior
rear view mirror on the driver’s side and
the interior rear view mirror will respond
automatically to glare when�
the ignition is switched on
and
�
incoming light from headlamps falls on
the sensor in the interior rear view
mirror.
The rear view mirror will not react if
�
reverse gearR is engaged
�
the interior lighting is turned on
Warning!
G
The automatic antiglare function does not
react if incoming light is not aimed directly
at sensors in the interior rear view mirror.
The interior rear view mirror and the exterior
rear view mirror on the driver’s side do not
react, for example, when transporting cargo
which covers the rear window.
Glare can endanger you and others.Warning!
G
In the case of an accident liquid electrolyte
may escape from the mirror housing if the
mirror glass breaks.
Electrolyte has an irritating effect. Do not
allow the liquid to come into contact with
eyes, skin, clothing, or respiratory system.
In case it does, immediately flush affected
area with water, and seek medical help if
necessary.
Warning!
G
Exercise care when using the passen-
ger-side exterior rear view mirror. The mirror
surface is convex (outwardly curved surface
for a wider field of view). Objects in mirror
are closer than they appear. Check your
interior rear view mirror or glance over your
shoulder before changing lanes.!Electrolyte drops coming into contact
with the vehicle paint finish can be
completely removed only while in the
liquid state and by applying plenty of
water.
Page 165 of 426

163 Controls in detail
Good visibility
Activating exterior rear view mirror
parking position*
Follow these steps to activate the mirror
parking position so that the
passenger-side exterior rear view mirror
will be turned downward to the stored
position.
The buttons are located above the exterior
lamp switch.
1Driver’s side exterior rear view mirror
button
2Passenger-side exterior rear view
mirror button
�
Make sure you have stored a parking
position for the passenger-side exterior
rear view mirror (
�page 107).
�
Make sure the
Mirror set. parking
aid
function in the
Convenience
submenu of the control system is
switched to
On (�page 146).
�
Switch on ignition (
�page 33).
�
Press button2 for the passenger-side
exterior rear view mirror.
�
Place the gear selector lever in reverse
gearR.
The passenger-side exterior rear view
mirror will be turned downward to the
stored position.The exterior rear view mirror returns to its
previously stored driving position:
�
ten seconds after you put the gear
selector lever out of positionR
�
immediately once your vehicle exceeds
a speed of approx. 6 mph (10 km/h)
�
immediately when you press button1
for the driver’s side mirror
Page 166 of 426
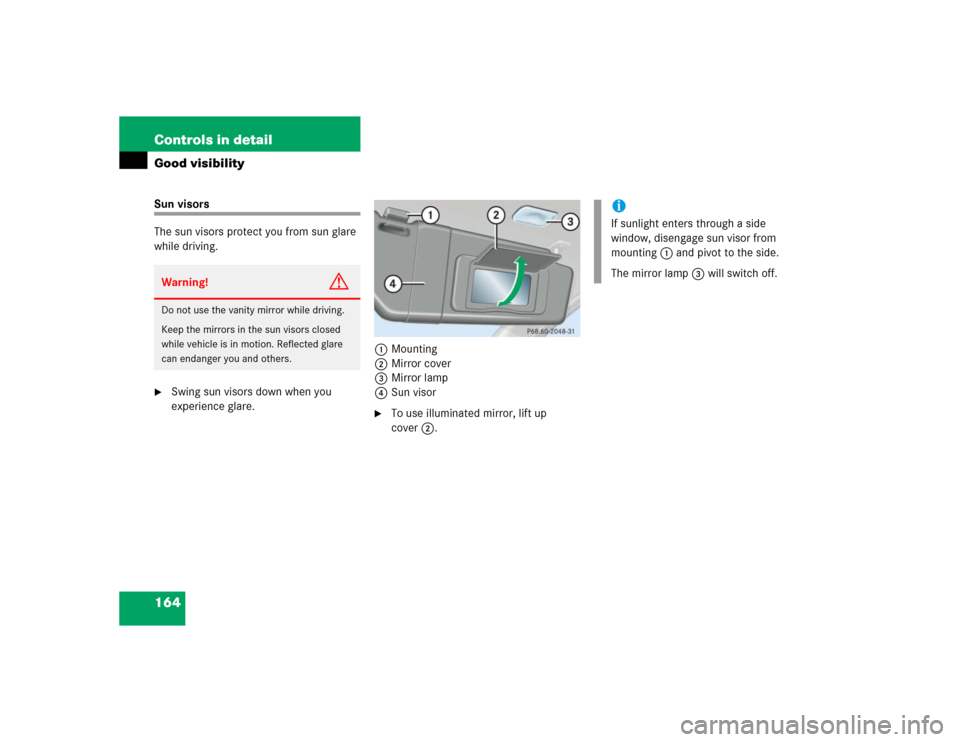
164 Controls in detailGood visibilitySun visors
The sun visors protect you from sun glare
while driving.�
Swing sun visors down when you
experience glare.1Mounting
2Mirror cover
3Mirror lamp
4Sun visor
�
To use illuminated mirror, lift up
cover2.
Warning!
G
Do not use the vanity mirror while driving.
Keep the mirrors in the sun visors closed
while vehicle is in motion. Reflected glare
can endanger you and others.
iIf sunlight enters through a side
window, disengage sun visor from
mounting1 and pivot to the side.
The mirror lamp3 will switch off.
Page 244 of 426

The Tele Aid system consists of three
types of response:�
automatic and manual emerg")
242 Controls in detailUseful featuresTele Aid* The Tele Aid system
(Tele
matic A
larm I
dentification on
D
emand)
The Tele Aid system consists of three
types of response:�
automatic and manual emergency
�
roadside assistance and
�
information
The Tele Aid system is operational provid-
ing that the vehicle’s battery is charged,
properly connected, not damaged and
cellular and GPS coverage is available.
The speaker volume of a Tele Aid call can
be adjusted when using the volume control
on the multifunction steering wheel. To
raise, press buttonæ and to lower,
press buttonç. The volume can also be
adjusted using the volume knob on your
audio system or COMAND* head unit.
�
To activate, press the SOS button, the
Roadside Assistance button• or
the Information button¡, depend-
ing on the type of response required.Shortly after the completion of your Tele
Aid acquaintance call, you will receive a
user ID and password. By visiting
www.mbusa.com and selecting “Tele Aid”
(USA only), you will have access to account
information, remote door unlock and
more.
!The initial activation of the Tele Aid
system may only be performed by
completing the subscriber agreement
and placing an acquaintance call using
the¡ button. Failure to complete
either of these steps will result in a
system that is not activated.
If you have any questions regarding
activation, please call the Response
Center at 1-800-756-9018 (in the USA)
or 1-888-923-8367 (in Canada).
iThe SOS button is located above the
interior rear view mirror.
The Roadside Assistance button•
and the Information button¡ are
located below the center armrest
cover.iThe Tele Aid system utilizes the cellular
network for communication and the
GPS (Global Positioning System) satel-
lites for vehicle location. If either of
these signals are unavailable, the
Tele Aid system may not function and if
this occurs, assistance must be sum-
moned by other means.
Page 245 of 426

243 Controls in detail
Useful features
System self-check
Initially, after switching on ignition, mal-
functions are detected and indicated (the
indicator lamps in the SOS button, the
Roadside Assistance button• and the
Information button¡ stay on longer
than ten seconds or do not come on). The
message
Tele Aid malfunction. Drive
to workshop
appears in the multifunction
display.Emergency calls
An emergency call is initiated
automatically following an accident in
which the emergency tensioning devices
(ETDs) or air bags deploy.
An emergency call can also be initiated
manually by opening the cover next to the
interior rear view mirror labeled SOS, then
briefly pressing the button located under
the cover. See (
�page 244) for
instructions on initiating an emergency call
manually.
Once the emergency call is in progress, the
indicator lamp in the SOS button will begin
to flash. The message
Connecting call
appears in the multifunction display and
the audio system is muted. When the
connection is established, the message
Call connected
appears in the multifunc-
tion display. All information relevant to the
emergency, such as the location of the
vehicle (determined by the GPS satellite
location system), vehicle model, identifica-
tion number and color are generated.
Warning!
G
If the indicator lamps in the SOS button, in
the Roadside Assistance button and/or in
the Information button remain illuminated
constantly in red and/or the message Tele Aid malfunction. Drive to
workshop
is displayed in the multifunction
display after the system self-check, a mal-
function in the system has been detected.
If a malfunction is indicated as outlined
above, the system may not operate as
expected. Have the system checked at the
nearest Mercedes-Benz Center as soon as
possible.
Page 252 of 426

250 Controls in detailUseful featuresRemote control integrated into the interior
rear view mirror1Indicator lamp
2 3 4Signal transmitter button
5Hand-held transmitter button
6Hand-held remote control
transmitter (not part of the
vehicle equipment)
Warning!
G
Before programming the integrated remote
control to a garage door opener or gate
operator, make sure people and objects are
out of the way of the device to prevent po-
tential harm or damage. When programming
a garage door opener, the door moves up or
down. When programming a gate operator,
the gate opens or closes.
Do not use the integrated remote control
with any garage door opener that lacks
safety stop and reverse features as required
by U.S. federal safety standards (this
includes any garage door opener model
manufactured before April 1, 1982).
A garage door that cannot detect an object
- signaling the door to stop and reverse -
does not meet current U.S. federal safety
standards.
iCertain types of garage door openers
are incompatible with the integrated
opener. If you should experience
difficulties with programming the
transmitter, contact an authorized
Mercedes-Benz Center, or call
Mercedes-Benz Customer Assistance
Center (in the USA only) at
1-800-FOR-MERCedes, or Customer
Service (in Canada) at
1-800-387-0100.