Page 309 of 474

(�page 308) as to not ex")
308 OperationTires and wheelsCertification label
Even after careful determination of the
combined weight of all occupants, cargo
and the trailer tongue load (if applicable)
(�page 308) as to not exceed the permis-
sible load limit, you must make sure that
your vehicle never exceeds the Gross Vehi-
cle Weight Rating (GVWR) and the Gross
Axle Weight Rating (GAWR) for either the
front or rear axle. You can obtain the
GVWR and GAWR from the Certification la-
bel. The Certification Label can be found
on the driver’s door B-pillar, see “Technical
data” (
�page 416).Gross Vehicle Weight Rating (GVWR): The
total weight of the vehicle, all occupants,
all cargo, and the trailer tongue load
(
�page 308) must never exceed the
GVWR.
Gross Axle Weight Rating (GAWR): The to-
tal allowable weight that can be carried by
a single axle (front or rear).
To assure that your vehicle does not ex-
ceed the maximum permissible weight
limits (GVWR and GAWR for front and rear
axle), have the loaded vehicle (including
driver, passengers and all cargo and, if ap-
plicable, trailer fully loaded) weighed on a
suitable commercial scale.Trailer tongue load
The tongue load of any trailer is an impor-
tant weight to measure because it affects
the load you can carry in your vehicle. If a
trailer is towed, the tongue load must be
added to the weight of all occupants riding
and any cargo you are carrying in the
vehicle. The tongue load typically is ten
percent of the trailer weight and every-
thing loaded in it.
Your Mercedes-Benz has been designed
primarily to carry passengers and their
cargo. Mercedes-Benz does not recom-
mend trailer towing with your vehicle.
Page 336 of 474

335 Operation
Vehicle care
Engine cleaning
Prior to cleaning the engine compartment
make sure to protect electrical compo-
nents and connectors from the intrusion of
water and cleaning agents.
Corrosion protection, such as MB Anticor-
rosion Wax, should be applied to the en-
gine compartment after every engine
cleaning. Before applying, all control link-
age bushings and joints should be lubricat-
ed. The poly-V-belt and all pulleys should
be protected from any wax.Vehicle washing
Do not use hot water or wash your vehicle
in direct sunlight. Use only a mild car wash
detergent, such as Mercedes-Benz ap-
proved Car Shampoo.
Thoroughly spray the vehicle with a dif-
fused jet of water. Direct only a very weak
spray towards the ventilation intake. Use
plenty of water and rinse the sponge and
chamois frequently.
Rinse with clear water and thoroughly dry
with a chamois. Do not allow cleaning
agents to dry on the finish.
Due to the width of the vehicle, fold in ex-
terior rear view mirrors prior to running the
vehicle through an automatic car wash to
prevent damage to the mirrors.
In the winter, thoroughly remove all traces
of road salt as soon as possible.
When washing the underbody, do not
forget to clean the inner sides of the
wheels.Ornamental moldings
For regular cleaning and care of very dirty
chrome-plated parts, use a chrome clean-
er.
Headlamps, tail lamps, side markers,
turn signal lenses
Use a mild car wash detergent, such as
Mercedes-Benz approved Car Shampoo,
with plenty of water.
To prevent scratches, never apply strong
force and use only a soft, non-scratchy
cloth when cleaning the lenses. Do not
attempt to wipe dirty lenses with a dry
cloth or sponge.
Page 340 of 474
339 Practical hints
What to do if …
Where will I find ...?
Unlocking/locking in an emergency
Opening/closing in an emergency
Replacing SmartKey batteries
Replacing bulbs
Replacing wiper blades
Flat tire
Battery
Jump starting
Towing the vehicle
Fuses
Page 374 of 474
373 Practical hints
Where will I find ...?
�Where will I find ...?
First aid kit
The first aid kit is stored in the trunk be-
hind the left trim panel.
1Handles
2Trim panel�
Turn handles1 clockwise.
�
Remove the trim panel2.3First aid kit
4Securing strap
5To loosen securing strap
�
Loosen5 the securing strap4.
�
Remove first aid kit3.
Vehicle tool kit
The vehicle tool kit and air pump are stored
in the wheel well below the trunk floor.
1Vehicle jack
2Air pump
3Alignment bolt
4Wheel wrench
5Towing eye bolt
6Collapsible wheel chock
7Wheel bolts (under cover)
8Gloves
iCheck expiration dates and contents
for completeness at least once a year
and replace missing/expired items.
Page 381 of 474
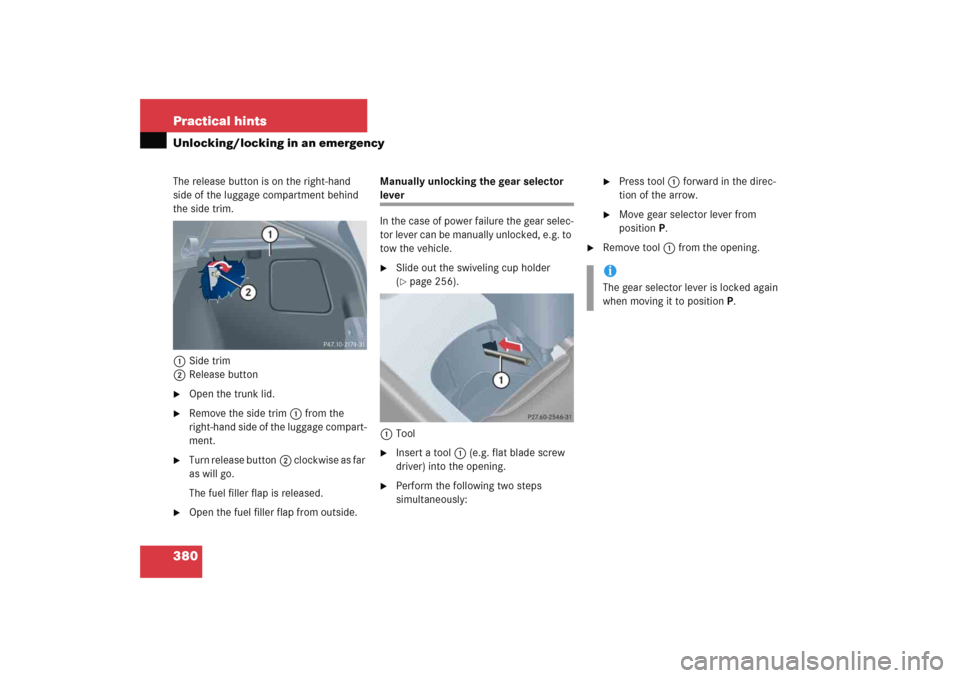
380 Practical hintsUnlocking/locking in an emergencyThe release button is on the right-hand
side of the luggage compartment behind
the side trim.
1Side trim
2Release button�
Open the trunk lid.
�
Remove the side trim1 from the
right-hand side of the luggage compart-
ment.
�
Turn release button2 clockwise as far
as will go.
The fuel filler flap is released.
�
Open the fuel filler flap from outside.Manually unlocking the gear selector
lever
In the case of power failure the gear selec-
tor lever can be manually unlocked, e.g. to
tow the vehicle.�
Slide out the swiveling cup holder
(�page 256).
1Tool
�
Insert a tool1 (e.g. flat blade screw
driver) into the opening.
�
Perform the following two steps
simultaneously:
�
Press tool1 forward in the direc-
tion of the arrow.
�
Move gear selector lever from
positionP.
�
Remove tool1 from the opening.iThe gear selector lever is locked again
when moving it to positionP.
Page 391 of 474

390 Practical hintsReplacing bulbsParking and standing lamp bulb�
Turn housing cover2 counterclock-
wise and remove it.
�
Pull out bulb socket5 with the bulb.
�
Pull the bulb out of bulb socket5.
�
Press the new bulb into bulb socket5.
�
Press bulb socket5 back into the
lamp.
�
Align housing cover2 and turn it
clockwise.Side marker lamp bulb
�
Carefully slide the lamp towards the
rear in direction of arrows.
�
Remove the front end first.
�
Turn the bulb socket with the bulb
counterclockwise and remove it.
�
Pull the bulb out of the bulb socket.
�
Insert the new bulb into the bulb sock-
et.
�
Place the bulb socket back into the
lamp and turn it clockwise.
�
To reinstall the lamp, set the rear end in
the bumper and let the front end en-
gage.
Replacing bulbs for rear lamps
Before you start to replace a bulb for a rear
lamp, do the following first:�
Turn the exterior lamp switch to
positionM (
�page 110).
Tail lamp unit
1Trim panel
2Latch
�
Open the trunk lid.
�
Turn latches1 on respective trim
panel2 clockwise.
�
Fold trim panel2 to the side.
Page 406 of 474

405 Practical hints
Jump starting
The battery is located in the engine com-
partment on the right hand side. The
terminals for jump starting are located in
front of the battery.�
Make sure the two vehicles do not
touch.
�
Turn off the engine.
On both vehicles:
�
Turn off all electrical consumers.
�
Apply parking brake.
�
Shift gear selector lever to positionP
(manual transmission to Neutral).1Positive terminal of charged battery
2Positive under hood terminal in front of
discharged battery
3Negative terminal of charged battery
4Negative under hood terminal in front
of discharged battery
�
Connect positive terminal1 of the
charged battery with positive under
hood terminal2 in front of the dis-
charged battery with the jumper ca-
bles. Clamp cable to charged
battery1 first.
�
Start engine of the vehicle with the
charged battery and run at idle speed.
�
Connect negative terminal3 of the
charged battery with negative under
hood terminal4 in front of the dis-
charged battery with the jumper
cables. Clamp cable to charged
battery3 first.
�
Start the engine of the disabled
vehicle.
Now you can turn on the electrical con-
sumers. Do not turn on the lights under
any circumstances.
�
Remove the jumper cables first from
negative terminals4 and3 and then
from positive terminals2 and1.
You can now turn on the lights.
�
Have the battery checked at the
nearest authorized Mercedes-Benz
Center.
Warning!
G
Keep flames or sparks away from battery.
Do not smoke.
Observe all safety instructions and precau-
tions when handling automotive batteries
(�page 297).
!Vehicles with automatic transmission:
Do not tow-start the vehicle.
Page 407 of 474

406 Practical hintsTowing the vehicleMercedes-Benz recommends that the vehi-
cle be transported with all wheels off the
ground using flatbed or appropriate wheel
lift/dolly equipment. This method is pref-
erable to other types of towing.When circumstances do not permit the
recommended towing methods, the vehi-
cle may be towed with all wheels on the
ground or front wheels raised only so far as
necessary to have the vehicle moved to a
safe location where the recommended
towing methods can be employed.
!Use flatbed or wheel lift/dolly equip-
ment with SmartKey in starter switch
turned to position0.
Do not tow with sling-type equipment.
Towing with sling-type equipment over
bumpy roads will damage radiator and
supports.
To prevent damage during transport,
do not tie down vehicle by its chassis or
suspension parts.
Switch off the tow-away alarm
(�page 87) and deactivate the auto-
matic central locking (
�page 148).
!Vehicles with automatic transmission:
Do not tow-start the vehicle.
!If the vehicle is towed with the front
axle raised, the engine must be shut off
(SmartKey in starter switch position0
or1). Otherwise, the ESP will immedi-
ately be engaged and will apply the rear
wheel brakes.
When towing the vehicle with all wheels
on the ground, the gear selector lever
must be in positionN (manual trans-
mission: gears disengaged) and the
SmartKey must be in starter switch
position2.
When towing the vehicle with all wheels
on the ground or the front axle raised,
the vehicle may be towed only for dis-
tances up to 30 miles (50 km) and at a
speed not to exceed 30 mph
(50 km/h).