Page 269 of 474
,
and the reserve key is not handy:�
Contact the Mercedes")
268 Controls in detailUseful features
Remote door unlock
In case you have locked your vehicle unin-
tentionally (e.g. SmartKey inside vehicle),
and the reserve key is not handy:�
Contact the Mercedes-Benz Response
Center at 1-800-756-9018 (in the USA)
or 1-888-923-8367 (in Canada).
You will be asked to provide your pass-
word which you provided when you
completed the subscriber agreement.
�
Then return to your vehicle and pull the
trunk lid recessed handle for minimum
of 20 seconds until the SOS button is
flashing.
The message
Connecting call
appears in the multifunction display.
As an alternative, you may unlock the vehi-
cle via Internet using the ID and password
sent to you shortly after the completion of
your acquaintance call.
The Response Center will then unlock your
vehicle with the remote door unlocking
feature.
iWhen a Tele Aid call has been initiated,
the audio system or the COMAND*
system audio is muted and the select-
ed mode (radio, tape or CD) pauses.
The optional cellular phone (if installed)
switches off. If you must use this
phone, the vehicle must be parked.
Disconnect the coiled cord and place
the call. The COMAND* navigation
system (if engaged) will continue to
run. The display in the instrument clus-
ter is available for use and spoken com-
mands are only available by pressing
the RPT button on the COMAND* unit.
A pop-up window will appear in the
COMAND* display to indicate that a
Tele Aid call is in progress.
iThe remote door unlock feature is avail-
able if the relevant cellular phone net-
work is available.
The SOS button will flash and the mes-
sage
Connecting call
will appear in
the multifunction display to indicate
receipt of the door unlock command.
Once the vehicle is unlocked, a
Response Center specialist will
attempt to establish voice contact with
the vehicle occupants.
If the trunk lid recessed handle was
pulled for more than 20 seconds be-
fore door unlock authorization was re-
ceived by the Response Center, you
must wait 15 minutes before pulling
the trunk lid recessed handle again.
Page 285 of 474

284 OperationDriving instructionsStanding water
Passenger compartmentDriving abroad
Abroad, there is an extensive
Mercedes-Benz service network at your
disposal. If you plan to drive into areas
which are not listed in the index of your
Mercedes-Benz Center directory, you
should request pertinent information from
an authorized Mercedes-Benz Center.Control and operation of radio
transmitter
COMAND*, radio and telephone*
!Do not drive through flooded areas or
water of unknown depth. Before driving
through water, determine its depth.
Never accelerate before driving into
water. The bow wave could force water
into the engine and auxiliary equip-
ment, thus damaging them.
If you must drive through standing wa-
ter, drive slowly to prevent water from
entering the passenger compartment
or the engine compartment. Water in
these areas could cause damage to
electrical components or wiring of the
engine or transmission, or could result
in water being ingested by the engine
through the air intake causing severe
internal engine damage. Any such
damage is not covered by the
Mercedes-Benz Limited Warranty.
Warning!
G
Always fasten items being carried as secure-
ly as possible.
In an accident, during hard braking or sud-
den maneuvers, loose items will be thrown
around inside the vehicle, and cause injury
to vehicle occupants unless the items are
securely fastened in the vehicle.
The trunk is the preferred place to carry
objects.
Warning!
G
Please do not forget that your primary
responsibility is to drive the vehicle safely.
Only operate the COMAND (Cockpit Man-
agement and Data System), radio or tele-
phone
1 if road, weather and traffic
conditions permit.
Bear in mind that at a speed of just 30 mph
(approximately 50 km / h), your vehicle is
covering a distance of 44 feet (approximate-
ly 14 m) every second.
1Observe all legal requirements
Page 373 of 474

372 Practical hintsWhat to do if …Display symbol
Display message
Possible cause
Possible solution
K
Close slid./pop-up
sunroof
You have opened the driver’s door with
the SmartKey removed from the starter
switch and the panorama roof with power
tilt/sliding panel open.
�
Close the panorama roof with power
tilt/sliding panel (
�page 242).
J
Close slid./pop-up
sunroof
You have opened the driver’s door with
the SmartKey removed from the starter
switch and the panorama roof with power
tilt/sliding panel open.
�
Close the panorama roof with power
tilt/sliding panel (
�page 242).
L
Tele Aid malfunction.
Drive to workshop
One or more main functions of the Tele
Aid system* are malfunctioning.
�
Have the Tele Aid system* checked by
an authorized Mercedes-Benz Center.
t
Function unavailable.
This display appears if buttont
ors on the multifunction steering
wheel is pressed and the vehicle is not
equipped with a telephone*.
Ê
Trunk open
This message will appear whenever the
trunk lid is open.
�
Close the trunk lid.
W
Washer fluid
please refill
The fluid level has dropped to
about
1/3of total reservoir capacity.
�
Add washer fluid (
�page 299).
Page 374 of 474
373 Practical hints
Where will I find ...?
�Where will I find ...?
First aid kit
The first aid kit is stored in the trunk be-
hind the left trim panel.
1Handles
2Trim panel�
Turn handles1 clockwise.
�
Remove the trim panel2.3First aid kit
4Securing strap
5To loosen securing strap
�
Loosen5 the securing strap4.
�
Remove first aid kit3.
Vehicle tool kit
The vehicle tool kit and air pump are stored
in the wheel well below the trunk floor.
1Vehicle jack
2Air pump
3Alignment bolt
4Wheel wrench
5Towing eye bolt
6Collapsible wheel chock
7Wheel bolts (under cover)
8Gloves
iCheck expiration dates and contents
for completeness at least once a year
and replace missing/expired items.
Page 375 of 474

374 Practical hintsWhere will I find ...?Vehicle jack
Storage position�
Remove the vehicle jack from the spare
wheel well under the trunk floor.
�
Push the crank handle up.
�
Turn the crank handle clockwise until it
engages (operational position).
Before storing the vehicle jack in its com-
partment:
�
It should be fully collapsed.
�
The handle must be folded in (storage
position).
Warning!
G
The jack is designed exclusively for jacking
up the vehicle at the jack take-up brackets
built into both sides of the vehicle. To help
avoid personal injury, use the jack only to lift
the vehicle during a wheel change. Never
get beneath the vehicle while it is supported
by the jack. Keep hands and feet away from
the area under the lifted vehicle. Always
firmly set parking brake and block wheels
before raising vehicle with jack.
Do not disengage parking brake while the
vehicle is raised. Be certain that the jack is
always vertical (plumb line) when in use, es-
pecially on hills. Always try to use the jack
on level surface. Make sure the jack arm is
fully seated in the jack take-up bracket. Al-
ways lower the vehicle onto sufficient ca-
pacity jack stands before working under the
vehicle.
Page 376 of 474
375 Practical hints
Where will I find ...?
Setting up the collapsible wheel chock
The collapsible wheel chock serves to ad-
ditionally secure the vehicle, e.g. while
changing the wheel.
1Tilt the plates upward
2Fold the lower plate outward
3Insert the plate
�
Tilt both plates upward1.
�
Fold the lower plate outward2.
�
Guide the tabs of the lower plate all the
way into the openings of the base
plate3.
Spare wheel
The spare wheel is located under the trunk
floor.
Removing the spare wheel�
Lift trunk floor.
1Spare wheel
2Storage tray with vehicle tool kit
3Mounting screw for spare wheel/cover
for vehicle tools
�
Turn the mounting screw3 counter-
clockwise.
�
Remove the spare wheel1.
Page 377 of 474

376 Practical hintsWhere will I find ...?Storing the spare wheel
If you wish to store the spare wheel after
use, carry out the following steps. Other-
wise the spare wheel will not fit the wheel
well.�
Unscrew the valve cap from the valve
of the spare wheel.
�
Carefully push the tip of the valve cap
into the spare wheel valve and allow
the air to escape.
�
Screw the valve cap back on the valve.
�
Place spare wheel1 in wheel well.
�
Turn retaining screw3 clockwise to
its stop to secure the spare wheel.
�
Install the trunk floor.Spare wheel bolts
1Wheel bolt for light alloy rims
2Wheel bolt for light alloy spare wheel
rim size 4
1/2B x15 H2For more information on model and spare
wheel rim size, see “Technical data”
section (
�page 422).
iIt may take a few minutes for the col-
lapsible tire to deflate completely.
!Wheel bolts2 must be used when
mounting spare wheel rim
size 4
1/2Bx15 H2 (
�page 422).
The use of any wheel bolts other than
wheel bolts2 for spare wheel rim
size 4
1/2B x15 H2 can cause physical
damage to the vehicle.
Warning!
G
Make sure to use the original length wheel
bolts when remounting the original wheel af-
ter it has been repaired.
Page 378 of 474
377 Practical hints
Unlocking/locking in an emergency
�Unlocking/locking in an emergency
Unlocking the vehicle
If you are unable to unlock the vehicle with
the SmartKey, open the driver’s door using
the mechanical key and the trunk lid using
the emergency release lever.
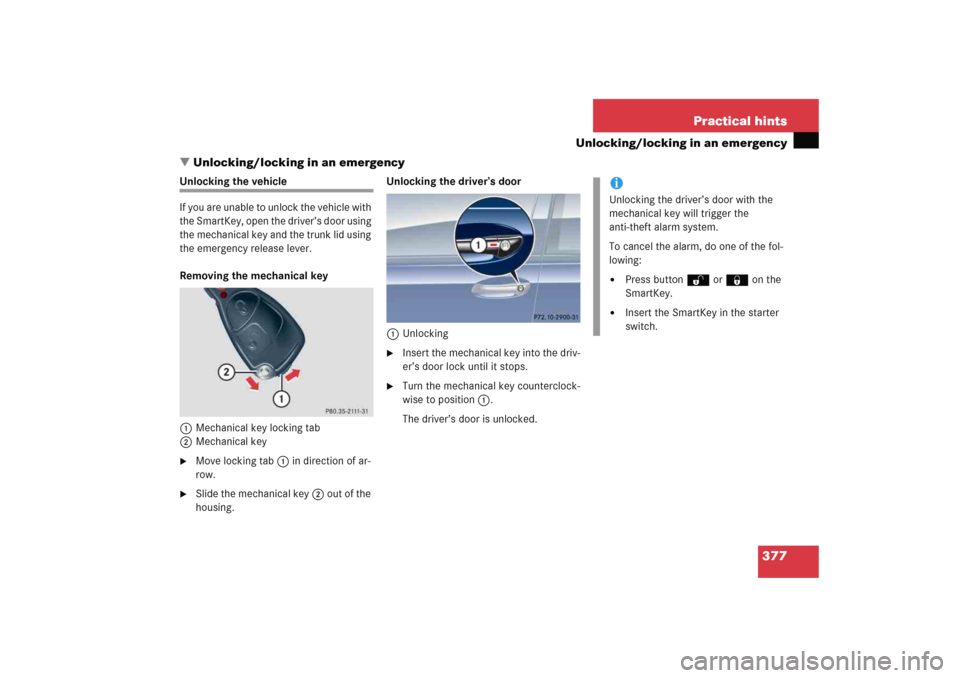
Removing the mechanical key
1Mechanical key locking tab
2Mechanical key�
Move locking tab1 in direction of ar-
row.
�
Slide the mechanical key2 out of the
housing.Unlocking the driver’s door
1Unlocking
�
Insert the mechanical key into the driv-
er’s door lock until it stops.
�
Turn the mechanical key counterclock-
wise to position1.
The driver’s door is unlocked.
iUnlocking the driver’s door with the
mechanical key will trigger the
anti-theft alarm system.
To cancel the alarm, do one of the fol-
lowing:�
Press buttonŒ or ‹ on the
SmartKey.
�
Insert the SmartKey in the starter
switch.