Page 34 of 474

33 Getting started
Unlocking
Starter switch positions
Starter switch0For removing SmartKey
The steering is locked when the Smart-
Key is removed from the starter switch.
If necessary, move steering wheel
slightly to allow the locking mechanism
to engage.
1Power supply to some electrical con-
sumers, such as seat adjustment2Ignition (power supply for all electrical
consumers) and driving position. All
lamps (except low beam headlamp in-
dicator lamp, high beam headlamp indi-
cator lamp, and turn signal indicator
lamps unless activated) in the instru-
ment cluster come on. If a lamp in the
instrument cluster fails to come on
when the ignition is switched on, have
it checked and replaced if necessary. If
a lamp in the instrument cluster re-
mains on after starting the engine or
comes on while driving, refer to “Lamps
in instrument cluster” (
�page 340).
3Starting position
Warning!
G
When leaving the vehicle, always remove the
SmartKey from the starter switch, take it
with you, and lock the vehicle. Do not leave
children unattended in the vehicle, or with
access to an unlocked vehicle. Unsuper-
vised use of vehicle equipment may cause
an accident and/or serious personal injury.
Page 35 of 474

34 Getting startedUnlocking
iWhen you switch on the ignition, the in-
dicator and warning lamps (except low
beam headlamp indicator lamp, high
beam headlamp indicator lamp, and
turn signal indicator lamps unless acti-
vated) in the instrument cluster come
on. This indicates that the respective
systems are operational. The indicator
and warning lamps (except low beam
headlamp indicator lamp, high beam
headlamp indicator lamp, and turn sig-
nal indicator lamps if activated) should
go out when the engine is running.iVehicles with automatic transmission:
The SmartKey can only be removed
from the starter switch with the gear
selector lever in positionP.
!If the SmartKey cannot be turned in the
starter switch, the battery may not be
sufficiently charged.�
Check the battery and charge it if
necessary (
�page 401).
�
Get a jump start (
�page 404).
To prevent accelerated battery dis-
charge and a possible dead battery, al-
ways remove the SmartKey from the
starter switch when the engine is not in
operation.
Page 36 of 474

35 Getting started
Adjusting
�Adjusting
Seats
The seats can be adjusted either manually
or electrically, depending on the vehicle’s
equipment.Warning!
G
All seat, head restraint, steering wheel, and
rear view mirror adjustments, as well as fas-
tening of seat belts, must be done before
the vehicle is put into motion.Warning!
G
Do not adjust the driver’s seat while driving.
Adjusting the seat while driving could cause
the driver to lose control of the vehicle.
Never ride in a moving vehicle with the seat
back in an excessively reclined position as
this can be dangerous. You could slide
under the seat belt in a collision. If you slide
under it, the belt would apply force at the
abdomen or neck.
That could cause serious or fatal injuries.
The seat back and seat belts provide the
best restraint when the wearer is in a nearly
upright position and belts are properly posi-
tioned on the body. Your seat must be
adjusted so that you can correctly fasten
your seat belt (
�page 44).
Never place hands under the seat or near
any moving parts while a seat is being ad-
justed.
Warning!
G
When leaving the vehicle, always remove the
SmartKey from the starter switch, take it
with you, and lock the vehicle.
Even with the SmartKey removed from the
starter switch, the power seats* can be op-
erated when the respective door is open.
Therefore, do not leave children unattended
in the vehicle, or with access to an unlocked
vehicle. Unsupervised use of vehicle equip-
ment may cause an accident and/or serious
personal injury.
Warning!
G
According to accident statistics, children
are safer when properly restrained in the
rear seating positions than in the front seat-
ing position. Thus, we strongly recommend
that children be placed in the rear seats
whenever possible. Regardless of seating
position, children 12 years old and under
must be seated and properly secured in an
appropriate infant, or toddler restraint, or
booster seat recommended for the size and
weight of the child. For additional
information, see “Children in the vehicle”
(�page 70).
A child’s risk of serious or fatal injuries is
significantly increased if the child restraints
are not properly secured in the vehicle
and/or the child is not properly secured in
the child restraint.
Page 38 of 474
37 Getting started
Adjusting
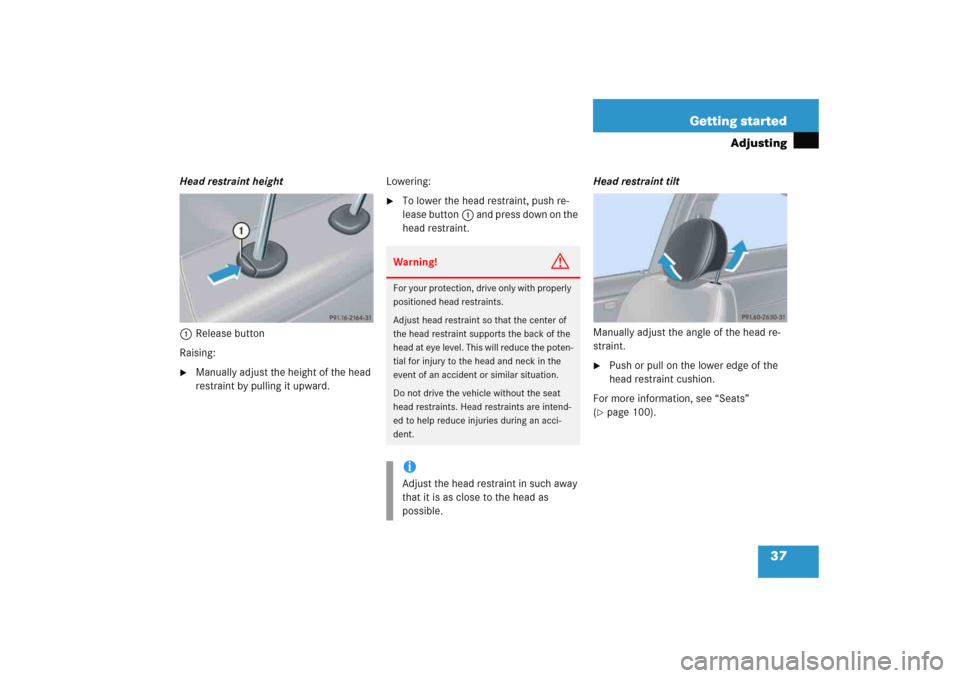
Head restraint height
1Release button
Raising:�
Manually adjust the height of the head
restraint by pulling it upward.Lowering:
�
To lower the head restraint, push re-
lease button1 and press down on the
head restraint.Head restraint tilt
Manually adjust the angle of the head re-
straint.
�
Push or pull on the lower edge of the
head restraint cushion.
For more information, see “Seats”
(
�page 100).
Warning!
G
For your protection, drive only with properly
positioned head restraints.
Adjust head restraint so that the center of
the head restraint supports the back of the
head at eye level. This will reduce the poten-
tial for injury to the head and neck in the
event of an accident or similar situation.
Do not drive the vehicle without the seat
head restraints. Head restraints are intend-
ed to help reduce injuries during an acci-
dent.iAdjust the head restraint in such away
that it is as close to the head as
possible.
Page 40 of 474

39 Getting started
Adjusting
Head restraint tilt
Manually adjust the angle of the head re-
straint. �
Push or pull on the lower edge of the
head restraint cushion.
For more information, see “Seats”
(
�page 100).Folding front seat backrest forward
1Release lever
2Seat belt presenter
Warning!
G
For your protection, drive only with properly
positioned head restraints.
Adjust head restraint so that the center of
the head restraint supports the back of the
head at eye level. This will reduce the poten-
tial for injury to the head and neck in the
event of an accident or similar situation.
Do not drive the vehicle without the seat
head restraints. Head restraints are intend-
ed to help reduce injuries during an acci-
dent.
iIn addition to the front seat backrests,
the front seat cushions can also be
shifted forward to permit easy access
to the rear whenever the seat is located
in the rear half of its adjustment range.
Swivel backrest forward by pulling the
release lever until the seat moves in a
combined forward and upward move-
ment.
Page 41 of 474

40 Getting startedAdjustingFolding backrest forward�
Pivot seat belt presenter2 down.
�
Pull release lever1 forward and fold
the seat backrest forward.
Vehicles with manual seat adjustment:
�
If necessary, press the head restraint
downward while tilting the backrest
forward.Folding backrest back
�
Fold and press the backrest rearward
until it engages in driving position.
Vehicles with manual seat adjustment:
�
If necessary, pull the head restraint out
while tilting the seat back.
For more information, see “Seats”
(
�page 100).
Steering wheel
iVehicles with power seat*: The head
restraints will automatically move
down.
iVehicles with power seat*: The head
restraint returns to its previous posi-
tions.
Warning!
G
Do not adjust the steering wheel while
driving. Adjusting the steering wheel while
driving, or driving without the steering wheel
adjustment locked could cause the driver to
lose control of the vehicle.
When leaving the vehicle, always remove the
SmartKey from the starter switch, take it
with you, and lock the vehicle.
Even with the SmartKey removed from the
starter switch, the electrical steering wheel
adjustment feature* can be operated when
the driver’s door is open. Therefore, do not
leave children unattended in the vehicle, or
with access to an unlocked vehicle. Unsu-
pervised use of vehicle equipment may
cause an accident and/or serious personal
injury.
Page 42 of 474

41 Getting started
Adjusting
Steering wheel adjustment, manual
1Handle�
To unlock the steering column, pull
handle1 out until its stop limit.
�
Move steering wheel to the desired
position.
�
To lock the steering column, push
handle1 all the way in until it
engages.
The steering wheel is once again
locked into position.
�
Make sure the steering wheel is
securely locked by trying to move it up
and down, and in and out before driving
off.
Make sure your legs can move freely and
that all the displays (inclusive malfunction
and indicator lamps) on the instrument
cluster are clearly visible.Steering wheel adjustment, electrical*
The stalk for steering wheel adjustment is
located on the steering column (lower left).
1Adjusting steering column, in or out
2Adjusting steering column, up or down
�
Switch on the ignition (
�page 33).
or
�
Open the driver’s door.
Warning!
G
Only adjust the steering wheel with the vehi-
cle at a standstill and make sure the steer-
ing wheel is securely locked in place before
driving off.
Driving without the steering wheel adjust-
ment locked may cause an unexpected
steering wheel movement which could
cause the driver to lose control of the vehi-
cle. Make sure the steering wheel is secure-
ly locked by trying to move it up and down,
and in and out before driving off.
Page 43 of 474

42 Getting startedAdjustingAdjusting steering column in or out�
Move stalk forward or back in the direc-
tion of arrow1 until a comfortable
steering wheel position is reached with
your arms slightly bent at the elbow.
Adjusting steering column, up or down
�
Move stalk up or down in the direction
of arrow2.
Make sure your legs can move freely
and that all the displays (inclusive mal-
function and indicator lamps) on the in-
strument cluster are clearly visible.
Mirrors
Adjust the interior and exterior rear view
mirrors before driving so that you have a
good view of the road and traffic condi-
tions.Interior rear view mirror
�
Manually adjust the interior rear view
mirror.
For more information, see “Rear view mir-
rors” (
�page 167).
Exterior rear view mirrors
iThe memory function* (
�page 107)
lets you store the setting for the steer-
ing wheel together with the setting for
the seat position and exterior rear view
mirrors.
Warning!
G
In the case of an accident, liquid electrolyte
may escape the mirror housing if the mirror
glass breaks.
Electrolyte has an irritating effect. Do not al-
low the liquid to come into contact with
eyes, skin, clothing, or respiratory system.
In case it does, immediately flush affected
area with water, and seek medical help if
necessary.!Electrolyte drops coming into contact
with the vehicle paint finish can only be
completely removed while in their
liquid state and by applying plenty of
water.
Warning!
G
Exercise care when using the passen-
ger-side exterior rear view mirror. The mirror
surface is convex (outwardly curved surface
for a wider field of view). Objects in mirror
are closer than they appear. Check your in-
side rear view mirror or glance over your
shoulder before changing lanes.