Page 383 of 474
382 Practical hintsReplacing SmartKey batteriesIf the batteries in the SmartKey are dis-
charged, the vehicle can no longer be
locked or unlocked. It is recommended to
have the batteries replaced at an autho-
rized Mercedes-Benz Center.Batteries contain materials that can harm
the environment if disposed of improperly.
Recycling of batteries is the preferred
method of disposal. Many states require
sellers of batteries to accept old batteries
for recycling.Warning!
G
Keep the batteries out of reach of children.
If a battery is swallowed, seek medical help
immediately.
iWhen inserting the batteries, make
sure they are clean and free of lint.iWhen changing batteries, always
replace both batteries.
The required replacement batteries are
available at any Mercedes-Benz
Center.
Page 384 of 474
383 Practical hints
Replacing SmartKey batteries
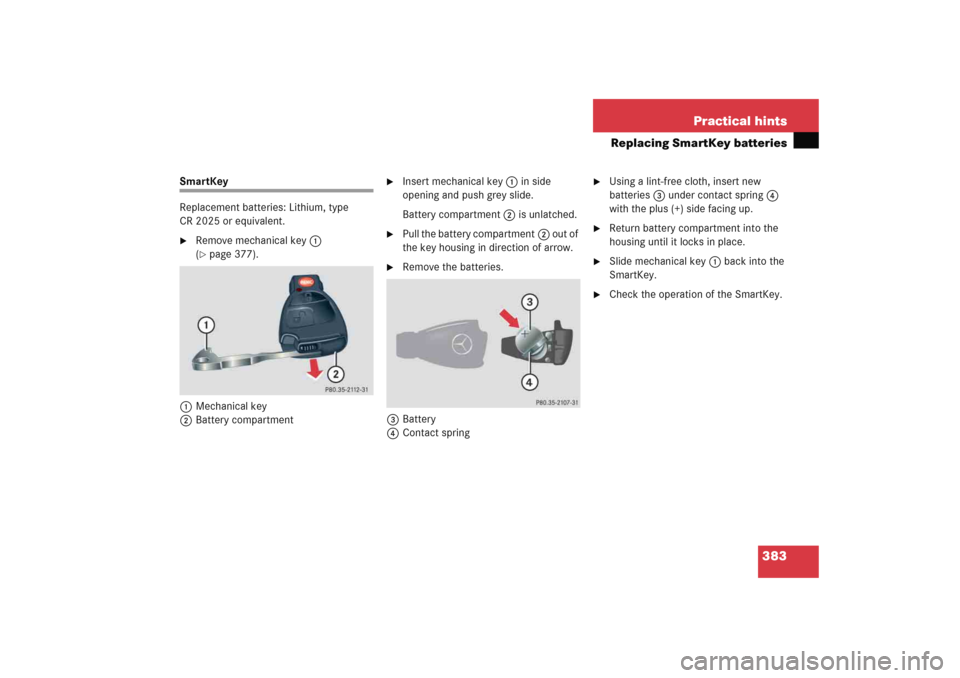
SmartKey
Replacement batteries: Lithium, type
CR 2025 or equivalent.�
Remove mechanical key1
(�page 377).
1Mechanical key
2Battery compartment
�
Insert mechanical key1 in side
opening and push grey slide.
Battery compartment2 is unlatched.
�
Pull the battery compartment2 out of
the key housing in direction of arrow.
�
Remove the batteries.
3Battery
4Contact spring
�
Using a lint-free cloth, insert new
batteries3 under contact spring4
with the plus (+) side facing up.
�
Return battery compartment into the
housing until it locks in place.
�
Slide mechanical key1 back into the
SmartKey.
�
Check the operation of the SmartKey.
Page 402 of 474

401 Practical hints
Battery
�Battery
The battery is located in the engine com-
partment on the right hand side.
1Clamps
Removing filter box�
Release clamps1.
�
Remove filter box.
Installing filter box
�
Insert filter box properly.
�
Secure it with clamps1.
Warning!
G
Failure to follow these instructions can re-
sult in severe injury or death.
Observe all safety instructions and precau-
tions when handling automotive batteries
(�page 297).
Never lean over batteries while connecting,
you might get injured.
Battery fluid contains sulfuric acid. Do not
allow this fluid to come in contact with eyes,
skin or clothing. In case it does, immediately
flush affected area with water and seek
medical help if necessary.
A battery will also produce hydrogen gas,
which is flammable and explosive. Keep
flames or sparks away from battery, avoid
improper connection of jumper cables,
smoking, etc.
!Never loosen or detach battery termi-
nal clamps while the engine is running
or the SmartKey is in the starter switch.
Otherwise the alternator and other
electronic components could be se-
verely damaged.
Have the battery checked regularly by
an authorized Mercedes-Benz Center.
Refer to Maintenance Booklet for main-
tenance intervals or contact an autho-
rized Mercedes-Benz Center for further
information.Warning!
G
Do not place metal objects on the battery as
this could result in a short circuit.
Use leak-proof battery only to avoid the risk
of acid burns in the event of an accident.
��
Page 403 of 474
.
�
Turn off all electrical consumers.
�
Remove SmartKey from starter sw")
402 Practical hintsBattery1Negative terminal
2Positive terminal cover
Disconnecting the battery�
Turn off the engine (
�page 58).
�
Turn off all electrical consumers.
�
Remove SmartKey from starter switch.
�
Open the hood (
�page 291).
�
Read and observe safety instructions
and precautions (
�page 297).
�
Remove the filter box (
�page 401).
�
Disconnect battery negative lead from
negative terminal1.
�
Remove cover2 from the positive
terminal.
�
Disconnect the battery positive lead.
Removing the battery�
Remove the screw-nuts securing the
battery.
�
Remove the battery bracket.
�
Take out the battery.
Charging and reinstalling battery�
Charge battery in accordance with the
instructions of the battery charger
manufacturer.
�
Reinstall the charged battery. Follow
the previously described steps in re-
verse order.
Warning!
G
With a disconnected battery�
you will no longer be able to turn the
SmartKey in the starter switch
�
the gear selector lever will remain
locked in positionP
��
Page 404 of 474
.
�")
403 Practical hints
Battery
Reconnecting the battery�
Turn off all electrical consumers.
�
Remove SmartKey from the starter
switch.
�
Connect the positive lead and fasten its
cover2 (
�page 402).
�
Connect the negative lead.
�
Reinstall the filter box (
�page 401).
Batteries contain materials that can harm
the environment if disposed of improperly.
Large 12-volt storage batteries contain
lead. Recycling of batteries is the preferred
method of disposal. Many states require
sellers of batteries to accept old batteries
for recycling.
Warning!
G
Never charge a battery while still installed in
the vehicle unless the accessory battery
charge unit approved by Mercedes-Benz is
being used. Gases may escape during charg-
ing and cause explosions that may result in
paint damage, corrosion or personal injury.
An accessory battery charge unit specially
adapted for Mercedes-Benz vehicles and
tested and approved by Mercedes-Benz is
available, permitting the charging of the bat-
tery in its installed position. Contact an au-
thorized Mercedes-Benz Center for
information and availability. Charge battery
in accordance with the instructions for the
accessory battery charger.
!NEVER invert the terminal connections!!The battery, its filler caps and the vent
tube must always be securely installed
when the vehicle is in operation.
iThe following procedures must be car-
ried out following any interruption of
battery power (e.g. due to reconnec-
tion):�
Set the clock (
�page 139) (vehi-
cles with COMAND*: see COMAND
operator’s manual).
�
Resynchronize side windows
(�page 240).
�
Resynchronize panorama roof with
power tilt/sliding panel*
(�page 246).
Page 409 of 474

408 Practical hintsTowing the vehicleWarning!
G
With the engine not running, there is no
power assistance for the brake and steering
systems. In this case, it is important to keep
in mind that a considerably higher degree of
effort is necessary to brake and steer the ve-
hicle. Adapt your driving accordingly.
!When towing the vehicle with all wheels
on the ground, please note the follow-
ing:
With the automatic central locking acti-
vated and the SmartKey in starter
switch position2, the vehicle doors
lock if the left front wheel as well as the
right rear wheel are turning at vehicle
speeds of approximately 9 mph
(15 km/h) or more.
Switch off the tow-away alarm
(�page 87).
To prevent the vehicle doors from lock-
ing, deactivate the automatic central
locking (
�page 148).
Towing of the vehicle should only be
done using the properly installed tow-
ing eye bolt. Never attach tow cable,
tow rope or tow rod to vehicle chassis,
frame or suspension parts.
iIf the battery is disconnected or dis-
charged�
the SmartKey will not turn in the
starter switch. For more informa-
tion, see “Battery” (
�page 401)
and “Jump starting” (�page 404).
�
the gear selector lever will remain
locked in positionP. For informa-
tion on manually unlocking trans-
mission gear selector lever, see
(�page 380).
Page 442 of 474

441 Technical terms
Shift lock
When the vehicle is parked, this lock
prevents the gear selector lever from
being moved out of positionP without
SmartKey turned and brake pedal de-
pressed.
Sidewall
(
�page 325)
SRS
(Supplemental R
estraint S
ystem)
Air bags, air bag control unit (with
crash sensor), emergency tensioning
device. Though independent systems,
they are closely interfaced to provide
effective occupant protection.Tele Aid* System
(T
elematic A
larm I
dentification on D
e-
mand)
The Tele Aid system consists of three
types of response: automatic and man-
ual emergency, roadside assistance
and information. Tele Aid is initially
activated by completing a subscriber
agreement and placing an acquain-
tance call.
The Tele Aid system is operational pro-
vided that the vehicle’s battery is
charged, properly connected, not dam-
aged and cellular and GPS coverage is
available.
Tightening torque
Force times lever arm (e.g. a lug
wrench) with which threaded fasteners
such as wheel bolts are tightened.
TIN
(T
ire I
dentification N
umber)
(
�page 325)
Tire load rating
(�page 325)Tire ply composition and material used
(
�page 325)
Tire speed rating
(�page 325)
Traction
(�page 325)
Tread
(�page 325)
Treadwear indicators
(�page 325)
Uniform Tire Quality Grading Standards
(�page 326)
Vehicle capacity weight
(�page 326)
Vehicle maximum load on the tire
(�page 326)
VIN
(Vehicle I
dentification N
umber)
The number set by the manufacturer
and placed on the body to uniquely
identify each vehicle produced.
Page 446 of 474

445 Index
Audio system 195
Audio and telephone, operation 195
Button and soft key operation 198
CD* operation 213
Operating and display elements 196
Operating safety 195
Operation 198
Radio operation 203
Switching off 199
Switching on 198
Telephone* operation 220
Auto-dimming* for rear view mirror 168
Automatic central locking
Activating/deactivating (control
system) 148
Automatic climate control* 182
Activating 183
Adjusting air distribution 186
Air recirculation mode 189
Deactivating 183
Defrosting 188
Setting the temperature 185
Automatic headlamp mode 111
Automatic lighting control
Activating 117
Deactivating 117Automatic locking when driving 97
Automatic shift program*
Program mode selector switch 164
Automatic time change
(summer-/winter) 141
Automatic transmission* 159, 296
Accelerator position 165
Automatic shift program 164
Comfort program mode 164
Emergency operation (Limp Home
Mode) 166
Fluid level 296
Gear ranges 161
Gear selector lever 159
Gear selector lever position 159, 162
Gear shifting malfunctions 166
Kickdown 165
Manual shifting 160
One-touch gearshifting 160
Program mode selector switch 164
Starting with 49
Transmission fluid 296
Working on the vehicle 165B
Backrest
Folding forward 251
Folding rearward 251
Backup lamps
Bulbs 384
Bar 323
BAS 82, 437
Messages in display 354
Batteries, SmartKey
Check lamp 93
Checking 93
Replacing 382, 383
Battery discharged
Jump starting 404
Battery, vehicle 297, 401
Charging 402
Disconnecting 402
Reconnecting 403
Reinstalling 402
Removing 402
Bead 323
Bi-Xenon headlamps* 437
Bi-Xenon type*
Front lamp bulbs 388
Block heater 329