Page 18 of 474
17 Introduction
Problems with your vehicle
Problems with your vehicle
If you should experience a problem with your vehicle, particularly one that you believe may affect its safe operation, we urge you to
immediately contact an authorized Mercedes-Benz Center to have the problem diagnosed and corrected if required. If the matter is
not handled to your satisfaction, please discuss the problem with the Mercedes-Benz Center management, or if necessary contact us
at one of the following addresses:
In the USA:
Customer Assistance Center
Mercedes-Benz USA, LLC
One Mercedes Drive
Montvale, NJ 07645-0350
In Canada:
Customer Relations Department
Mercedes-Benz Canada, Inc.
98 Vanderhoof Avenue
Toronto, Ontario M4G 4C9
Page 19 of 474
18 IntroductionReporting safety defectsFor the USA only:
The following text is published as required of manufacturers under Title 49, Code of U.S. Federal Regulations, Part 575 pursuant to the
“National Traffic and Motor Vehicle Safety Act of 1966”.Reporting Safety Defects
If you believe that your vehicle has a defect which could cause a crash or could cause injury or death, you should immediately inform
the National Highway Traffic Safety Administration (NHTSA) in addition to notifying Mercedes-Benz USA, LLC.
If NHTSA receives similar complaints, it may open an investigation, and if it finds that a safety defect exists in a group of vehicles, it
may order a recall and remedy campaign. However, NHTSA cannot become involved in individual problems between you, your dealer,
or Mercedes-Benz USA, LLC.
To contact NHTSA, you may either call the Auto Safety Hotline toll-free at 1-888-327-4236 (or 366-0123 in Washington, D.C. area) or
write to: NHTSA, U.S. Department of Transportation, Washington, D.C. 20590. You can also obtain other information about motor
vehicle safety from the Hotline.
Page 20 of 474
19 Introduction
Vehicle data recording
Vehicle data recording
Information regarding electronic recording devices
(Including notice pursuant to California Code § 9951)
Please note that your vehicle is equipped with devices that can record vehicle systems data and, if equipped with the Tele Aid system,
may transmit some data in certain accidents.
This information helps, for example, to diagnose vehicle systems after a collision and to continuously improve vehicle safety.
DaimlerChrysler may access the information and share it with others �
for safety research or vehicle diagnosis purposes
�
with the consent of the vehicle owner or lessee
�
in response to an official request by law enforcement or other government agency
�
for use in dispute resolution involving DaimlerChrysler, its affiliates or sales/service organization and/or
�
as otherwise required or permitted by law.
Please check the Tele Aid subscription service agreement for details regarding the information that may be recorded or transmitted
via that system.
Page 26 of 474

25 At a glance
Instrument cluster
Item
Page
1
Speedometer with:vElectronic Stability
Program (ESP)
warning lamp
83
343
;Brake warning lamp,
USA only
50
56
341
3Brake warning lamp,
Canada only
50
56
341
BLow beam headlamp
indicator lamp
51
110
2
LLeft turn signal
indicator lamp
52
3
Multifunction display with:Trip odometer
121
Main odometer
123
Gear selector lever position
49
162
Item
Page
Program mode
164
Status indicator
(outside temperature/ digital
speedometer)
121
138
Digital clock
123
139
4
KRight turn signal
indicator lamp
52
5
Tachometer with:-Antilock Brake
System (ABS)
indicator lamp
81
340
66
344
1Supplemental
restraint system
indicator lamp
60
344
AHigh beam headlamp
indicator lamp
51
114
Item
Page
úEngine malfunction
indicator lamp,
USA only
342
±Engine malfunction
indicator lamp,
Canada only
342
6
Fuel gauge with:Fuel reserve warning lamp
344
4Fuel filler cap location
indicator: The fuel
filler cap is on the rear
right-hand side.
7
Coolant temperature gauge
120
8
Reset button for:�
Resetting trip odometer
121
�
Resetting individual
settings
135
�
Instrument cluster
illumination
119
Page 33 of 474
32 Getting startedThe “Getting started” section provides an
overview of the vehicle’s most basic func-
tions. First-time Mercedes-Benz owners
should pay special attention to the infor-
mation given here.
If you are already familiar with the basic
functions described here, the “Controls in
detail” section will provide you with further
information. The corresponding page refer-
ences are located at the end of each seg-
ment.Unlocking
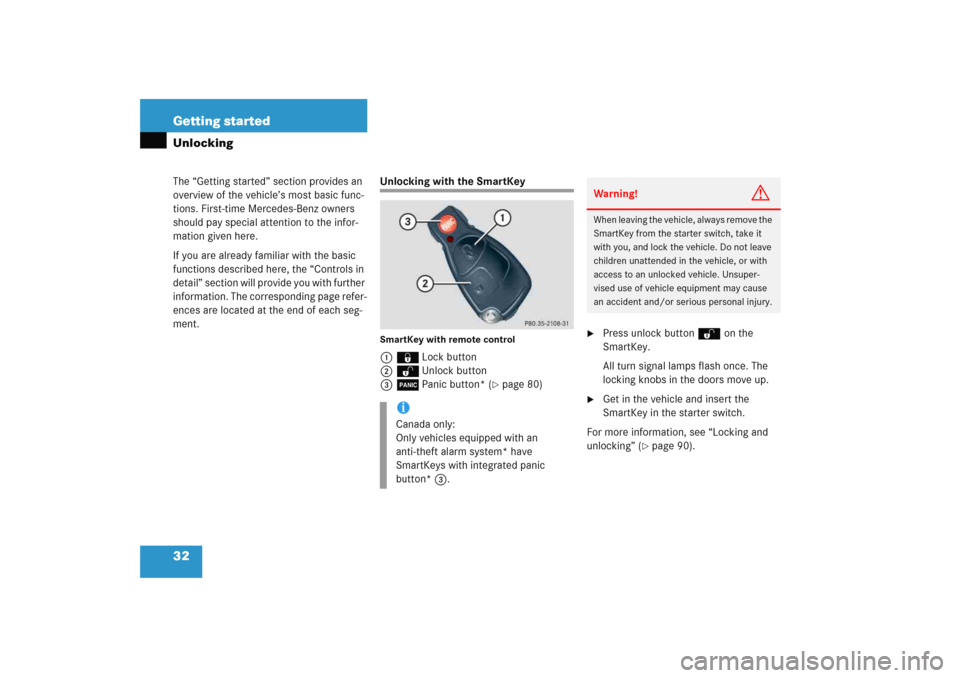
Unlocking with the SmartKeySmartKey with remote control 1‹Lock button
2ŒUnlock button
3ÂPanic button* (
�page 80)
�
Press unlock buttonΠon the
SmartKey.
All turn signal lamps flash once. The
locking knobs in the doors move up.
�
Get in the vehicle and insert the
SmartKey in the starter switch.
For more information, see “Locking and
unlocking” (
�page 90).
iCanada only:
Only vehicles equipped with an
anti-theft alarm system* have
SmartKeys with integrated panic
button*3.
Warning!
G
When leaving the vehicle, always remove the
SmartKey from the starter switch, take it
with you, and lock the vehicle. Do not leave
children unattended in the vehicle, or with
access to an unlocked vehicle. Unsuper-
vised use of vehicle equipment may cause
an accident and/or serious personal injury.
Page 35 of 474
34 Getting startedUnlocking
iWhen you switch on the ignition, the in-
dicator and warning lamps (except low
beam headlamp indicator lamp, high
beam headlamp indicator lamp, and
turn signal indicator lamps unless acti-
vated) in the instrument cluster come
on. This indicates that the respective
systems are operational. The indicator
and warning lamps (except low beam
headlamp indicator lamp, high beam
headlamp indicator lamp, and turn sig-
nal indicator lamps if activated) should
go out when the engine is running.iVehicles with automatic transmission:
The SmartKey can only be removed
from the starter switch with the gear
selector lever in positionP.
!If the SmartKey cannot be turned in the
starter switch, the battery may not be
sufficiently charged.�
Check the battery and charge it if
necessary (
�page 401).
�
Get a jump start (
�page 404).
To prevent accelerated battery dis-
charge and a possible dead battery, al-
ways remove the SmartKey from the
starter switch when the engine is not in
operation.
Page 36 of 474

35 Getting started
Adjusting
�Adjusting
Seats
The seats can be adjusted either manually
or electrically, depending on the vehicle’s
equipment.Warning!
G
All seat, head restraint, steering wheel, and
rear view mirror adjustments, as well as fas-
tening of seat belts, must be done before
the vehicle is put into motion.Warning!
G
Do not adjust the driver’s seat while driving.
Adjusting the seat while driving could cause
the driver to lose control of the vehicle.
Never ride in a moving vehicle with the seat
back in an excessively reclined position as
this can be dangerous. You could slide
under the seat belt in a collision. If you slide
under it, the belt would apply force at the
abdomen or neck.
That could cause serious or fatal injuries.
The seat back and seat belts provide the
best restraint when the wearer is in a nearly
upright position and belts are properly posi-
tioned on the body. Your seat must be
adjusted so that you can correctly fasten
your seat belt (
�page 44).
Never place hands under the seat or near
any moving parts while a seat is being ad-
justed.
Warning!
G
When leaving the vehicle, always remove the
SmartKey from the starter switch, take it
with you, and lock the vehicle.
Even with the SmartKey removed from the
starter switch, the power seats* can be op-
erated when the respective door is open.
Therefore, do not leave children unattended
in the vehicle, or with access to an unlocked
vehicle. Unsupervised use of vehicle equip-
ment may cause an accident and/or serious
personal injury.
Warning!
G
According to accident statistics, children
are safer when properly restrained in the
rear seating positions than in the front seat-
ing position. Thus, we strongly recommend
that children be placed in the rear seats
whenever possible. Regardless of seating
position, children 12 years old and under
must be seated and properly secured in an
appropriate infant, or toddler restraint, or
booster seat recommended for the size and
weight of the child. For additional
information, see “Children in the vehicle”
(�page 70).
A child’s risk of serious or fatal injuries is
significantly increased if the child restraints
are not properly secured in the vehicle
and/or the child is not properly secured in
the child restraint.
Page 40 of 474
39 Getting started
Adjusting
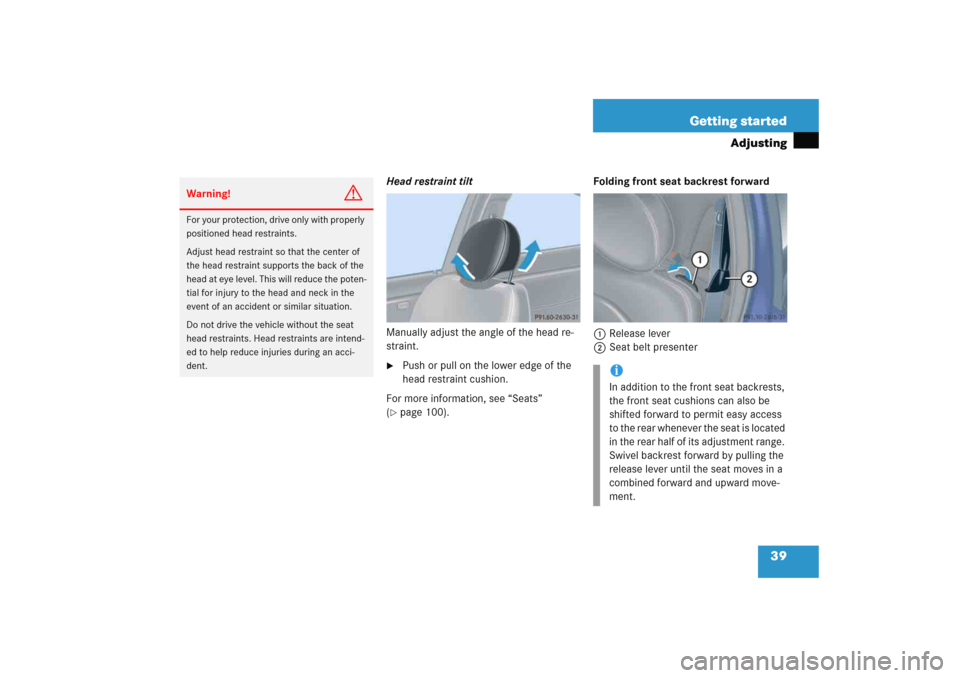
Head restraint tilt
Manually adjust the angle of the head re-
straint. �
Push or pull on the lower edge of the
head restraint cushion.
For more information, see “Seats”
(
�page 100).Folding front seat backrest forward
1Release lever
2Seat belt presenter
Warning!
G
For your protection, drive only with properly
positioned head restraints.
Adjust head restraint so that the center of
the head restraint supports the back of the
head at eye level. This will reduce the poten-
tial for injury to the head and neck in the
event of an accident or similar situation.
Do not drive the vehicle without the seat
head restraints. Head restraints are intend-
ed to help reduce injuries during an acci-
dent.
iIn addition to the front seat backrests,
the front seat cushions can also be
shifted forward to permit easy access
to the rear whenever the seat is located
in the rear half of its adjustment range.
Swivel backrest forward by pulling the
release lever until the seat moves in a
combined forward and upward move-
ment.