Page 109 of 474
.
or
�
Open the")
108 Controls in detailMemory function*The memory button and memory position
switch are located on the door.1 Memory button
2 Memory position switch�
Switch on the ignition (
�page 33).
or
�
Open the respective door and insert
the SmartKey in the starter switch.
Storing positions into memory�
Adjust the seats, steering wheel and
exterior rear view mirrors to the
desired position (
�page 35).
�
Turn memory position switch 2 to
selected memory position.
�
Press memory button 1.
�
Release memory button 1 and press
memory position switch 2 within
three seconds.
All settings are stored at the selected
position.
Recalling positions from memory�
Turn memory position switch 2 to
selected memory position.
�
Press and hold memory position
switch 2 until the seat, steering wheel
and exterior rear view mirrors have
completely moved to the stored
positions.!Do not operate the power seats using
the memory button if the seat backrest
is in an excessively reclined position.
Doing so could cause damage to front
or rear seats.iReleasing the memory position switch
stops movement to the stored posi-
tions immediately.
Page 112 of 474

111
Controls in detail
Lighting
Manual headlamp mode
The low beam headlamps and parking
lamps can be switched on and off with the
exterior lamp switch.
Automatic headlamp mode
The following lamps switch on and off
automatically depending on the brightness
of the ambient light:
�
Low beam headlamps
�
Tail and parking lamps
�
License plate lamps
�
Side marker lamps
�
Turn exterior lamp switch to
position
U.
With the SmartKey in starter switch
position 1, only the parking lamps will
switch on and off automatically.
When the engine is running, the low
beam headlamps, the tail and parking
lamps, the license plate lamps and the
side marker lamps will switch on and
off automatically.
iWith the SmartKey removed from the
starter switch and the driver’s door
open, while the parking lamps or low
beam headlamps are switched on, �
a warning sounds
�
$ appears in the multifunction
display
�
the message
Switch off lights.
appears in the multifunction display
Warning!
G
If the exterior lamp switch is set to U,�
the headlamps may switch off unexpect-
edly when the system senses bright am-
bient light, for example light from
oncoming traffic.
�
the headlamps will not be automatically
switched on under foggy conditions.
To minimize risk to you and to others, acti-
vate headlamps by turning exterior lamp
switch to B when driving or when traffic
and / or ambient lighting conditions require
you to do so.
In low ambient lighting conditions, only
switch from position U to B with the
vehicle at a standstill. Switching from U
to B will briefly switch off the head-
lamps. Doing so while driving in low ambient
lighting conditions may result in an acci-
dent.
The automatic headlamp feature is only an
aid to the driver. The driver is responsible for
the operation of the vehicle's lights at all
times.
Page 113 of 474

112 Controls in detailLightingDaytime running lamp mode�
Turn exterior lamp switch to
positionM orU .
When the engine is running, the low
beam headlamps are switched on.
In low ambient light conditions, the fol-
lowing lamps will switch on additional-
ly.�
Tail and parking lamps
�
License plate lamps
�
Side marker lamps
For nighttime driving you should turn the
exterior lamp switch to position B to
permit activation of the high beam head-
lamps. Canada only
The daytime running lamp mode is manda-
tory and therefore in a constant mode.
Vehicles with automatic transmission*:
When the engine is running, and you shift
from a driving position to position
N or P,
the low beam headlamps will switch off
with a three-minute time delay.
When the engine is running, and you
�
turn the exterior lamp switch to
position C, the parking lamps
switch on additionally.
�
turn the exterior lamp switch to
position B, the manual headlamp
mode has priority over the daytime
running.
The corresponding exterior lamps
switch on (
�page 110). USA only
By default, the daytime running lamp mode
is deactivated. Activate the daytime run-
ning lamp mode using the control system,
see “Setting daytime running lamp mode
(USA only)” (
�page 144).
When the engine is running, and you turn
the exterior lamp switch to position C
or B , the manual headlamp mode has
priority over the daytime running lamp
mode.
The corresponding exterior lamps switch
on (
�page 110).
Locator lighting and night security
illumination
The locator lighting and night security illu-
mination are described in the control sys-
tem section, see “Setting locator lighting”
(
�page 145) and “Headlamps delayed
shut off” (
�page 146).
iWith the daytime running lamp mode
activated and the exterior lamp switch
in position M, the high beam head-
lamps cannot be switched on.
Page 116 of 474
.
The respect")
115
Controls in detail
Lighting
Driving forward
Switching on cornering fog lamps�
Depending on whether you are turning
left or right, switch on the left or right
turn signal (
�page 52).
The respective front fog lamp comes on
and illuminates the road into which you
are turning. Switching off cornering fog lamps
The combination switch for the turn signal
resets automatically after major steering
wheel movements. This will switch off the
cornering fog lamps if they were activated
by switching on the left or right turn signal.
If the turn signal should stay on after mak-
ing the turn, the turn signal and cornering
fog lamp can be switched off by returning
the combination switch to its original posi-
tion. Driving rearward
Switching on cornering fog lamps
�
Place the gear selector lever (manual
transmission: gearshift lever) in
position
R.
The inverse front fog lamp comes on
automatically depending on the
steering direction and steering angle.
Switching off cornering fog lamps
�
Place the gear selector lever (manual
transmission: gearshift lever) out of
position R.
The respective front fog lamp goes out.
iThe cornering fog lamps will come on
automatically depending on the steer-
ing angle, even if you did not switch on
either turn signal. If the cornering fog
lamps came on automatically, they will
also go out automatically depending on
the steering angle.
Page 122 of 474
.
�
If it is not displayed, press butt")
121
Controls in detail
Instrument cluster
Trip odometer�
Make sure you are viewing the trip
odometer and main odometer in the
multifunction display (
�page 123).
�
If it is not displayed, press button
è
or ÿ on the multifunction steering
wheel until the trip odometer appears
(�page 124).
�
Press and hold the reset button in the
instrument cluster (
�page 119) until
the trip odometer is reset.
Tachometer
The red marking on the tachometer
(�page 24) denotes excessive engine
speed.
To help protect the engine, the fuel supply
is interrupted if the engine is operated
within the red marking.
Outside temperature indicator
!Avoid driving at excessive engine
speeds, as it may result in serious
engine damage that is not covered by
the Mercedes-Benz Limited Warranty.
Warning!
G
The outside temperature indicator is not de-
signed to serve as an ice-warning device and
is therefore unsuitable for that purpose.
Indicated temperatures just above the freez-
ing point do not guarantee that the road sur-
face is free of ice. The road may still be icy,
especially in wooded areas or on bridges.
Page 131 of 474
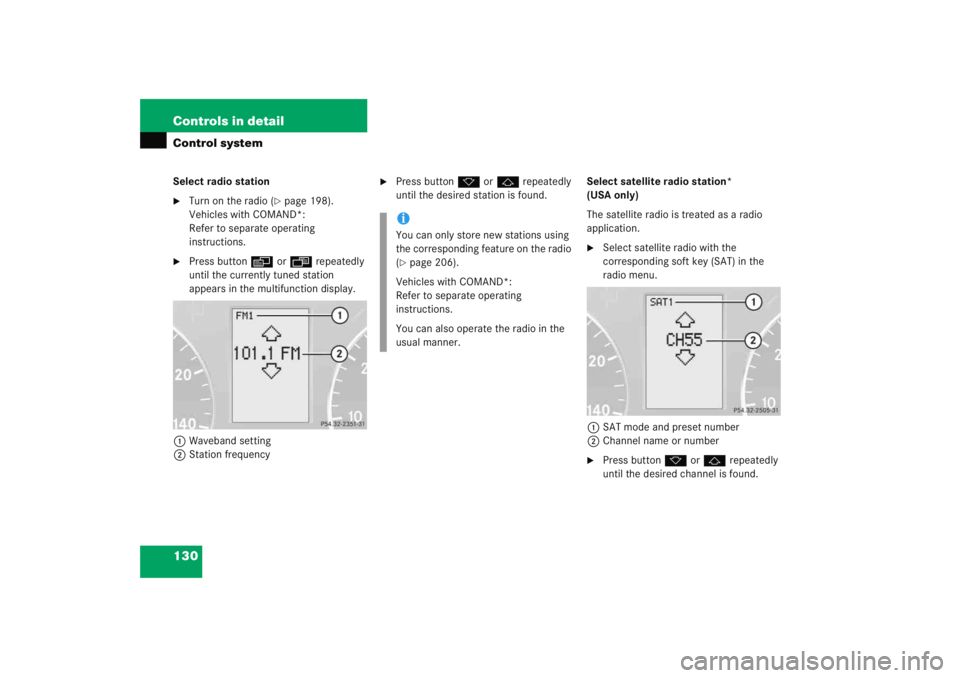
130 Controls in detailControl systemSelect radio station�
Turn on the radio (
�page 198).
Vehicles with COMAND*:
Refer to separate operating
instructions.
�
Press button è orÿ repeatedly
until the currently tuned station
appears in the multifunction display.
1 Waveband setting
2 Station frequency
�
Press button k orj repeatedly
until the desired station is found. Select satellite radio station*
(USA only)
The satellite radio is treated as a radio
application.
�
Select satellite radio with the
corresponding soft key (SAT) in the
radio menu.
1 SAT mode and preset number
2 Channel name or number
�
Press button k orj repeatedly
until the desired channel is found.
iYou can only store new stations using
the corresponding feature on the radio
(�page 206).
Vehicles with COMAND*:
Refer to separate operating
instructions.
You can also operate the radio in the
usual manner.
Page 133 of 474

132 Controls in detailControl systemVehicle status message memory menu
Use the vehicle status message memory
menu to scan malfunction and warning
messages that may be stored in the sys-
tem. Such messages appear in the
multifunction display and are based on
conditions or system status the vehicle’s
system has recorded.
�
Press buttonè orÿ repeatedly
until the vehicle status message
memory appears in the multifunction
display. No vehicle status messages
If no conditions are recorded in memory,
the message in the multifunction display
is:
No message
Vehicle status messages have been
recorded
If conditions have occurred causing status
messages to be recorded, the number of
messages appears in the multifunction
display:
1 Number of messages
Warning!
G
Malfunction and warning messages are only
indicated for certain systems and are inten-
tionally not very detailed. The malfunction
and warning messages are simply a remind-
er with respect to the operation of certain
systems and do not replace the owner’s
and/or driver’s responsibility to maintain
the vehicle’s operating safety by having all
required maintenance and safety checks
performed on the vehicle and by bringing
the vehicle to an authorized Mercedes-Benz
Center to address the malfunction and
warning messages (
�page 347).
Page 163 of 474

162 Controls in detailAutomatic transmission*Gear selector lever position
Effect
ì
Park position
Gear selector lever position
when the vehicle is parked. Place
gear selector lever in positionP
only when vehicle is stopped.
The park position is not intended
to serve as a brake when the
vehicle is parked. Rather, the
driver should always set the
parking brake in addition to
placing the gear selector lever in
position P to secure the vehicle.
EffectThe SmartKey can only be
removed from the starter switch
with the gear selector lever in
position P. With the SmartKey
removed, the gear selector lever
is locked in position P.
If the vehicle’s electrical system
is malfunctioning, the gear
selector lever could remain
locked in position P
(�page 380).
í
Reverse gear
Place gear selector lever in
position R only when vehicle is
stopped.
Effect
ë
Neutral
No power is transmitted from the
engine to the drive axle. When
the brakes are released, the
vehicle can be moved freely
(pushed or towed).
To avoid damage to the trans-
mission, never engage N while
driving.
If the ESP is deactivated or
malfunctioning:
Move gear selector lever to N
only if the vehicle is in danger of
skidding, e.g. on icy roads.
ê
Drive
The transmission shifts
automatically. All five forward
gears are available.