Page 79 of 474

78 Safety and SecurityOccupant safety
Head restraint must be positioned such
that the top tether strap can pass freely
between the head restraint and the top
of the seat back.
Make sure the tether strap is not twist-
ed.
2 Hook
3 Anchorage ring
�
Securely fasten the hook 2 to the
anchorage ring 3.
�
Swing rear seat backrest to the rear
until it engages.
�
Check the rear seat backrest to be
locked in its upright position
(�page 251).
Once the top tether anchorage hook is
attached, the child restraint itself can be
secured. Tighten the top tether strap
according to the child restraint manufac-
turer's instructions. Child seat anchors - LATCH type
To fold anchors out
This vehicle is equipped with two LATCH
(L
ower A
nchors and T
ethers for CH
ildren)
type anchors (at each of the rear seats) for
the installation of a “LATCH” child seat
with the matching mounting fittings.
The foldable LATCH type anchors are
located between the seat cushion and the
backrest.
1 Anchors
2 Release button
iFor safety, make sure the hook 2 has
attached to the ring 1 beyond the
safety catch, as illustrated.
Warning!
G
Always lock backrest in nearly upright posi-
tion when rear seat bench is occupied by
passengers, or the extended cargo area is
not in use. Check for secure locking by
pushing and pulling on the backrest.
��
Page 80 of 474

79
Safety and Security
Occupant safety
�
Grip inner side of anchor
1 and fold
forward until they lock in place.
�
Install child seat according to the
manufacturer’s instructions. To fold anchors back
�
Press down button
2 on each anchor
and return the anchors 1 to its catch.
iThe child seat must be firmly attached
in the right and left side anchors 1.
iNon-LATCH type child seats may also
be used and can be installed using the
vehicle’s seat belt system. Install child
seat according to the manufacturer’s
instructions.Warning!
G
Children too big for a toddler restraint must
ride in seats using regular seat belts. Posi-
tion shoulder belt across chest and shoul-
der, not face or neck. A booster seat may be
necessary to achieve proper belt positioning
for children from 41 lbs until they reach a
height where a lap/shoulder belt fits proper-
ly without a booster.
Before installing the child seat, make sure
anchors
1
are folded out and locked in
place.
Install child seat according to manufactur-
er’s instructions.
T h e c h i l d s e a t m u s t b e f i r m l y a t t a c h e d i n t h e
right and left side anchors
1
.
An incorrectly mounted child seat may come
loose during an accident which could result
in serious injury or death to the child.
Damaged or impact damaged child seats or
child seat anchor fittings must be replaced.
Do not leave children unattended in the
vehicle, even if the children are secured in a
child restraint system.
Page 90 of 474
89
Controls in detail
Locking and unlocking
Seats
Memory function*
Lighting
Instrument cluster Control system
Manual transmission
Automatic transmission*
Good visibility
Climate control
Automatic climate control* Audio system
Power windows
Panorama roof with power tilt/sliding panel*
Driving systemsLoading
Useful features
Page 101 of 474
.
Easy-entry/exit feature*
This feature allows for easier entry into and
exit from the vehicle.
The easy-ent")
100 Controls in detailSeatsFor information on seat adjustment, see
“Seats” (
�page 35).
Easy-entry/exit feature*
This feature allows for easier entry into and
exit from the vehicle.
The easy-entry/exit feature can be
activated or deactivated in the Convenience
submenu of the control
system (
�page 148). When exiting the vehicle, with the
easy-entry/exit feature activated and
depending on your selection, the steering
wheel tilts upwards and/or the driver’s
seat moves a few inches to the rear when
you:
�
remove the SmartKey from the starter
switch,
or
�
open the driver’s door with the
SmartKey in starter switch position
0
or 1.
Warning!
G
You must make sure no one can become
trapped or injured by the moving steering
wheel and driver’s seat when the easy-en-
try/exit feature is activated.
To cancel seat/steering wheel movement,
do one of the following:�
Press seat adjustment switch*
(�page 38).
�
Move steering column stalk*
(�page 41).
�
Press the memory position switch*
(�page 108).
Do not leave children unattended in the ve-
hicle, or with access to an unlocked vehicle.
Children could open the driver’s door and
unintentionally activate the easy-entry/exit
feature, which could result in an accident
and/or serious personal injury.
Page 102 of 474

101
Controls in detailSeats
When entering the vehicle, with the
easy-entry/exit feature activated, the
steering wheel or, depending on your
selection, the steering wheel and driver’s
seat will return to their last set position or
a factory-set maximum forward position
when you:�
close the driver’s door with the ignition
switched on
�
insert the SmartKey into the starter
switch with the driver’s door closed.
iIf the current position for the steering
wheel is in the uppermost tilt position,
the steering wheel will no longer be
able to move upward when the
easy-entry/exit feature is activated.
If the current seat position falls into a
factory-set position range and the sys-
tem recognizes the current seat posi-
tion to be rearward enough for easy
entry and exit, the driver’s seat will not
move to the rear when the easy-entry/
exit feature is activated.
iFor safety reasons, the driver’s seat will
not return to its last set position with
the easy-entry/exit feature activated if
the system recognizes the last set posi-
tion as an extreme forward position. In-
stead, the driver’s seat will remain at or
move to a factory-set maximum for-
ward position. To again fully return the
driver’s seat to your last set position or
to memory position, adjust the seat to
the desired position or press and hold
the respective memory position but-
ton* (
�page 108).
Page 103 of 474
.Front seat head restraints, manual seat
1")
102 Controls in detailSeatsRemoving and installing front seat head restraints
For more information on head restraint
adjustment, see “Seats” (
�page 35).Front seat head restraints, manual seat
1 Release button
Removing front seat head restraints
�
Pull head restraint to its highest posi-
tion.
�
Press release button 1 and pull out
head restraint.
Installing front seat head restraints
�
Insert head restraint and push it down
to the stop.
�
Press release button 1 and adjust
head restraint to desired position.
iAdjust the head restraint in such a way
that it is as close to the head as possi-
ble.
Warning!
G
For your protection, drive only with properly
positioned head restraints.
Adjust head restraint so that the center of
the head restraint supports the back of the
head at eye level. This will reduce the poten-
tial for injury to the head and neck in the
event of an accident or similar situation.
Do not drive the vehicle without the seat
head restraints. Head restraints are intend-
ed to help reduce injuries during an acci-
dent.
Do not interchange head restraints from
front and rear seat.iTilt the backrest to the rear for easier
removal and installation of the head re-
straints.
Page 104 of 474
103
Controls in detailSeats
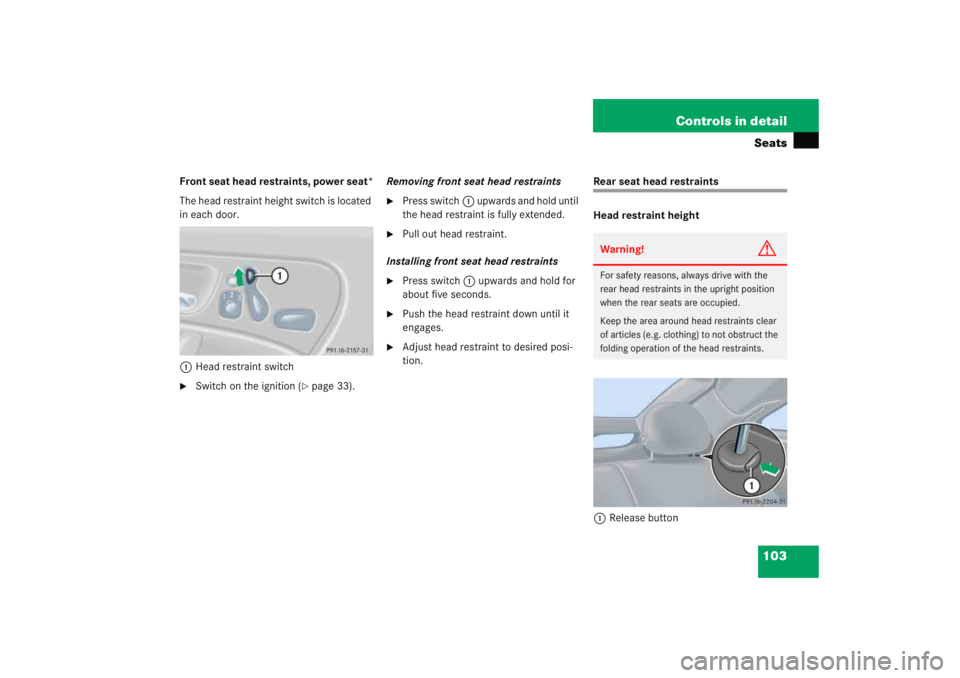
Front seat head restraints, power seat*
The head restraint height switch is located
in each door.
1 Head restraint switch�
Switch on the ignition (
�page 33). Removing front seat head restraints
�
Press switch
1 upwards and hold until
the head restraint is fully extended.
�
Pull out head restraint.
Installing front seat head restraints
�
Press switch 1 upwards and hold for
about five seconds.
�
Push the head restraint down until it
engages.
�
Adjust head restraint to desired posi-
tion.
Rear seat head restraints
Head restraint height
1 Release buttonWarning!
G
For safety reasons, always drive with the
rear head restraints in the upright position
when the rear seats are occupied.
Keep the area around head restraints clear
of articles (e.g. clothing) to not obstruct the
folding operation of the head restraints.
Page 105 of 474

104 Controls in detailSeatsRaising�
Manually adjust the height of the head
restraint by pulling it upward.
If the head restraint is fully retracted,
press release button 1 and pull the
head restraint out.
Lowering
�
To lower the head restraint, press
release button 1 and press down on
the head restraint. Folding head restraints back
The rear seat head restraints can be folded
backward for increased visibility.
1 Release button
�
Press release button 1.
The head restraints will fold backward.
iAdjust the head restraint in such a way
that it is as close to the head as possi-
ble.
Warning!
G
For your protection, drive only with properly
positioned head restraints.
Adjust head restraint so that the center of
the head restraint supports the back of the
head at eye level. This will reduce the poten-
tial for injury to the head and neck in the
event of an accident or similar situation.
Do not drive the vehicle without the seat
head restraints. Head restraints are intend-
ed to help reduce injuries during an acci-
dent.