Page 175 of 237

115 Navigation
Route guidance
� Route guidance
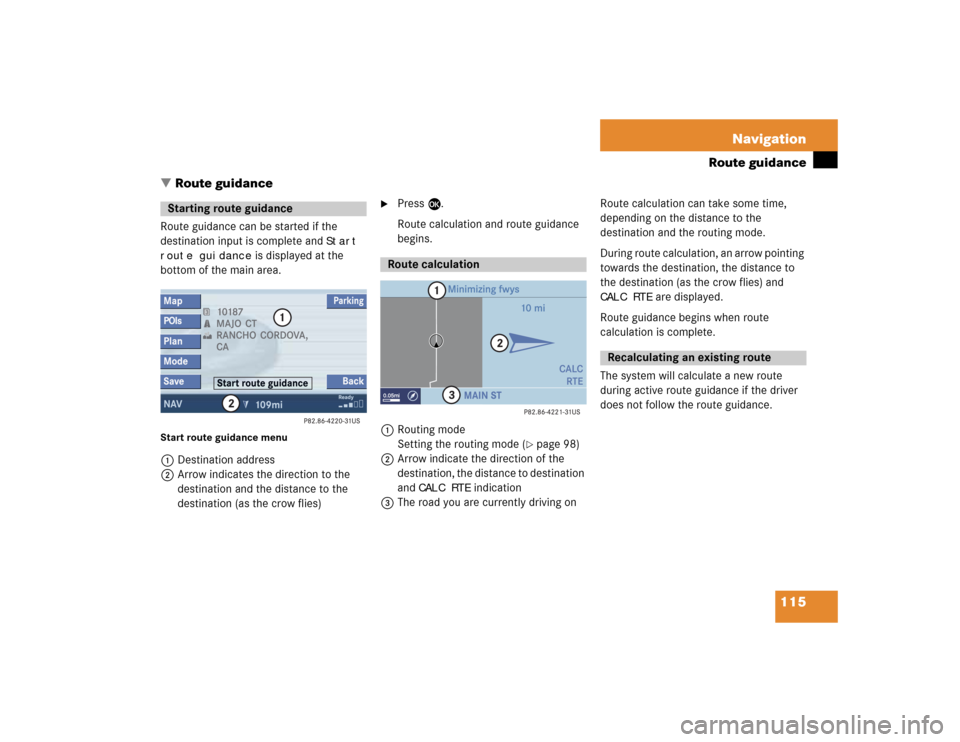
Route guidance can be started if the
destination input is complete and
Start
route guidance
is displayed at the
bottom of the main area.
Start route guidance menu1Destination address
2Arrow indicates the direction to the
destination and the distance to the
destination (as the crow flies)
�
Press E.
Route calculation and route guidance
begins.
1Routing mode
Setting the routing mode (
�page 98)
2Arrow indicate the direction of the
destination, the distance to destination
and
CALC RTE
indication
3The road you are currently driving onRoute calculation can take some time,
depending on the distance to the
destination and the routing mode.
During route calculation, an arrow pointing
towards the destination, the distance to
the destination (as the crow flies) and
CALC RTE
are displayed.
Route guidance begins when route
calculation is complete.
The system will calculate a new route
during active route guidance if the driver
does not follow the route guidance.
Starting route guidance
Route calculation
Recalculating an existing route
Page 192 of 237

132 NavigationDuring route guidance�
ManualIf you choose this option, the system
only switches to split screen by
pressing c.
The symbol _ indicates the present
setting.
�
Move the E joystick in g or G
direction to select the option with the
symbol -.
�
Press button E.
The option is changed.
�
Press the
Back
soft key to confirm and
return to the map.Trail settings
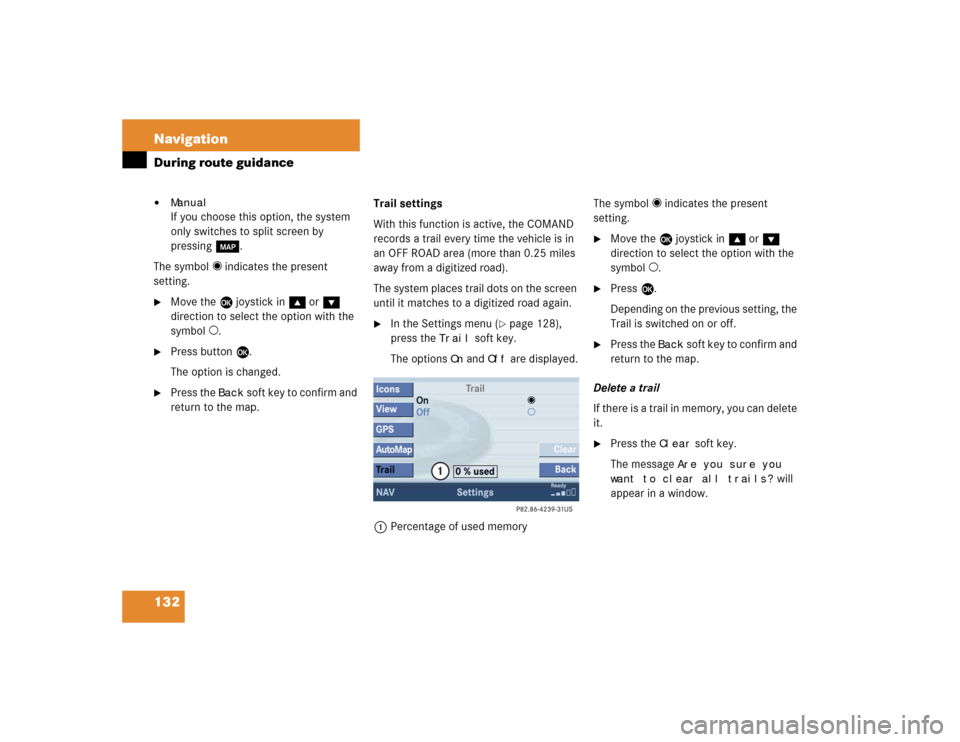
With this function is active, the COMAND
records a trail every time the vehicle is in
an OFF ROAD area (more than 0.25 miles
away from a digitized road).
The system places trail dots on the screen
until it matches to a digitized road again.
�
In the Settings menu (
�page 128),
press the
Trail
soft key.
The options
On
and
Off
are displayed.
1Percentage of used memoryThe symbol _ indicates the present
setting.
�
Move the E joystick in g or G
direction to select the option with the
symbol -.
�
Press E.
Depending on the previous setting, the
Trail is switched on or off.
�
Press the
Back
s o f t k e y t o c o n f i rm a nd
return to the map.
Delete a trail
If there is a trail in memory, you can delete
it.
�
Press the
Clear
soft key.
The message
Are you sure you
want to clear all trails?
will
appear in a window.
Page 220 of 237
160 System settingsSystem settings
� System settings�
Press C.
�
In the Service main menu
(�page 152), press the
System
soft
key.
System settings menu
In the System settings menu you can:�
select the time zone and daylight
savings time settings
�
select the language (
�page 161)
�
switch verification and notification
tones on and off (
�page 162)
�
adjust display settings (
�page 163)
�
reset all settings to the factory settings
(�page 164)You can select the applicable time zone
and daylight saving time settings.
�
In the System settings menu, press the Time
soft key.
The available time zones are shown.
�
Push the joystick to g or G to
select the time zone.
�
Press E.
You can now select the daylight saving
time settings.
Activating the System settings
menu
Selecting the time zone
Page 221 of 237
161 System settings
System settings
�
Push the joystick to g or G to
select the desired entry.Daylight Savings Time
:
Changes from summer to winter time
automatically.
Standard Time
:
No time conversion is made. The
change to winter time must be made
manually.
�
Press E.
The System settings menu will appear.
The setting is saved.The language affects the menu text
displays and the voice output during route
guidance.
�
In the System settings menu
(�page 160), press the
Lang.
soft
key.
The languages list will appear.
Option
Symbol
Time change selected
_
Time change not
selected
-
Selecting the language
Page 223 of 237
163 System settings
System settings
�
In the System settings menu, press the Display
soft key.You can use the following functions:
�
set the display dimming characteristics
�
adjust the display brightness
Setting the display dimming
characteristics
�
Push the joystick to G or g to
select an entry.Day modeThe display is continuously set to
daylight design.Night modeThe display is continuously set to night-
time design.AutomaticThe display changes depending on the
ambient light sensor in the vehicle.
�
Press E.
The setting is applied. The System
settings menu will appear.
Adjusting the display brightness
�
Press the
Bright.
soft key.
�
Push the joystick to H or h
direction to adjust the brightness.
Making display settingsOption
Symbol
Display mode selected
_
Display mode not
selected
-
Page 224 of 237

164 System settingsSystem settingsor�
Press the
Bright
. soft key longer than
2 seconds.
The display brightness changes
gradually. When the slider reaches the
end of the left or right border, it starts
moving into the opposite direction.
�
Release the
Bright.
soft key.
Confirming the setting
�
Press the
Back
soft key.
or
�
Press E.
The brightness setting is applied.
�
In the System settings menu, press the Reset
soft key.
The Reset inquiry menu will appear.
No
is highlighted.If you do not wish to reset to the factory
settings
�
Press the
Back
soft key or press E.
The System settings menu will appear.
Accepting the factory settings
�
Push the joystick to H or h
direction to select
Yes
.
�
Press E.
The message
All data has been
reset.
COMAND will now
restart. will appear.
Resetting all settings to the factory
settingsiAll your personal data, e.g. Last desti-
nation entries or Radio main menu pre-
set entries, will be deleted.
iThe factory settings are:
Time - Atlantic Time
Language - Instrument cluster
Verification tone - On
Notification tone - On
Display setting - Automatic
Page 230 of 237

170 IndexSaving
current location 128
destination 135
radio station 40
Selecting
an audio source 34
CD (CD changer* only) 51
city 109
cross street 106
detour 123
map orientation 119
satellite radio* station 63
street 103
time zone 160
Setting
display dimming characteristics 163
map view 130
POI Icons displays 129
routing mode 98
SIM-CARD BLOCKED 78
SMS 153Software Updates 147
Sound functions* 30
Speed-dialling 85
Starting
route guidance 115
Station
radio station
Station selection via number key-
pad (presets) 38
satellite radio* station
station selection via direct channel
entry 64
Subscribing
to satellite radio* 61
Subsequent dialing 82
Switching
the GPS info setting on/off 130
to CD operation 49
to telephone* operation 78
Switching off
COMAND 27
hands-free microphone 86
telephone operation 74Switching on
CD operation
CD changer* 50
CD drive in the COMAND 50
COMAND 27
hands-free microphone 86
satellite radio* operation 62
telephone operation 74
T
Tele Aid* 155
TELEPHONE BEING ACTIVATED, PLEASE
WAIT. 73
TELEPHONE BEING DEACTIVATED, PLEA-
SE WAIT 74
TELEPHONE NOT AVAILABLE 79
TELEPHONE NOT INSERTED 79
The unlock code
entering 77
Three-way calling 86
Traffic routes
minimizing 98
Trail settings 132
Treble 30