2005 LINCOLN TOWN CAR Jack
[x] Cancel search: JackPage 9 of 328
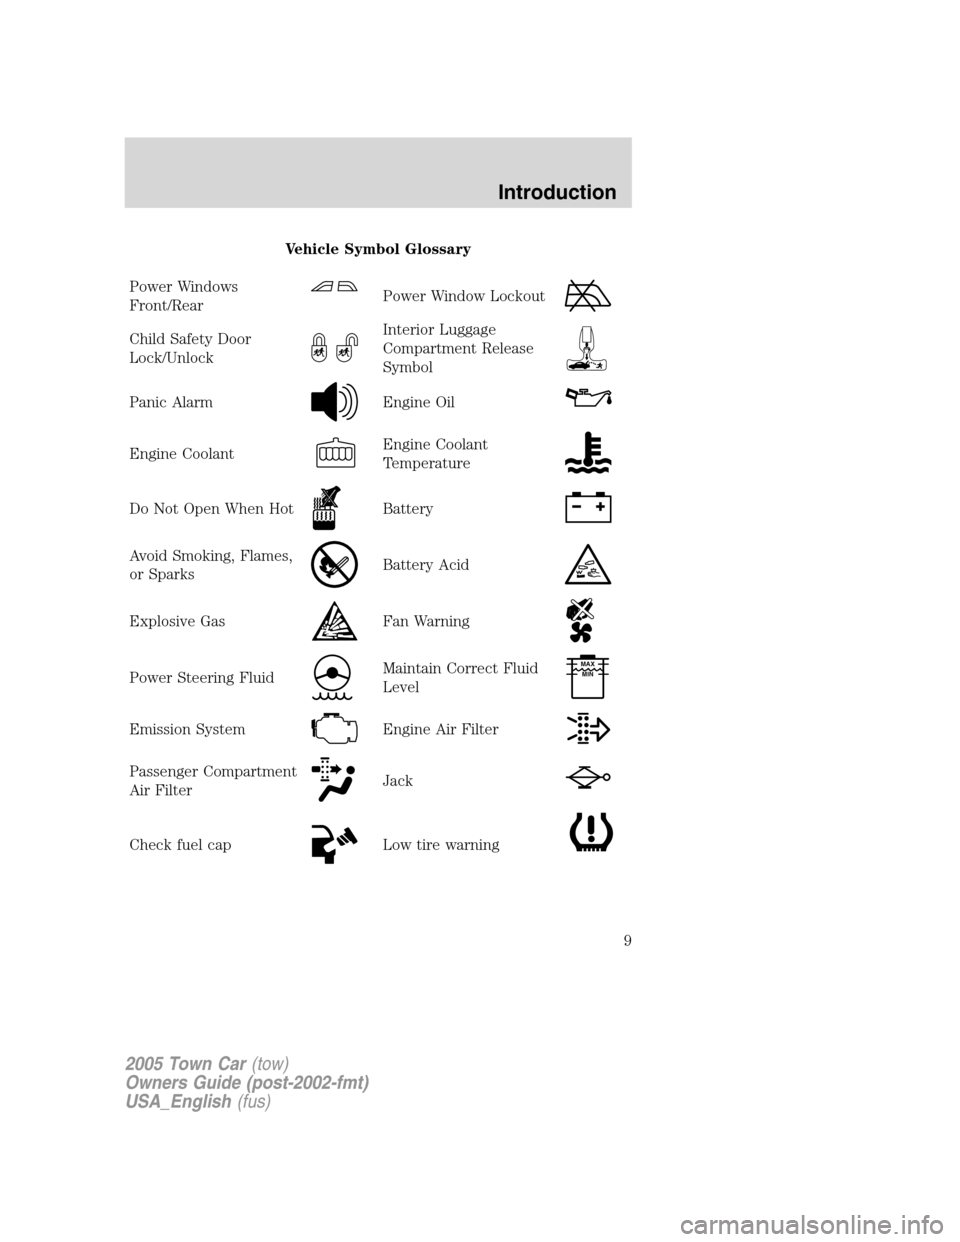
Vehicle Symbol Glossary
Power Windows
Front/Rear
Power Window Lockout
Child Safety Door
Lock/UnlockInterior Luggage
Compartment Release
Symbol
Panic AlarmEngine Oil
Engine CoolantEngine Coolant
Temperature
Do Not Open When HotBattery
Avoid Smoking, Flames,
or SparksBattery Acid
Explosive GasFan Warning
Power Steering FluidMaintain Correct Fluid
LevelMAX
MIN
Emission SystemEngine Air Filter
Passenger Compartment
Air FilterJack
Check fuel capLow tire warning
2005 Town Car(tow)
Owners Guide (post-2002-fmt)
USA_English(fus)
Introduction
9
Page 211 of 328
When driving with the dissimilar spare tire/wheel,do not:
•Exceed 70 mph (113 km/h)
•Use more than one dissimilar spare tire/wheel at a time
•Use commercial car washing equipment
•Use snow chains on the end of the vehicle with the dissimilar spare
tire/wheel
The usage of a dissimilar spare tire/wheel can lead to impairment of the
following:
•Handling, stability and braking performance
•Comfort and noise
•Ground clearance and parking at curbs
•Winter weather driving capability
•Wet weather driving capability
•All-Wheel driving capability (if applicable)
•Load leveling adjustment (if applicable)
When driving with the dissimilar spare tire/wheel additional caution
should be given to:
•Towing a trailer
•Driving vehicles equipped with a camper body
•Driving vehicles with a load on the cargo rack
Drive cautiously when using a dissimilar spare tire/wheel and seek
service as soon as possible.
Tire change procedure
To help prevent the vehicle from moving when you change a tire,
be sure the parking brake is set, then block (in both directions)
the wheel that is diagonally opposite (other side and end of the
vehicle) to the tire being changed.
If the vehicle slips off the jack, you or someone else could be
seriously injured.
2005 Town Car(tow)
Owners Guide (post-2002-fmt)
USA_English(fus)
Tires, Wheels and Loading
211
Page 212 of 328
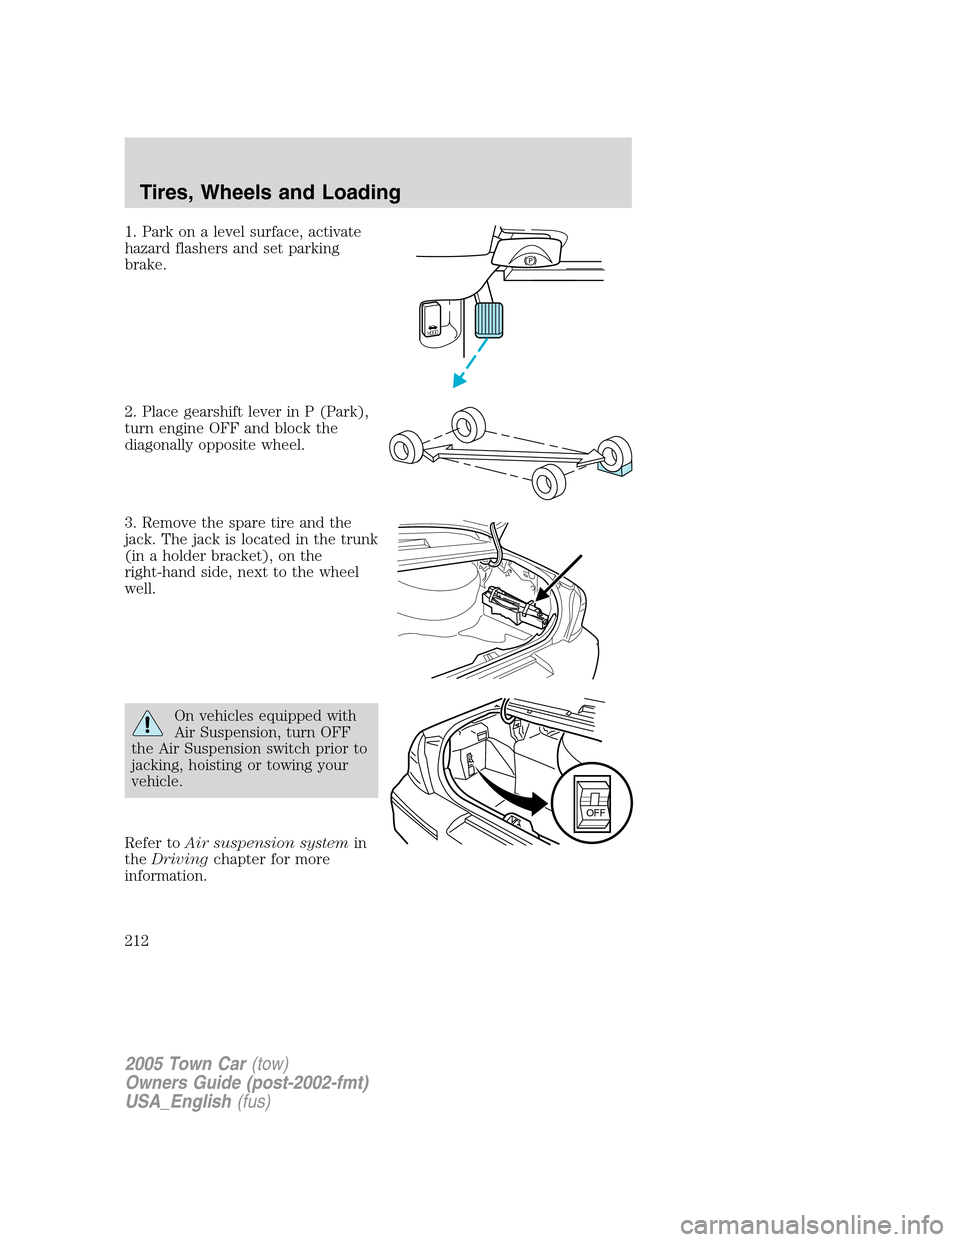
1. Park on a level surface, activate
hazard flashers and set parking
brake.
2. Place gearshift lever in P (Park),
turn engine OFF and block the
diagonally opposite wheel.
3. Remove the spare tire and the
jack. The jack is located in the trunk
(in a holder bracket), on the
right-hand side, next to the wheel
well.
On vehicles equipped with
Air Suspension, turn OFF
the Air Suspension switch prior to
jacking, hoisting or towing your
vehicle.
Refer toAir suspension systemin
theDrivingchapter for more
information.
HOOD
OFF
2005 Town Car(tow)
Owners Guide (post-2002-fmt)
USA_English(fus)
Tires, Wheels and Loading
212
Page 213 of 328
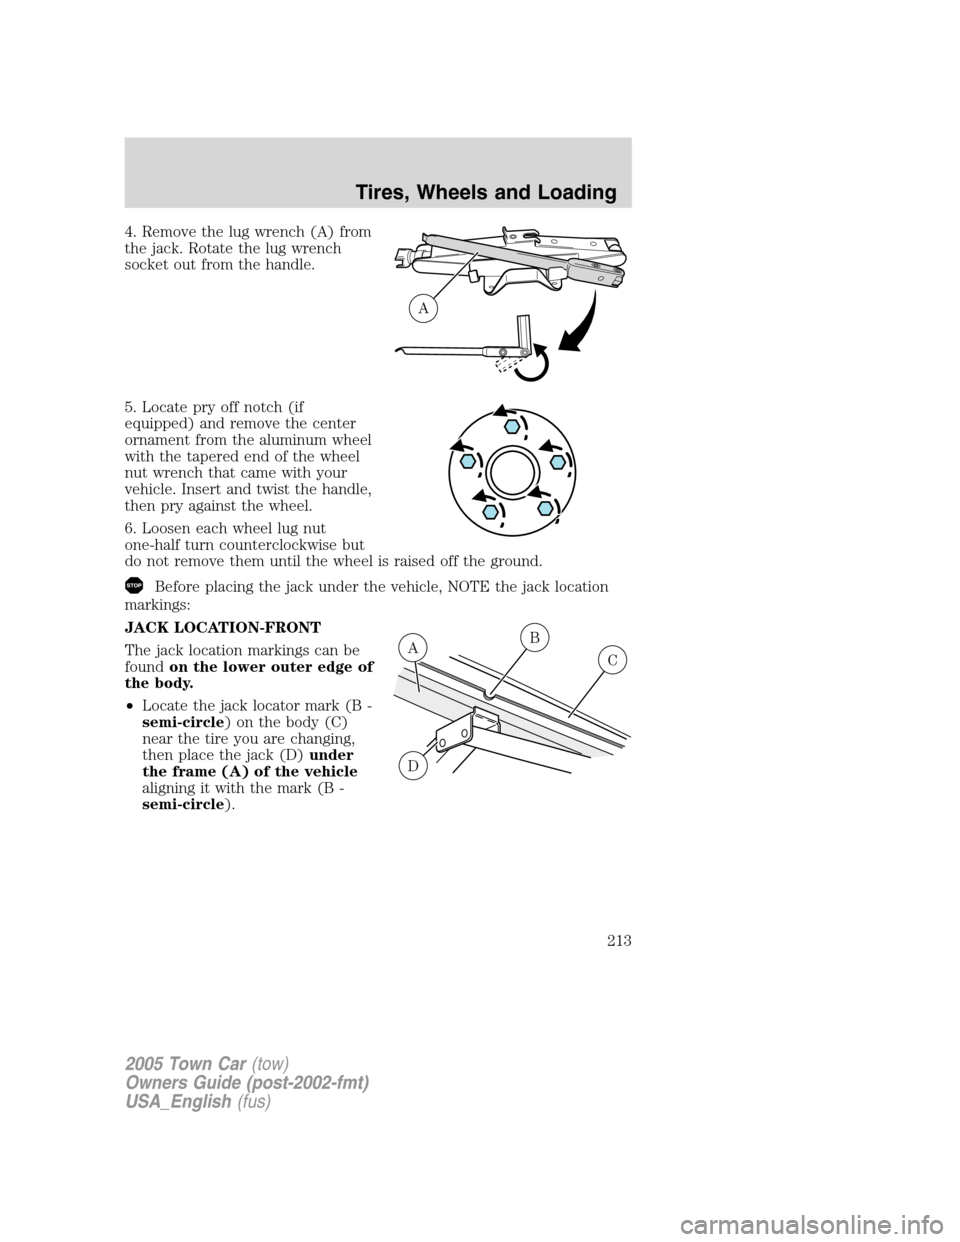
4. Remove the lug wrench (A) from
the jack. Rotate the lug wrench
socket out from the handle.
5. Locate pry off notch (if
equipped) and remove the center
ornament from the aluminum wheel
with the tapered end of the wheel
nut wrench that came with your
vehicle. Insert and twist the handle,
then pry against the wheel.
6. Loosen each wheel lug nut
one-half turn counterclockwise but
do not remove them until the wheel is raised off the ground.
Before placing the jack under the vehicle, NOTE the jack location
markings:
JACK LOCATION-FRONT
The jack location markings can be
foundon the lower outer edge of
the body.
•Locate the jack locator mark (B -
semi-circle) on the body (C)
near the tire you are changing,
then place the jack (D)under
the frame (A) of the vehicle
aligning it with the mark (B -
semi-circle).
A
B
C
D
A
2005 Town Car(tow)
Owners Guide (post-2002-fmt)
USA_English(fus)
Tires, Wheels and Loading
213
Page 214 of 328
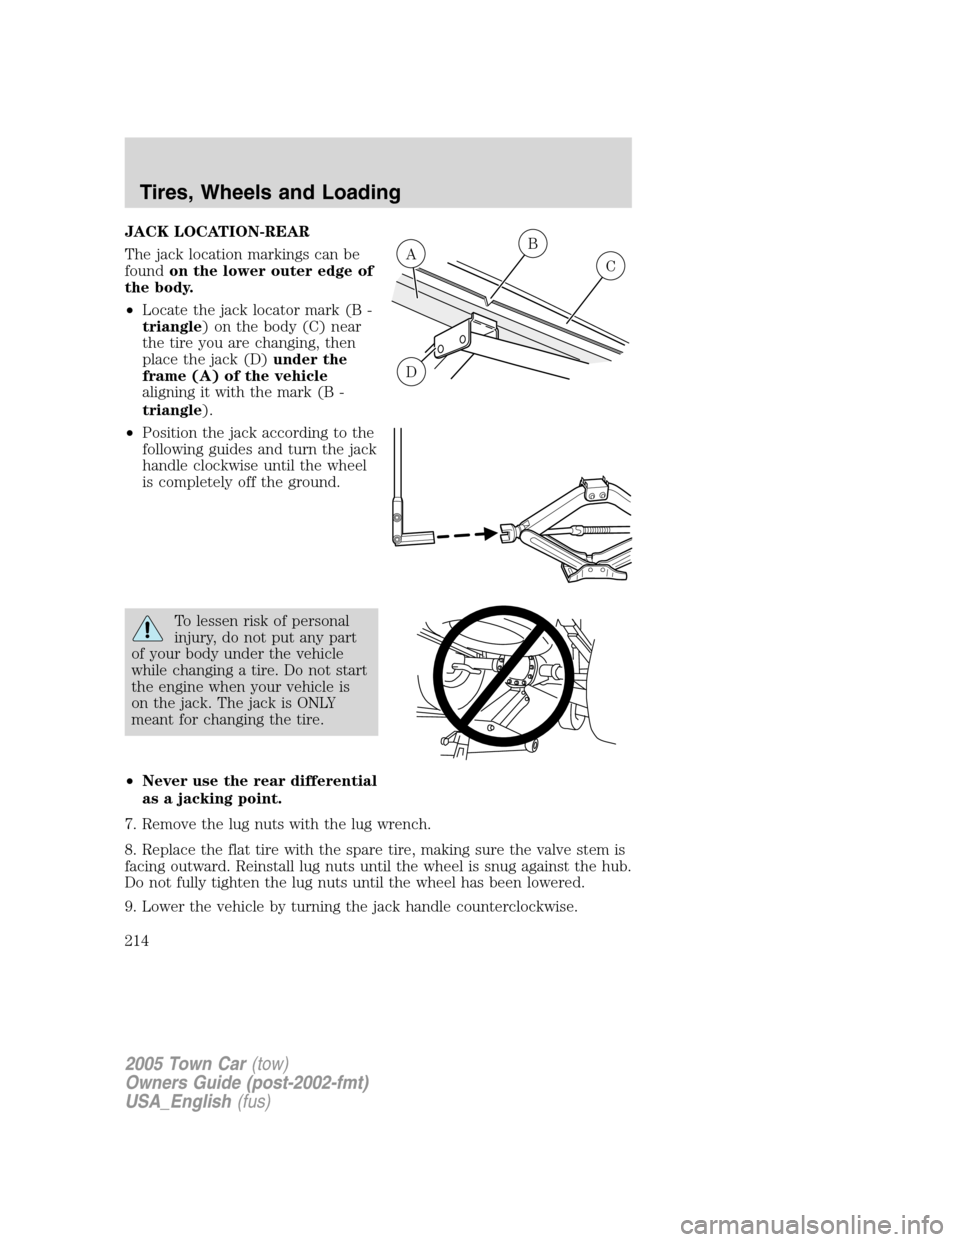
JACK LOCATION-REAR
The jack location markings can be
foundon the lower outer edge of
the body.
•Locate the jack locator mark (B -
triangle) on the body (C) near
the tire you are changing, then
place the jack (D)under the
frame (A) of the vehicle
aligning it with the mark (B -
triangle).
•Position the jack according to the
following guides and turn the jack
handle clockwise until the wheel
is completely off the ground.
To lessen risk of personal
injury, do not put any part
of your body under the vehicle
while changing a tire. Do not start
the engine when your vehicle is
on the jack. The jack is ONLY
meant for changing the tire.
•Never use the rear differential
as a jacking point.
7. Remove the lug nuts with the lug wrench.
8. Replace the flat tire with the spare tire, making sure the valve stem is
facing outward. Reinstall lug nuts until the wheel is snug against the hub.
Do not fully tighten the lug nuts until the wheel has been lowered.
9. Lower the vehicle by turning the jack handle counterclockwise.
B
C
D
A
2005 Town Car(tow)
Owners Guide (post-2002-fmt)
USA_English(fus)
Tires, Wheels and Loading
214
Page 215 of 328
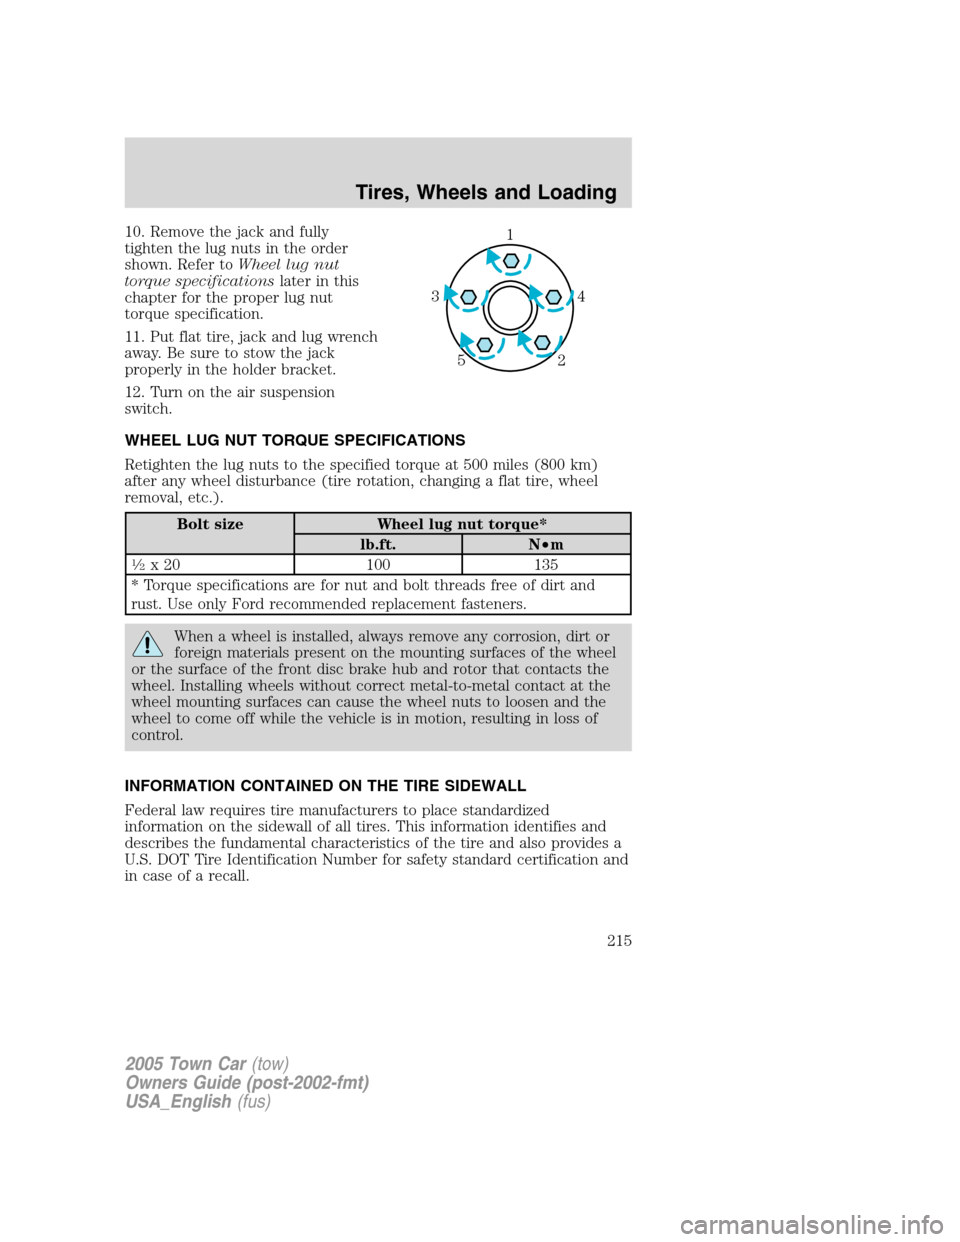
10. Remove the jack and fully
tighten the lug nuts in the order
shown. Refer toWheel lug nut
torque specificationslater in this
chapter for the proper lug nut
torque specification.
11. Put flat tire, jack and lug wrench
away. Be sure to stow the jack
properly in the holder bracket.
12. Turn on the air suspension
switch.
WHEEL LUG NUT TORQUE SPECIFICATIONS
Retighten the lug nuts to the specified torque at 500 miles (800 km)
after any wheel disturbance (tire rotation, changing a flat tire, wheel
removal, etc.).
Bolt size Wheel lug nut torque*
lb.ft. N•m
1�2x 20 100 135
* Torque specifications are for nut and bolt threads free of dirt and
rust. Use only Ford recommended replacement fasteners.
When a wheel is installed, always remove any corrosion, dirt or
foreign materials present on the mounting surfaces of the wheel
or the surface of the front disc brake hub and rotor that contacts the
wheel. Installing wheels without correct metal-to-metal contact at the
wheel mounting surfaces can cause the wheel nuts to loosen and the
wheel to come off while the vehicle is in motion, resulting in loss of
control.
INFORMATION CONTAINED ON THE TIRE SIDEWALL
Federal law requires tire manufacturers to place standardized
information on the sidewall of all tires. This information identifies and
describes the fundamental characteristics of the tire and also provides a
U.S. DOT Tire Identification Number for safety standard certification and
in case of a recall.
1
4 3
2 5
2005 Town Car(tow)
Owners Guide (post-2002-fmt)
USA_English(fus)
Tires, Wheels and Loading
215
Page 243 of 328
If the amount of effort required to steer your vehicle changes while
driving at a constant vehicle speed, have the power steering system
checked by your dealer or a qualified service technician.
AIR SUSPENSION SYSTEM
The air suspension system is designed to improve ride, handling and
general vehicle performance during:
•Certain road conditions
•Steering maneuvers
•Braking
•Accelerations
This system keeps the rear of your vehicle at a constant level by
automatically adding air or releasing air from the springs.
If you exceed the load limit, the rear air suspension may not operate.
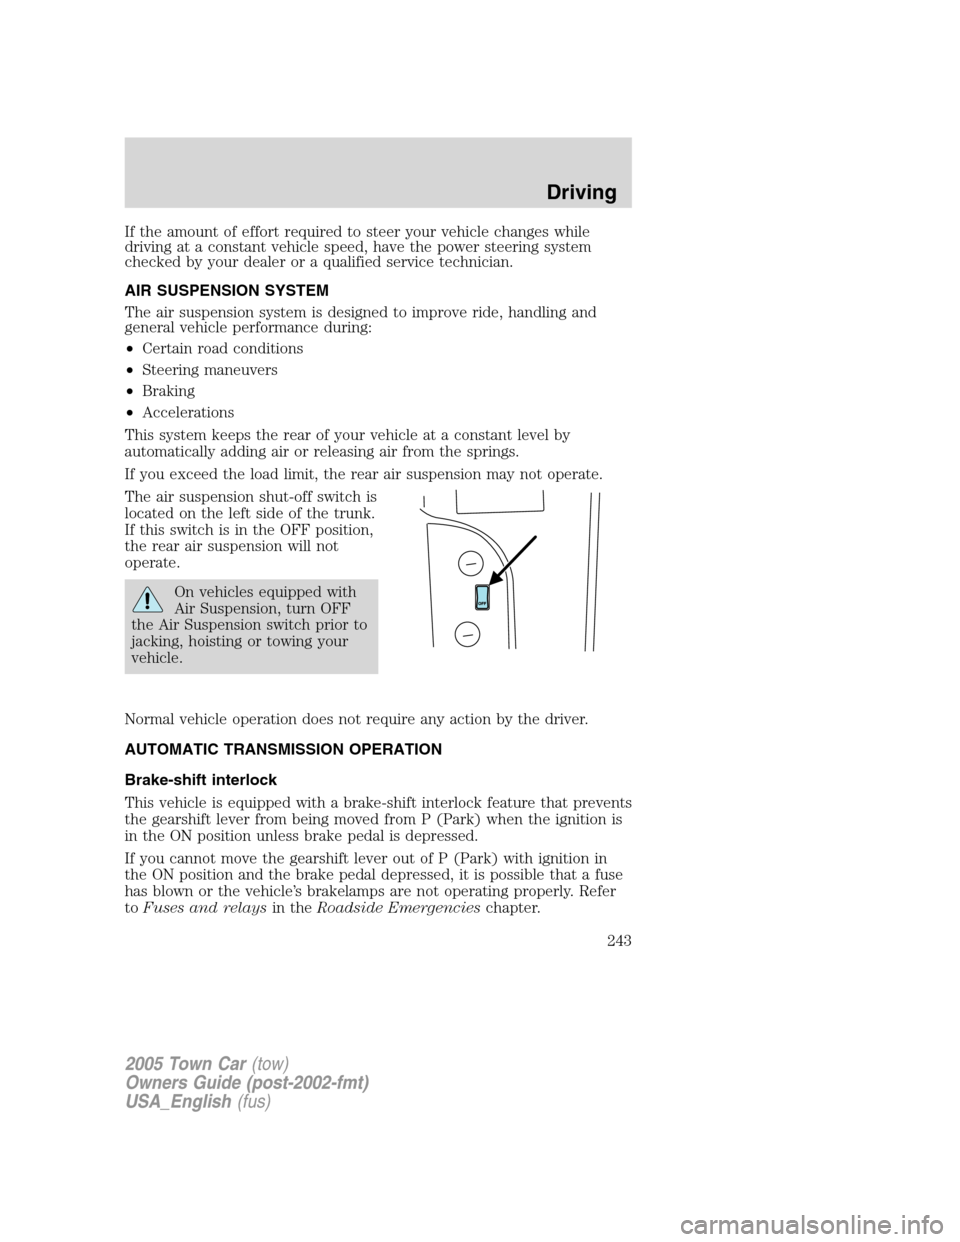
The air suspension shut-off switch is
located on the left side of the trunk.
If this switch is in the OFF position,
the rear air suspension will not
operate.
On vehicles equipped with
Air Suspension, turn OFF
the Air Suspension switch prior to
jacking, hoisting or towing your
vehicle.
Normal vehicle operation does not require any action by the driver.
AUTOMATIC TRANSMISSION OPERATION
Brake-shift interlock
This vehicle is equipped with a brake-shift interlock feature that prevents
the gearshift lever from being moved from P (Park) when the ignition is
in the ON position unless brake pedal is depressed.
If you cannot move the gearshift lever out of P (Park) with ignition in
the ON position and the brake pedal depressed, it is possible that a fuse
has blown or the vehicle’s brakelamps are not operating properly. Refer
toFuses and relaysin theRoadside Emergencieschapter.
2005 Town Car(tow)
Owners Guide (post-2002-fmt)
USA_English(fus)
Driving
243
Page 325 of 328
F
Fail safe coolant ........................296
Floor mats .................................145
Fluid capacities .........................312
Fuel ............................................297
calculating fuel
economy ..................120, 139, 302
cap ...........................................299
capacity ...................................312
choosing the right fuel ...........300
comparisons with EPA fuel
economy estimates .................305
detergent in fuel .....................301
filling your vehicle with
fuel ...........................297, 299, 302
filter, specifications ........301, 311
fuel filler door override ..........144
fuel filler door release ............144
fuel pump shut-off switch .....252
improving fuel economy ........302
octane rating ...................301, 316
quality ......................................301
running out of fuel .................301
safety information relating to
automotive fuels .....................297
Fuses ..................................253–254
G
Gas cap (see Fuel cap) ............299
Gas mileage
(see Fuel economy) .................302
Gauges .........................................15
H
Hazard flashers .........................252
Head restraints .........................162
Headlamps .................................105aiming ......................................107
autolamp system .....................105
bulb specifications ..................110
daytime running lights ...........106
flash to pass ............................106
high beam ...............................106
replacing bulbs .......................111
turning on and off ..................105
Hood ..........................................283
I
Ignition ...............................235, 316
Infant seats
(see Safety seats) .....................196
Inspection/maintenance (I/M)
testing ........................................307
Instrument panel
cleaning ...................................279
cluster ........................................10
lighting up panel and
interior .....................................107
J
Jack ............................................209
positioning ...............................209
storage .....................................209
Jump-starting your vehicle ......260
K
Keyless entry system ...............155
Keys
positions of the ignition .........235
L
Lamps
autolamp system .....................105
2005 Town Car(tow)
Owners Guide (post-2002-fmt)
USA_English(fus)
Index
325