Page 34 of 328

15.Mute mode:Press to mute the
playing media.
16.Power/volume:Press to turn
the system on/off. Turn to
raise/lower the volume.
17.Tape:Press to play the tape.
18.CD door:Insert the disc with the playing side down and printed side
up.
19.Tape door:Insert the tape facing the right.
REAR CONSOLE AUDIO CONTROLS (IF EQUIPPED)
•NEXT:Press to access the next
radio memory preset, the next
CD track or the next tape
selection.
•VOL:Press the up arrow to
increase the volume or the down
arrow to decrease the volume.
•MODE:Press to toggle through
AM, FM1, FM2, TAPE or CD (if
equipped) modes.
ACCESSORY DELAY
With accessory delay, the window switches, moon roof (if equipped) and
audio system may be used for up to ten minutes after the ignition switch
is turn to the OFF position or until any door is opened.
RADIO FREQUENCIES
AM and FM frequencies are established by the Federal Communications
Commission (FCC) and the Canadian Radio and Telecommunications
Commission (CRTC). Those frequencies are:
AM - 530, 540–1700, 1710 kHz
FM- 87.7, 87.9–107.7, 107.9 MHz
2005 Town Car(tow)
Owners Guide (post-2002-fmt)
USA_English(fus)
Entertainment Systems
34
Page 47 of 328

•Chinese food•Continental restaurant
•Continental food•French restaurant
•French food•Italian restaurant
•Italian food•Japanese restaurant
•Japanese food•Mexican restaurant
•Mexican food•Seafood restaurant
•Seafood•Other restaurant
•Other food•Shopping
•Shopping mall•Grocery store
•Airport•Bus station
•Ferry terminal•Historical monument
•Hotel•Park and ride
•Rental car agency•Rest area
•Rest stop•Tourist information
•Train station•Business facility
•City center•POI off
•Commuter rail station
While in navigation destination (DEST) mode, the following commands
are available:
•Home•Go home
•Previous starting point•Go starting point
•Next way point map•First way point map
•Second way point map•Third way point map
•Fourth way point map•Fifth way point map
•Destination map•Delete destination
•Cancel destination
While in navigation guidance mode, the following commands are available
by voice activation:
•Repeat guidance•Repeat voice
•Louder•Softer
•Voice guidance off•Voice guidance on
•Open guidance screen•Close guidance screen
•Arrow guidance•Arrow guide
2005 Town Car(tow)
Owners Guide (post-2002-fmt)
USA_English(fus)
Entertainment Systems
47
Page 50 of 328
3. SCV is located in the middle of
the screen. Press to turn on.
4. Select setting 1 to 7 or turn off.
The recommended level for the speed compensated volume is from level
1 through level 3. When activated, level 1 is the minimum setting and
level 7 is the maximum setting.
AM/FM select
The AM/FM control works in radio, CD and navigation modes.
AM/FM select in radio mode
Press AM/FM1/FM2 to switch between AM/FM1/FM2 memory preset
stations.
AM/FM select in CD mode
Press to stop CD play and begin radio play.
AM/FM select in navigation mode
The radio will continue to play in the background of the navigation
screens. To access, press AUDIO then AM/FM1/FM2.
Seek
•Press
/to find the next
listenable station up/down the
frequency band.
•Press
/to advance to the
next/previous track on a CD.
2005 Town Car(tow)
Owners Guide (post-2002-fmt)
USA_English(fus)
Entertainment Systems
50
Page 56 of 328

Satellite ready capability
Your Lincoln navigation system
comes equipped with Satellite ready
capability. The kit to enable Satellite
reception is available through your
Lincoln dealer. Detailed Satellite
instructions are included with the
dealer installed kit.
CD mode
CD units are designed to play commercially pressed 4.75 in (12
cm) audio compact discs only. Due to technical incompatibility,
certain recordable and re-recordable compact discs may not
function correctly when used in Ford CD players. Irregular
shaped CDs, CDs with a scratch protection film attached, and CDs
with homemade paper (adhesive) labels should not be inserted
into the CD player. The label may peel and cause the CD to
become jammed. It is recommended that homemade CDs be
identified with permanent felt tip marker rather than adhesive
labels. Ball point pens may damage CDs. Please contact your
dealer for further information.
Playing a previously loaded CD:
To begin CD play (if a CD is already
loaded), press AUDIO hard button
and then CD.
SOUND
AM
FM1
FM2
CDSEEK
TUNE
PRESET SCANAUTO SET
SCAN
RDS
TRAFFIC
INFO PTYSET PTY
87.9
89.9 98.1
98.5 106.3 107.9
2005 Town Car(tow)
Owners Guide (post-2002-fmt)
USA_English(fus)
Entertainment Systems
56
Page 117 of 328

Rotate the visor towards the side
window and extend it rearward for
additional sunlight coverage.
Note:To stow the visor back into
the headliner, visor must be
retra")
Slide on rod feature (if
equipped)
Rotate the visor towards the side
window and extend it rearward for
additional sunlight coverage.
Note:To stow the visor back into
the headliner, visor must be
retracted before moving it back
towards the windshield.
OVERHEAD CONSOLE (IF EQUIPPED)
The appearance of your vehicle’s overhead console will vary according to
your option package. Some of the features in the overhead console
include Compass, Homelink, Oil minder and Park assist deactivation.
Normal mode
There are three normal modes; Compass, Oil Minder and Off. To select
one of these:
1. From a blank display (OFF),
press and release the MODE button
once to enter the compass mode.
2. Press and release the MODE
button again to enter the oil minder
mode.
3. Press and release the MODE
button again to return to OFF.
Warning mode
A system warning will display for oil minder, park assist and alarm
system related warnings. A higher priority active warning message will
overwrite the lower message. Press the RESET button to acknowledge
the warning, the warning message is cleared and a normal mode message
or another warning message will be displayed.
•The park assist de-activation cannot be cleared by the RESET button
and will remain displayed until the system is reactivated.
•The oil minder has a two-level warning. The first level messages
disappear from the display when the RESET button is pressed. The
second level messages return on the display after a period of time.
•The alarm system warning will be displayed when you first start the
vehicle and can be cleared by pressing the RESET button.
2005 Town Car(tow)
Owners Guide (post-2002-fmt)
USA_English(fus)
Driver Controls
117
Page 119 of 328

2. Hold down the MODE button for
5 seconds to enter zone mode. The
display will read PRESS RESET TO
SET ZONE XX where XX is the
current zone.
3. Release the MODE button.
4. Determine which magnetic zone
you are in by referring to the zone
map.
5. Repeatedly press and release the
RESET button to scroll through the
zones 1–15 until the desired zone is
displayed.
6. Press the MODE button to save
the new zone setting and return to
the compass normal mode.
Note:The compass exits the zone
setting mode and returns to its previous setting after one minute of no
activity.
Note:If power is interrupted during the zone setting process, the
compass resets to the same zone it was set to before the zone change
process was started.
Calibration mode
For optimum calibration, turn off all electrical accessories (heater/air
conditioning, wipers, etc.) and make sure all vehicle doors are shut.
To calibrate the compass:
1. Press and release the MODE
button until the compass directional
heading is displayed.
1 2 3
4
5
6 7 8 9 101112 13 14 15
2005 Town Car(tow)
Owners Guide (post-2002-fmt)
USA_English(fus)
Driver Controls
119
Page 120 of 328

2. Hold down the MODE button for
10 seconds to enter the calibration
mode. The display will read PRESS
RESET TO DECAL.
3. Release the MODE button.
4. Press the RESET button to
de-calibrate the compass. The
display will read CIRCLE SLOWLY
TO CALIBRATE for a few seconds
and then display a direction with
CAL displayed on the right side.
5. Drive the vehicle in a tight circle
in a magnetically clean area such as
an open parking lot.
6. Slowly drive the vehicle in a circle (less than 3 mph [5 km/h]). This
will take up to three circles to complete calibration.
7. The correct compass heading will be displayed when the compass is
calibrated.
Note:If the RESET button is not pressed, the compass will exit
calibration mode after three minutes of no activity and the original
calibration data will be restored.
Note:If power is interrupted during the calibration process, the compass
resets to the original calibration data from before the calibration process
started.
HomeLink�wireless control system (if equipped)
The HomeLink�Wireless Control System, located on the overhead
console, provides a convenient way to replace up to three hand-held
transmitters with a single built-in device. This feature will learn the radio
frequency codes of most transmitters to operate garage doors, entry gate
operators, security systems, entry door locks, and home or office lighting.
When programming your HomeLink�Wireless Control System to a
garage door or gate, be sure that people and objects are out of the way
to prevent potential harm or damage. Do not use the HomeLink�
Wireless Control System with any garage door opener that lacks safety
stop and reverse features as required by U.S. federal safety standards
(this includes any garage door opener model manufactured before April
1, 1982). A garage door which cannot detect an object, signaling the
2005 Town Car(tow)
Owners Guide (post-2002-fmt)
USA_English(fus)
Driver Controls
120
Page 125 of 328
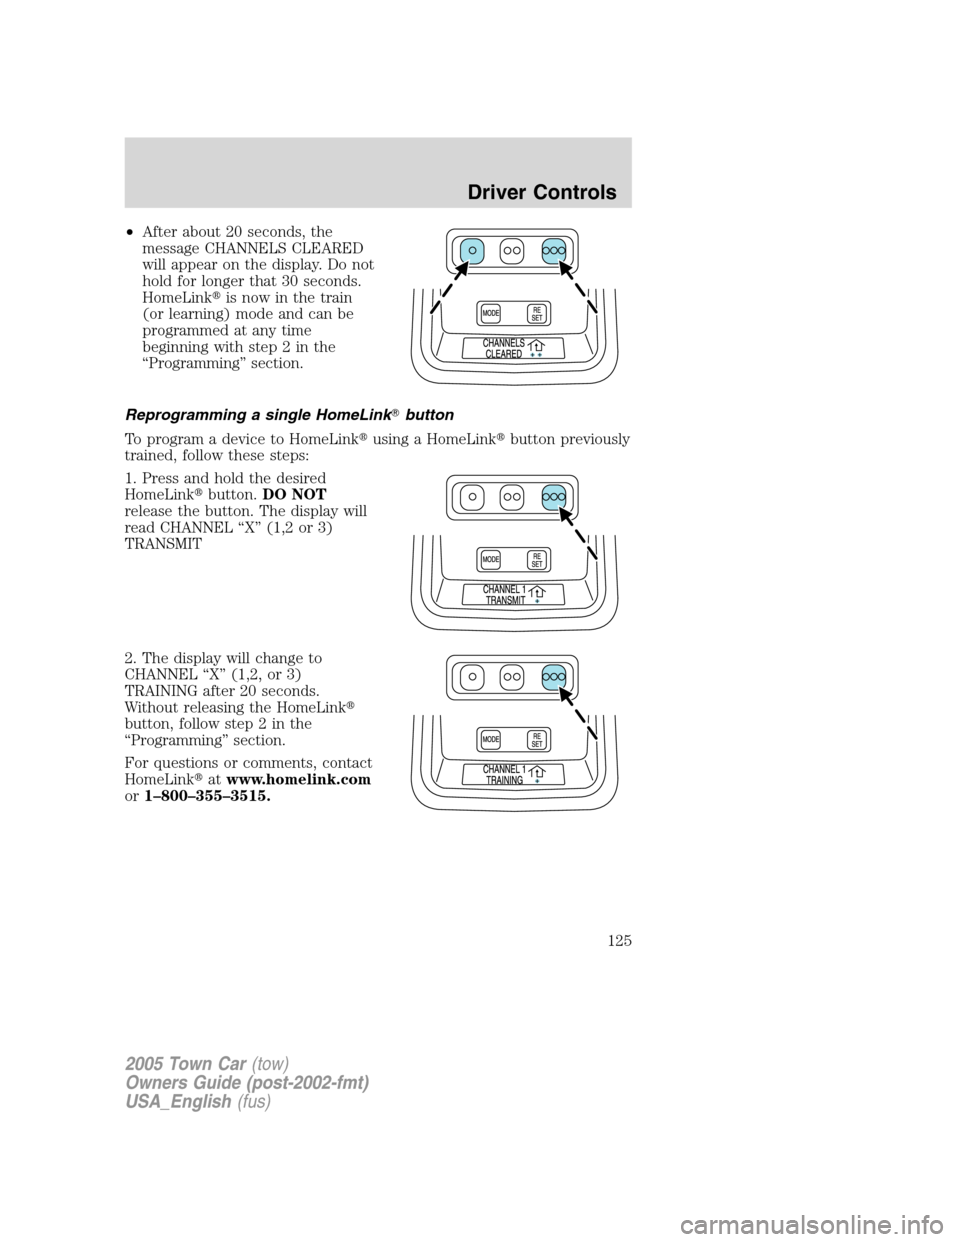
•After about 20 seconds, the
message CHANNELS CLEARED
will appear on the display. Do not
hold for longer that 30 seconds.
HomeLink�is now in the train
(or learning) mode and can be
programmed at any time
beginning with step 2 in the
“Programming” section.
Reprogramming a single HomeLink�button
To program a device to HomeLink�using a HomeLink�button previously
trained, follow these steps:
1. Press and hold the desired
HomeLink�button.DO NOT
release the button. The display will
read CHANNEL “X” (1,2 or 3)
TRANSMIT
2. The display will change to
CHANNEL “X” (1,2, or 3)
TRAINING after 20 seconds.
Without releasing the HomeLink�
button, follow step 2 in the
“Programming” section.
For questions or comments, contact
HomeLink�atwww.homelink.com
or1–800–355–3515.
2005 Town Car(tow)
Owners Guide (post-2002-fmt)
USA_English(fus)
Driver Controls
125