2005 LINCOLN AVIATOR Tow
[x] Cancel search: TowPage 187 of 368
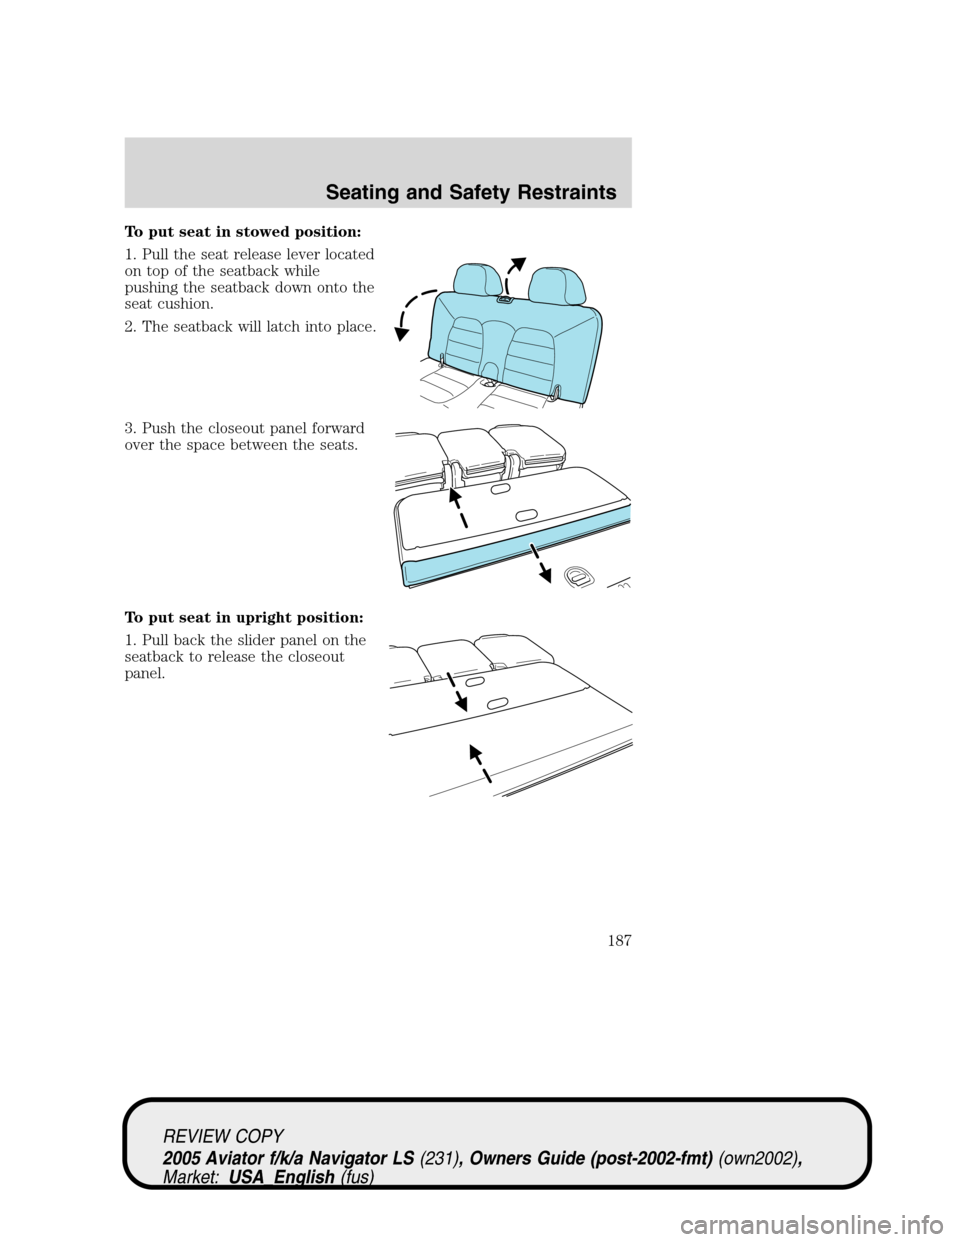
To put seat in stowed position:
1. Pull the seat release lever located
on top of the seatback while
pushing the seatback down onto the
seat cushion.
2. The seatback will latch into place.
3. Push the closeout panel forward
over the space between the seats.
To put seat in upright position:
1. Pull back the slider panel on the
seatback to release the closeout
panel.
REVIEW COPY
2005 Aviator f/k/a Navigator LS(231), Owners Guide (post-2002-fmt)(own2002),
Market:USA_English(fus)
Seating and Safety Restraints
187
Page 202 of 368

All occupants of the vehicle, including the driver, should always
properly wear their safety belts, even when an air bag
supplemental restraint system (SRS) is provided.
Always transport children 12 years old and under in the back
seat and always properly use appropriate child restraints.
The National Highway Traffic Safety Administration (NHTSA)
recommends a minimum distance of at least 10 inches (25 cm)
between an occupant’s chest and the driver air bag module.
Never place your arm over the air bag module as a deploying air
bag can result in serious arm fractures or other injuries.
To properly position yourself away from the air bag:
•Move your seat to the rear as far as you can while still reaching the
pedals comfortably.
•Recline the seat slightly one or two degrees from the upright position.
Do not put anything on or over the air bag module. Placing
objects on or over the air bag inflation area may cause those
objects to be propelled by the air bag into your face and torso causing
serious injury.
Do not attempt to service, repair, or modify the air bag
supplemental restraint systems or its fuses. See your Ford or
Lincoln Mercury dealer.
Modifying or adding equipment to the front end of the vehicle
(including frame, bumper, front end body structure and tow
hooks) may affect the performance of the air bag system, increasing
the risk of injury. Do not modify the front end of the vehicle.
Additional equipment may affect the performance of the air bag
sensors increasing the risk of injury. Please refer to theBody
Builders Layout Bookfor instructions about the appropriate
installation of additional equipment.
REVIEW COPY
2005 Aviator f/k/a Navigator LS(231), Owners Guide (post-2002-fmt)(own2002),
Market:USA_English(fus)
Seating and Safety Restraints
202
Page 211 of 368
The shoulder belt should cross the chest, resting snugly on the center of
the shoulder. The lap belt should rest low and snug across the hips,
never up high across the stomach.
If the booster seat slides on the vehicle seat, placing a rubberized mesh
sold as shelf or carpet liner under the booster seat may improve this
condition.
The importance of shoulder belts
Using a booster without a shoulder belt increases the risk of a child’s
head hitting a hard surface in a collision. For this reason, you should
never use a booster seat with a lap belt only. It is best to use a booster
seat with lap/shoulder belts in the back seat- the safest place for children
to ride.
Follow all instructions provided by the manufacturer of the
booster seat.
Never put the shoulder belt under a child’s arm or behind the
back because it eliminates the protection for the upper part of
the body and may increase the risk of injury or death in a collision.
Never use pillows, books, or towels to boost a child. They can
slide around and increase the likelihood of injury or death in a
collision.
SAFETY SEATS FOR CHILDREN
Child and infant or child safety seats
Use a safety seat that is recommended for the size and weight of the
child. Carefully follow all of the manufacturer’s instructions with the
safety seat you put in your vehicle. If you do not install and use the
safety seat properly, the child may be injured in a sudden stop or
collision.
REVIEW COPY
2005 Aviator f/k/a Navigator LS(231), Owners Guide (post-2002-fmt)(own2002),
Market:USA_English(fus)
Seating and Safety Restraints
211
Page 215 of 368
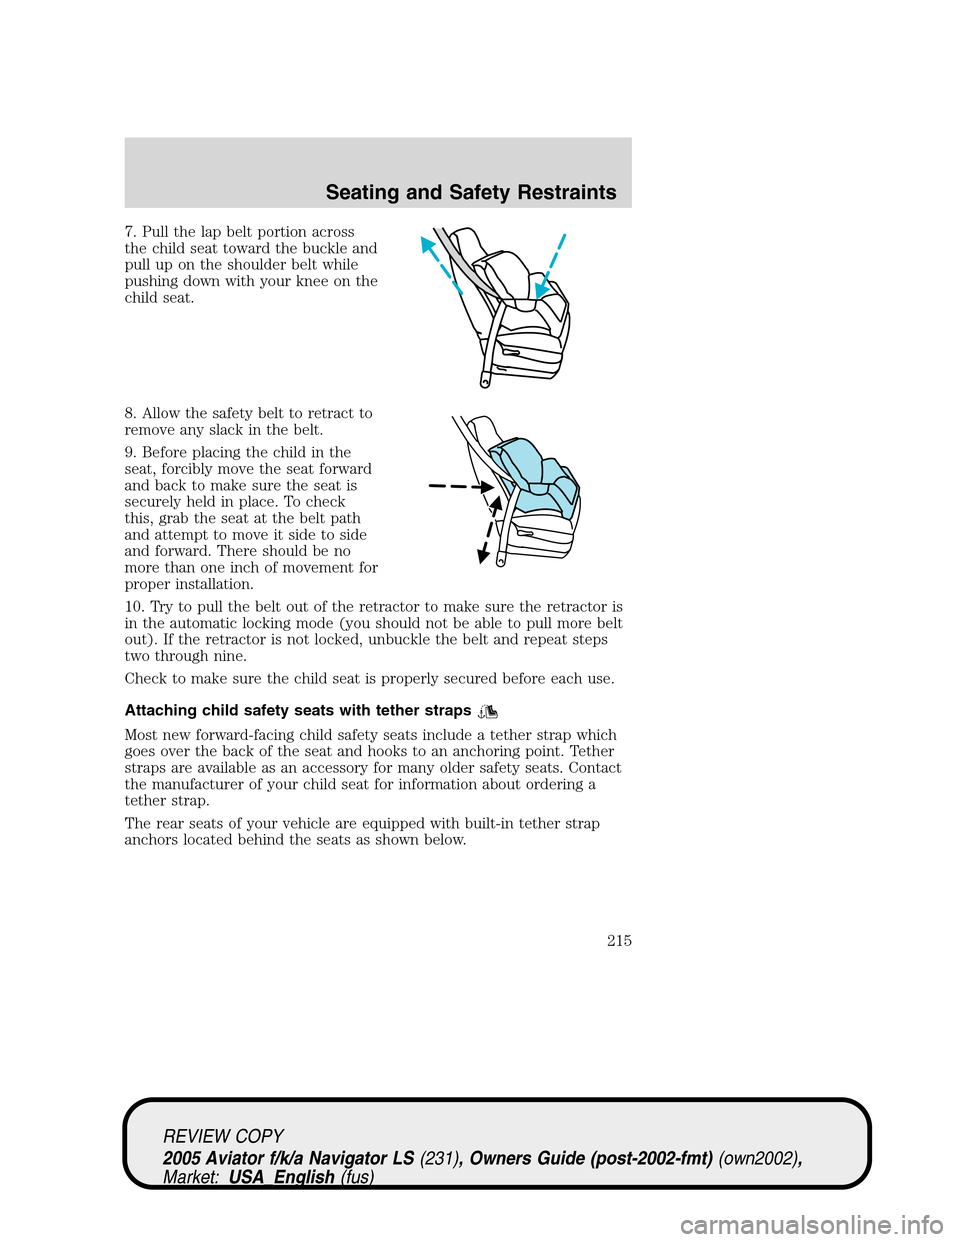
7. Pull the lap belt portion across
the child seat toward the buckle and
pull up on the shoulder belt while
pushing down with your knee on the
child seat.
8. Allow the safety belt to retract to
remove any slack in the belt.
9. Before placing the child in the
seat, forcibly move the seat forward
and back to make sure the seat is
securely held in place. To check
this, grab the seat at the belt path
and attempt to move it side to side
and forward. There should be no
more than one inch of movement for
proper installation.
10. Try to pull the belt out of the retractor to make sure the retractor is
in the automatic locking mode (you should not be able to pull more belt
out). If the retractor is not locked, unbuckle the belt and repeat steps
two through nine.
Check to make sure the child seat is properly secured before each use.
Attaching child safety seats with tether straps
Most new forward-facing child safety seats include a tether strap which
goes over the back of the seat and hooks to an anchoring point. Tether
straps are available as an accessory for many older safety seats. Contact
the manufacturer of your child seat for information about ordering a
tether strap.
The rear seats of your vehicle are equipped with built-in tether strap
anchors located behind the seats as shown below.
REVIEW COPY
2005 Aviator f/k/a Navigator LS(231), Owners Guide (post-2002-fmt)(own2002),
Market:USA_English(fus)
Seating and Safety Restraints
215
Page 230 of 368
Your vehicle may be equipped with a dissimilar spare tire/wheel. A
dissimilar spare tire/wheel is defined as a spare tire and/or wheel that is
different in brand, size or appearance from the road tires and wheels. If
you have a dissimilar spare tire/wheel, then it is intended for temporary
use only. This means that if you need to use it, you should replace it as
soon as possible with a road tire/wheel that is the same size and type as
the road tires and wheels that were originally provided by Ford. If the
dissimilar spare tire or wheel is damaged, it should be replaced rather
than repaired.
When driving with the dissimilar spare tire/wheel,do not:
•Exceed 70 mph (113 km/h)
•Use more than one dissimilar spare tire/wheel at a time
•Use commercial car washing equipment
•Use snow chains on the end of the vehicle with the dissimilar spare
tire/wheel
The usage of a dissimilar spare tire/wheel can lead to impairment of the
following:
•Handling, stability and braking performance
•Comfort and noise
•Ground clearance and parking at curbs
•Winter weather driving capability
•Wet weather driving capability
•All-Wheel driving capability (if applicable)
•Load leveling adjustment (if applicable)
When driving with the dissimilar spare tire/wheel additional caution
should be given to:
•Towing a trailer
•Driving vehicles equipped with a camper body
•Driving vehicles with a load on the cargo rack
Drive cautiously when using a dissimilar spare tire/wheel and seek
service as soon as possible.
REVIEW COPY
2005 Aviator f/k/a Navigator LS(231), Owners Guide (post-2002-fmt)(own2002),
Market:USA_English(fus)
Tires, Wheels and Loading
230
Page 232 of 368
Note:Passengers should not remain
in the vehicle when the vehicle is
being jacked.
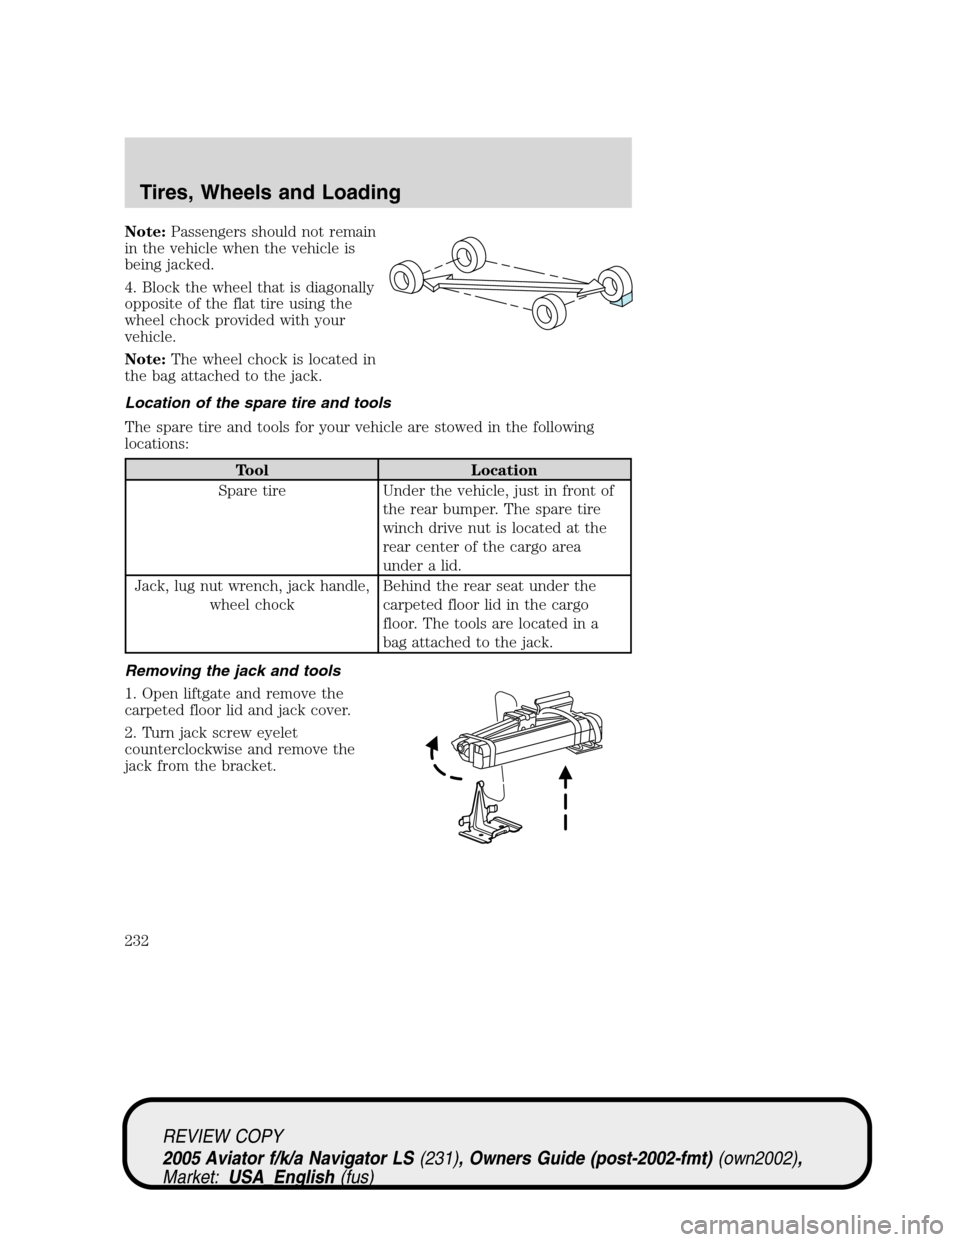
4. Block the wheel that is diagonally
opposite of the flat tire using the
wheel chock provided with your
vehicle.
Note:The wheel chock is located in
the bag attached to the jack.
Location of the spare tire and tools
The spare tire and tools for your vehicle are stowed in the following
locations:
Tool Location
Spare tire Under the vehicle, just in front of
the rear bumper. The spare tire
winch drive nut is located at the
rear center of the cargo area
under a lid.
Jack, lug nut wrench, jack handle,
wheel chockBehind the rear seat under the
carpeted floor lid in the cargo
floor. The tools are located in a
bag attached to the jack.
Removing the jack and tools
1. Open liftgate and remove the
carpeted floor lid and jack cover.
2. Turn jack screw eyelet
counterclockwise and remove the
jack from the bracket.
REVIEW COPY
2005 Aviator f/k/a Navigator LS(231), Owners Guide (post-2002-fmt)(own2002),
Market:USA_English(fus)
Tires, Wheels and Loading
232
Page 236 of 368
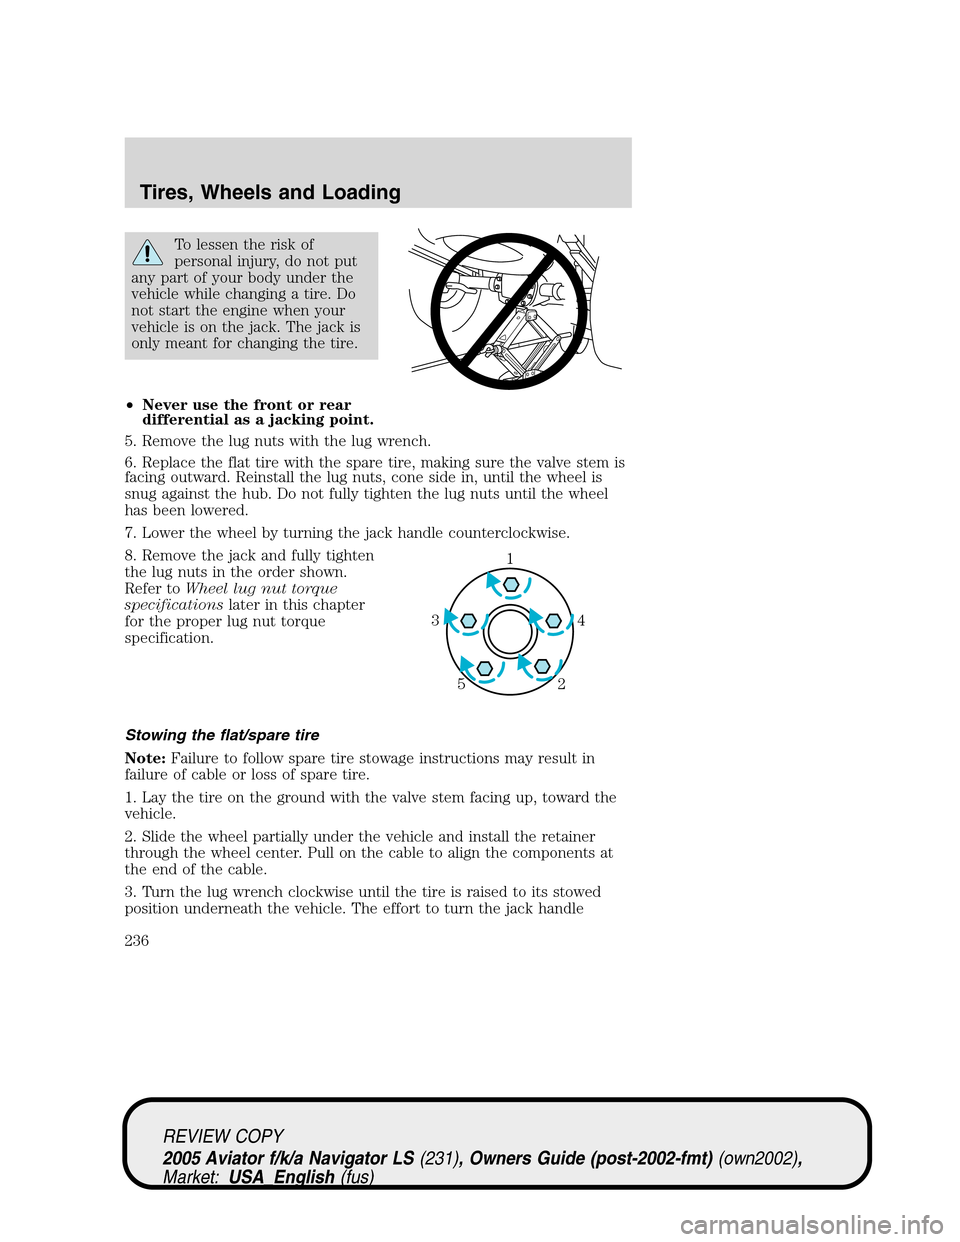
To lessen the risk of
personal injury, do not put
any part of your body under the
vehicle while changing a tire. Do
not start the engine when your
vehicle is on the jack. The jack is
only meant for changing the tire.
•Never use the front or rear
differential as a jacking point.
5. Remove the lug nuts with the lug wrench.
6. Replace the flat tire with the spare tire, making sure the valve stem is
facing outward. Reinstall the lug nuts, cone side in, until the wheel is
snug against the hub. Do not fully tighten the lug nuts until the wheel
has been lowered.
7. Lower the wheel by turning the jack handle counterclockwise.
8. Remove the jack and fully tighten
the lug nuts in the order shown.
Refer toWheel lug nut torque
specificationslater in this chapter
for the proper lug nut torque
specification.
Stowing the flat/spare tire
Note:Failure to follow spare tire stowage instructions may result in
failure of cable or loss of spare tire.
1. Lay the tire on the ground with the valve stem facing up, toward the
vehicle.
2. Slide the wheel partially under the vehicle and install the retainer
through the wheel center. Pull on the cable to align the components at
the end of the cable.
3. Turn the lug wrench clockwise until the tire is raised to its stowed
position underneath the vehicle. The effort to turn the jack handle
1
4 3
2 5
REVIEW COPY
2005 Aviator f/k/a Navigator LS(231), Owners Guide (post-2002-fmt)(own2002),
Market:USA_English(fus)
Tires, Wheels and Loading
236
Page 237 of 368

increases significantly and the spare tire carrier ratchets or slips when
the tire is raised to the maximum tightness. Tighten to the best of your
ability, to the point where the ratchet/slip occurs, if possible. The spare
tire carrier will not allow you to overtighten. If the spare tire carrier
ratchets or slips with little effort, take the vehicle to your dealer for
assistance at your earliest convenience.
4. Check that the tire lies flat against the frame and is properly
tightened. Try to push or pull, then turn the tire to be sure it will not
move. Loosen and retighten, if necessary. Failure to properly stow the
spare tire may result in failure of the winch cable and loss of the tire.
5. If your vehicle is equipped with a spare tire lock and key, be sure to
install the spare tire lock into the bumper drive tube with the spare tire
lock key and jack handle.
6. Repeat this tightness check procedure when servicing the spare tire
pressure (every six months, perScheduled Maintenance Guide),or at
any time that the spare tire is disturbed through service of other
components.
Re-stowing the jack and tools
1. Unblock the wheels.
2. Replace beauty cap, stow the jack and tools in their respective
locations, making sure they are fully secured so they do not rattle when
you drive.
WHEEL LUG NUT TORQUE SPECIFICATIONS
Retighten the lug nuts to the specified torque at 50–100 miles (80–160
km) after any wheel disturbance (rotation, flat tire, wheel removal, etc.).
Lug nut socket
size/Bolt sizeWheel lug nut torque*
lb.ft. N•m
Lug nut socket size:
3�4”(19 mm) hex
Bolt size:1�2x20100 135
* Torque specifications are for nut and bolt threads free of dirt and
rust. Use only Ford recommended replacement fasteners.
When a wheel is installed, always remove any corrosion, dirt and
foreign materials present on the mounting surfaces of the wheel
and the surface of the front disc brake hub and rotor that contacts the
wheel. Installing wheels without correct metal-to-metal contact at the
wheel mounting surfaces can cause the wheel nuts to loosen and the
wheel to come off while the vehicle is in motion, resulting in loss of
control.
REVIEW COPY
2005 Aviator f/k/a Navigator LS(231), Owners Guide (post-2002-fmt)(own2002),
Market:USA_English(fus)
Tires, Wheels and Loading
237