Page 101 of 368

6.:Distributes outside air through the windshield defroster vents.
7.
:Distributes outside air through the windshield defroster vents
and floor vents.
8.
:Distributes outside air through the floor vents.
9.
:Distributes outside air through the instrument panel vents and
the floor vents.
10.
:Distributes outside air through the instrument panel vents.
11.OFF:Outside air is shut out and
the fan will not operate.
12.AUTO:Press to select the
desired temperature shown in the
display window. The system will
automatically determine the fan speed, airflow location, outside or
recirculated air to heat or cool the vehicle to the selected temperature.
13.Driver’s side temperature
control:Controls the temperature
on the driver side of the vehicle.
14.Fan Speed:Used to manually
enable or disable the fan speed.
15.EXT:Displays the outside air temperature. It will remain displayed
until the EXT control is pressed again. The external temperature will be
most accurate when the vehicle has been moving for a period of time.
16.Temperature conversion:Press to toggle between Fahrenheit and
Celsius temperature on the DATC display only. The set point
temperatures in Celsius will be displayed in half-degree increments.
Manual override controls:Allows
you to manually determine where
airflow is directed. To return to fully
automatic control, press AUTO.
OFF
AUTO
OFF
REVIEW COPY
2005 Aviator f/k/a Navigator LS(231), Owners Guide (post-2002-fmt)(own2002),
Market:USA_English(fus)
Climate Controls
101
Page 102 of 368

AUXILIARY CLIMATE CONTROLS
Your vehicle may be equipped with auxiliary climate controls. These
allow the front or rear seat passengers to control airflow direction,
temperature and fan level of the rear compartment to quickly heat or
cool the entire vehicle.
Front auxiliary controls:
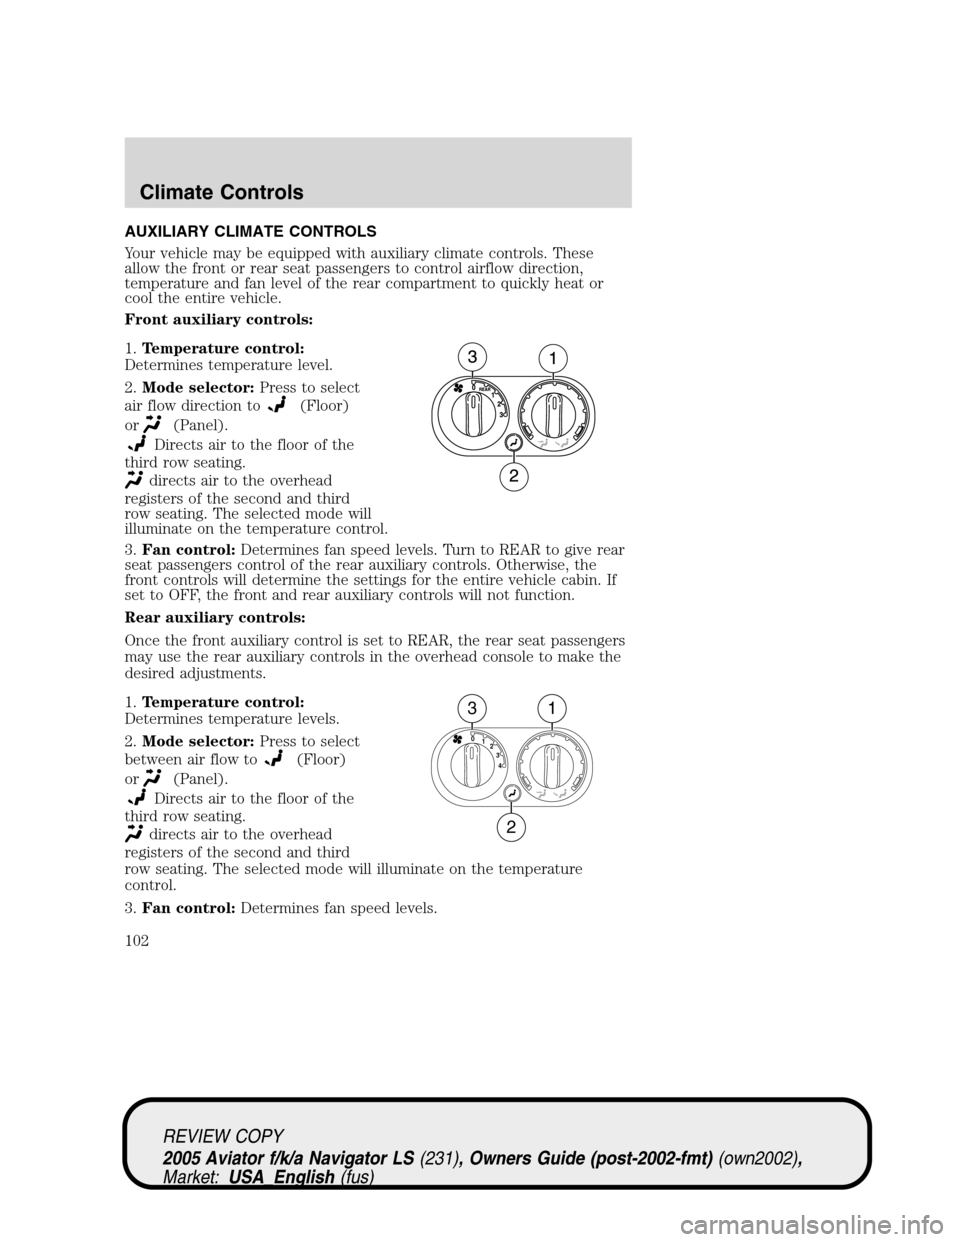
1.Temperature control:
Determines temperature level.
2.Mode selector:Press to select
air flow direction to
(Floor)
or
(Panel).
Directs air to the floor of the
third row seating.
directs air to the overhead
registers of the second and third
row seating. The selected mode will
illuminate on the temperature control.
3.Fan control:Determines fan speed levels. Turn to REAR to give rear
seat passengers control of the rear auxiliary controls. Otherwise, the
front controls will determine the settings for the entire vehicle cabin. If
set to OFF, the front and rear auxiliary controls will not function.
Rear auxiliary controls:
Once the front auxiliary control is set to REAR, the rear seat passengers
may use the rear auxiliary controls in the overhead console to make the
desired adjustments.
1.Temperature control:
Determines temperature levels.
2.Mode selector:Press to select
between air flow to
(Floor)
or
(Panel).
Directs air to the floor of the
third row seating.
directs air to the overhead
registers of the second and third
row seating. The selected mode will illuminate on the temperature
control.
3.Fan control:Determines fan speed levels.
4 3 2 1 0
31
2
REVIEW COPY
2005 Aviator f/k/a Navigator LS(231), Owners Guide (post-2002-fmt)(own2002),
Market:USA_English(fus)
Climate Controls
102
Page 106 of 368

•Press the setup button- The message center then displays the next
menu selection in its list.
•Press the reset button- The message center then proceeds to the
next sequence/step (3) below.
•The message center sends/issues the“Autolamp Delay Command”to
the body security module (BSM).
•The body security module responds within 100 milliseconds with next
auto lamp exit delay time.
3. Next sequence/step number is one (1) steps 1,2,3,4 & 5 are repeated
until exit via step 2.
4. The message center displays the next menu selection.
Daytime running lamps (DRL) (if equipped)
To activate DRL:
•the ignition must be in the ON position and
•the headlamp control is in the
orposition
•the parking brake must be disengaged.
Always remember to turn on your headlamps at dusk or during
inclement weather. The Daytime Running Light (DRL) System
does not activate your tail lamps and generally may not provide
adequate lighting during these conditions. Failure to activate your
headlamps under these conditions may result in a collision.
High beams
Push the lever toward the
instrument panel to activate. Pull
the lever towards you to deactivate.
INT2OFFOFFINT1
REVIEW COPY
2005 Aviator f/k/a Navigator LS(231), Owners Guide (post-2002-fmt)(own2002),
Market:USA_English(fus)
Lights
106
Page 107 of 368

Flash to pass
Pull toward you slightly to activate
and release to deactivate.
AUTOMATIC PANEL DIMMING
Use to adjust the brightness of the
instrument panel and all applicable
switches in the vehicle during
headlamp and parklamp operation.
The instrument panel illumination
automatically adjusts to provide the
best visibility as outside light levels
change; this can range from full on
to dim during dark or nearly dark
outside conditions, to completely off
during bright outside conditions.
This will work independently from the headlamp, parklamp and autolamp
systems.
At all illumination levels, the instrument panel lights can still be dimmed
by using the panel dimmer control.
The dimmer switch can be used to control the interior dome lamps.
Move the control to the full upright position, past detent, to turn on the
interior lamps and the outside mirror puddle lamps.
Move the control to the full down position, past detent, to prevent the
interior lights from illuminating when the doors are opened. When the
control is in the full down position, it acts as a dome lamp
defeat/override.
VERTICAL AIM ADJUSTMENT
Your vehicle is fitted with eitherVOR(conventional halogen) orVOL
(High Intensity Discharge - HID) headlamps. The adjustment procedure
depends on the type of headlamps that are equipped on your vehicle.
INT2OFFOFFINT1
REVIEW COPY
2005 Aviator f/k/a Navigator LS(231), Owners Guide (post-2002-fmt)(own2002),
Market:USA_English(fus)
Lights
107
Page 110 of 368
INTERIOR LAMPS
Front row map lights (if equipped)
To turn on the map lights, press the
edge of the light.
Second row dome lamps
The dome lamp lights when:
•any door is opened.
•the instrument panel dimmer
switch is rotated up until the
courtesy lamps come on.
•any of the remote entry controls
are pressed and the ignition is
OFF.
The reading portion (the two outer lights) can only be toggled on and off
at the lamp.
Third row courtesy/reading/cargo lamps
The dome portion of the lamp (the
center light) can be turned on when
the headlamp control is rotated fully
up or when any door is opened.
With the ignition key in the ACC or ON position, the rear dome lamp can
be turned ON or OFF by sliding the control.
REVIEW COPY
2005 Aviator f/k/a Navigator LS(231), Owners Guide (post-2002-fmt)(own2002),
Market:USA_English(fus)
Lights
110
Page 112 of 368
Function Number of bulbs Trade number
Approach lamp 2 912
Cargo lamp 1 211-2
Interior overhead lamp 1 912 (906)
Map lamps 2 168 (T10)
Front footwell light 2 194
All replacement bulbs are clear in color except where noted.
To replace all instrument panel lights see your dealer.
*For vehicles with HID lamps see your dealer.
**The entire LED display must be replaced.
Replacing the interior bulbs
Check the operation of all bulbs frequently.
Map lamps
To change the map lamp bulbs:
1. Use a small screwdriver to
remove the map lamp lens.
2. To remove the old bulb, twist
1⁄4
turn and pull it out.
3. Twist in a new bulb.
4. Align and press the map lamp
lens back on and test the lamp operation.
REVIEW COPY
2005 Aviator f/k/a Navigator LS(231), Owners Guide (post-2002-fmt)(own2002),
Market:USA_English(fus)
Lights
112
Page 123 of 368

Storage compartment
Push up on the bar to open the
storage compartment. Release your
hand and the door will fully open.
The storage compartment may be
used to secure sunglasses or a
similar sized object.
Moon roof (if equipped)
You can move the glass panel of the moon roof back to open or tilt up to
ventilate the vehicle.
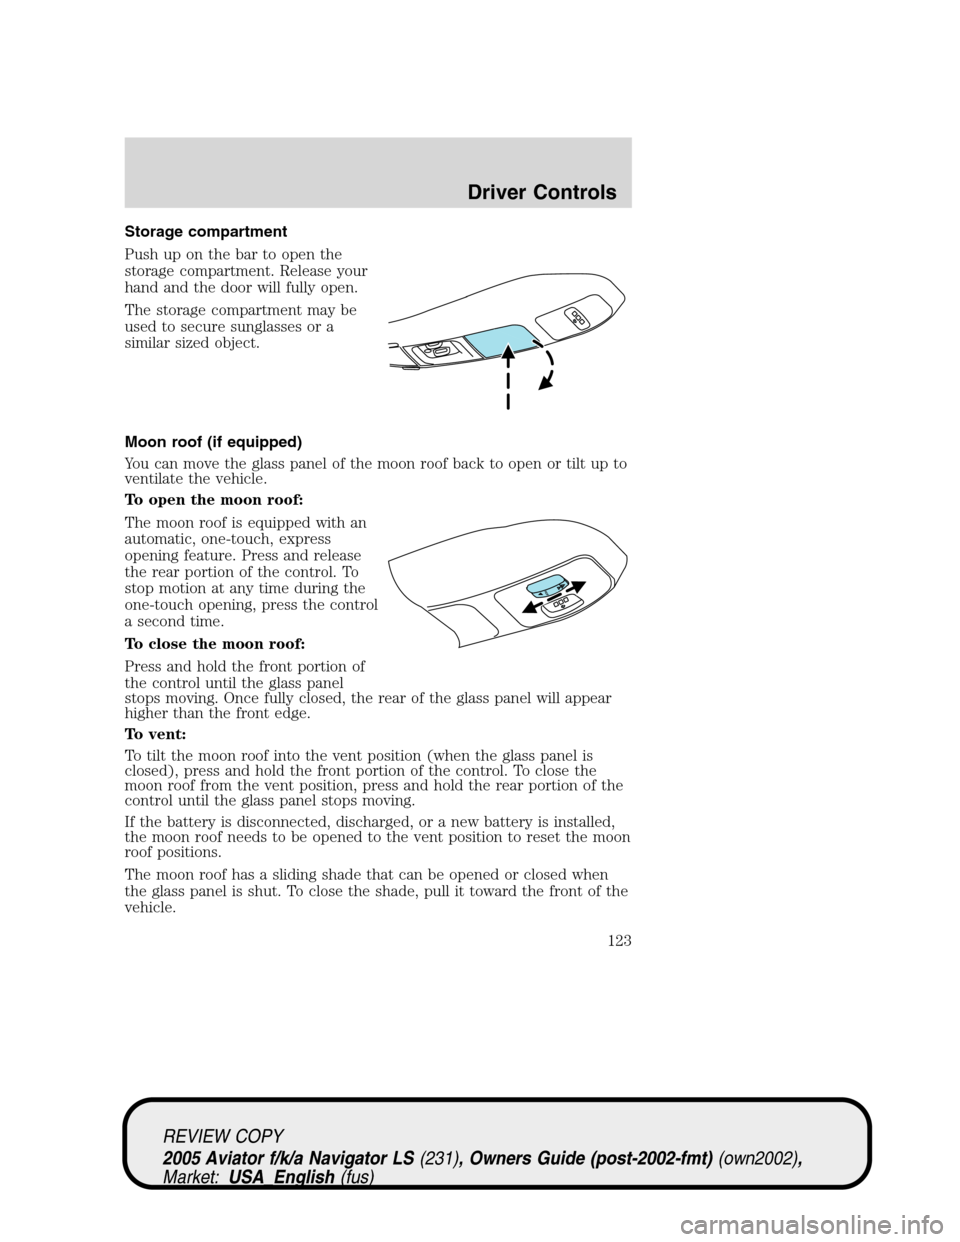
To open the moon roof:
The moon roof is equipped with an
automatic, one-touch, express
opening feature. Press and release
the rear portion of the control. To
stop motion at any time during the
one-touch opening, press the control
a second time.
To close the moon roof:
Press and hold the front portion of
the control until the glass panel
stops moving. Once fully closed, the rear of the glass panel will appear
higher than the front edge.
To vent:
To tilt the moon roof into the vent position (when the glass panel is
closed), press and hold the front portion of the control. To close the
moon roof from the vent position, press and hold the rear portion of the
control until the glass panel stops moving.
If the battery is disconnected, discharged, or a new battery is installed,
the moon roof needs to be opened to the vent position to reset the moon
roof positions.
The moon roof has a sliding shade that can be opened or closed when
the glass panel is shut. To close the shade, pull it toward the front of the
vehicle.
REVIEW COPY
2005 Aviator f/k/a Navigator LS(231), Owners Guide (post-2002-fmt)(own2002),
Market:USA_English(fus)
Driver Controls
123
Page 125 of 368
An auxiliary power point is located
on the lower rear side of the center
console. The power point is
accessible from the rear seats.
Another auxiliary power point is
located on the right rear quarter
panel. The power point is accessible
from the liftgate.
POWER WINDOWS
Do not leave children unattended in the vehicle and do not let
children play with the power windows. They may seriously injure
themselves.
When closing the power windows, you should verify they are free
of obstructions and ensure that children and/or pets are not in
the proximity of the window openings.
REVIEW COPY
2005 Aviator f/k/a Navigator LS(231), Owners Guide (post-2002-fmt)(own2002),
Market:USA_English(fus)
Driver Controls
125