Page 89 of 425
INTERIOR EQUIPMENT
72
SS14018
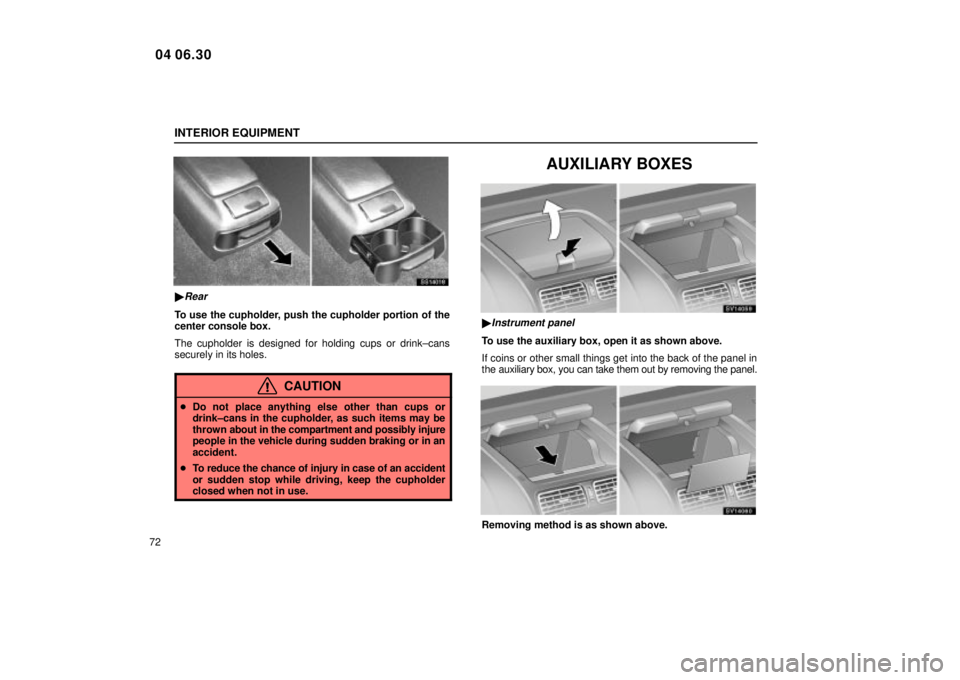
�Rear
To use the cupholder, push the cupholder portion of the
center console box.
The cupholder is designed for holding cups or drink±cans
securely in its holes.
CAUTION
�Do not place anything else other than cups or
drink±cans in the cupholder, as such items may be
thrown about in the compartment and possibly injure
people in the vehicle during sudden braking or in an
accident.
� To reduce the chance of injury in case of an accident
or sudden stop while driving, keep the cupholder
closed when not in use.
AUXILIARY BOXES
SV14059
�Instrument panel
To use the auxiliary box, open it as shown above.
If coins or other small things get into the back of the panel in
the auxiliary box, you can take them out by removing the panel.
SV14060
Removing method is as shown above.
04 06.30
Page 103 of 425
EXTERIOR EQUIPMENT
86
HOOD
SS15001
1. To open the hood, pull the hood lock release lever
under the instrument panel. The hood will spring up
slightly.
SV15010
2. Insert your fingers under the hood, push up the
auxiliary catch lever and lift the hood.
SV15002
3. Hold the hood open by inserting the support rod into
the slot.
CAUTION
After inserting the support rod into the slot, make sure
the rod supports the hood securely from falling down on
to your head or body.
NOTICE
Be sure to return the support rod to its clip beforeclosing the hood. C losing the hood with the support rod
up could cause the hood to bend.
04 06.30
Page 112 of 425
 OCCUPANT RESTRAINT SYSTEMS
95
�Slightly recline the back of the seat. Although vehicle
designs vary, many drivers can achieve the 250 mm
(10 in.) distance, even with the driver seat all the way
forwa")
OCCUPANT RESTRAINT SYSTEMS
95
�Slightly recline the back of the seat. Although vehicle
designs vary, many drivers can achieve the 250 mm
(10 in.) distance, even with the driver seat all the way
forward, simply by reclining the back of the seat
somewhat. If reclining the back of your seat makes it
hard to see the road, raise yourself by using a firm,
non±slippery cushion, or raise the seat if your vehicle
has that feature.
� If your steering wheel is adjustable, tilt it downward.
This points the airbag toward your chest instead of
your head and neck.
The seat should be adjusted as recommended by
NHTSA above, while still maintaining control of the foot
pedals, steering wheel, and your view of the instrument
panel controls.
Front passenger seat
CAUTION
The SRS front passenger airbag also deploys with
considerable force, and can cause death or serious
injury especially if the front passenger is very close to
the airbag. The front passenger seat should be as far
from the airbag as possible with the seatback adjusted,
so the front passenger sits upright.
Front seats
CAUTION
The SRS side airbags are installed in the driver and front
passenger seats. Observe the following precautions.
� Do not lean against the front door when the vehicle
is in use, since the side airbag inflates with
considerable speed and force. Otherwise, you may
be killed or severely injured.
� Do not use seat accessories which cover the area
where the side airbags inflate. Such accessories may
prevent the side airbags from activating correctly,
causing death or serious injury.
� Do not modify or replace the seats or upholstery of
the seats equipped with side airbags. Such change
may prevent the side airbag system from activating
correctly, disable the system, or cause the side
airbags to inflate accidentally, resulting in death or
serious injury.
04 06.30
Page 117 of 425
 OCCUPANT RESTRAINT SYSTEMS
100
�Slightly recline the back of the seat. Although vehicle
designs vary, many drivers can achieve the 250 mm
(10 in.) distance, even with the driver seat all the way
forw")
OCCUPANT RESTRAINT SYSTEMS
100
�Slightly recline the back of the seat. Although vehicle
designs vary, many drivers can achieve the 250 mm
(10 in.) distance, even with the driver seat all the way
forward, simply by reclining the back of the seat
somewhat. If reclining the back of your seat makes it
hard to see the road, raise yourself by using a firm,
non±slippery cushion, or raise the seat if your vehicle
has that feature.
� If your steering wheel is adjustable, tilt it downward.
This points the airbag toward your chest instead of
your head and neck.
The seat should be adjusted as recommended by
NHTSA above, while still maintaining control of the foot
pedals, steering wheel, and your view of the instrument
panel controls.
Front passenger seat
CAUTION
The SRS front passenger airbag also deploys with
considerable force, and can cause death or serious
injury especially if the front passenger is very close to
the airbag. The front passenger seat should be as far
from the airbag as possible with the seatback adjusted,
so the front passenger sits upright.
Front seats
CAUTION
The SRS side airbags are installed in the driver and front
passenger seats. Observe the following precautions.
� Do not lean against the front door when the vehicle
is in use, since the side airbag inflates with
considerable speed and force. Otherwise, you may
be killed or severely injured.
� Do not use seat accessories which cover the area
where the side air bags inflate. Such accessories may
prevent the side airbags from activating correctly,
causing death or serious injury.
� Do not modify or replace the seats or upholstery of
the seats equipped with side airbags. Such change
may prevent the side airbag system from activating
correctly, disable the system, or cause the side
airbags to inflate accidentally, resulting in death or
serious injury.
04 06.30
Page 207 of 425
AIR CONDITIONING
190
AUTOMATIC AIR CONDITIONING CONTROLS
SV21019
�You can adjust the brightness of the display. See
ªInstrument panel light controlº on page 58 for details.
The automatic air conditioning automatically maintains
the set temperature.
In the automatic operation mode, the air conditioning selects
the most suitable fan speed, air flow, air intake and on±off of
the air conditioning according to the temperature.
The ignition key must be in the ªONº position.
NOTICE
To prevent the battery from being discharged, do not leave the air conditioning on longer than necessarywhen the engine is not running.
04 06.30
Page 211 of 425
 AIR CONDITIONING
194SETTING OPERATION ± manual control
If manual air flow selection is desired ±
SV21017
The outlets from which air is delivered can be selected
manually by pushing the button. The f")
AIR CONDITIONING
194SETTING OPERATION ± manual control
If manual air flow selection is desired ±
SV21017
The outlets from which air is delivered can be selected
manually by pushing the button. The function of each mode is
as follows:
1Panel
± Air flows mainly from the instrument panel vents.
2Bi±level ± Air flows from both the floor vents and the
instrument panel vents.
3Floor ± Air flows mainly from the floor vents.
4Floor/Windshield ± Air flows mainly from the floor vents
and windshield vents.
Set the air flow control dial to the floor/windshield position
turns on the defogging function with the purpose of
clearing the front view.
Use with the air intake control positioned in fresh. Press the ªA/Cº button for dehumidified heating or
cooling. This setting clears the front view more quickly.
5Windshield
± Air flows mainly from the windshield vents.
Set the air flow control dial to the windshield position turns
on the defogging function with the purpose of clearing the
front view.
This position allows the air intake to select FRESH
automatically. This is to clean up the front view more
quickly.
If you want to return the setting to RECIRCULATE mode,
press the air intake selector button one again.
Press ªA/Cº button for dehumidified heating or cooling.
This setting clears the front view more quickly.
04 06.30
Page 214 of 425
AIR CONDITIONING
197
CAUTION
Do not use the ªFRONT WINDSHIELDº button during
cooled air operation in extremely humid weather. The
difference between the temperature of the outside air
and that of the windshield could cause the outer surface
of the windshield to fog up blocking your vision.
(c) Air conditioning filter
SV21028
The air conditioning filter information label is placed on
the driver side of the instrument panel as shown and
indicates that a filter has been installed.
The air conditioning filter prevents dust from entering the
vehicle through the air conditioning vent.
04 06.30
Page 221 of 425
AUDIO
204
AUDIO SYSTEM
Quick reference for your audio system (with six CD changer)
SV22066
�You can adjust the brightness of the display. See ªInstrument panel light controlº on page 58 for details.
04 06.30
 EXTERIOR EQUIPMENT
86
HOOD
SS15001
1. To open the hood, pull the hood lock release lever
under the instrument panel. The hood will spring up
slightly.
SV15010
2. Insert your fingers under the hood, pu")

 AIR CONDITIONING
197
CAUTION
Do not use the ªFRONT WINDSHIELDº button during
cooled air operation in extremely humid weather. The
difference between the temperature of the outside air
and that of th")
