Page 438 of 668
STARTING AND DRIVING
417
31PY046
�Corners of bumper
�The area covered by the camera is limited. Objects
which are close to either corner of the bumper or under
the bumper cannot be seen on the screen.
� The area displayed on the screen may vary according
to vehicle orientation or road conditions.
If the above screen appears on the display, the back door is
open. W hen backing up the vehicle, make sure the back door
is securely closed.
Page 439 of 668
 STARTING AND DRIVING
418THE REAR VIEW MONITOR SYSTEM CAMERA
The rear view monitor system camera is located on the back
door as shown in the illustration. The camera uses a special
lens. The distance")
STARTING AND DRIVING
418THE REAR VIEW MONITOR SYSTEM CAMERA
The rear view monitor system camera is located on the back
door as shown in the illustration. The camera uses a special
lens. The distance of the image that appears on the screen
differs from the actual distance.
In the following cases, it may become difficult to
see the images
on the screen, even when the system is functioning.
� In the dark (for example, at night)
� When the temperature near the lens is extremely high or low
� When water droplets are adhering to the camera, or when
humidity is high (for example, when it rains)
� When foreign matter (for example, snow or mud) adheres
to the camera lens
� When the sun or the beam of headlights is shining directly
into the camera lens
Check surroundings for safety.
If a bright light (for example, sunlight reflected off the vehicle
body) is picked up by the camera, the smear effect* peculiar to
the camera may occur.
*: Smear effect Ð A phenomenon that occurs when a bright
light (for example, sunlight reflected off the vehicle body) is
picked up by the camera; when transmitted by the camera, the
light source appears to have a vertical streak above and below
it.
Page 484 of 668
DRIVING TIPS
463
�Do not continue normal driving when the brakes are
wet. If they are wet, your vehicle will require a longer
stopping distance, and it may pull to one side when
the brakes are applied. Also, the parking brake will
not hold the vehicle securely.
� If you drive through deep water over about 500 mm
(20 in.) in depth, put the vehicle height in the HI (High)
mode with the active height select switch and then
turn off the active height control suspension by
pushing the height control switch. Drive your vehicle
at 30 km/h (19 mph) or lower speed.
Page 494 of 668
DRIVING TIPS
473
Hitches
�If you wish to install a trailer hitch, you should consult with
your Lexus dealer.
� Use only a hitch recommended by the hitch manufacture
and the one which conforms to the total trailer weight
requirement.
� If you wish to install an aftermarket hitch, the hitch must be
bolted securely to the vehicle frame and installed according
to the hitch manufactures' instructions.
� The hitch ball and king pin should have a light coat of grease.
� Lexus recommends the ball mount assembly be removed
when not towing to prevent injury and to prevent damage in
the event of a rear end collision. After removing the ball
mount assembly, install the grommet to the hitch to prevent
entry of dirt and mud.
Page 498 of 668
 DRIVING TIPS
477
Brakes and safety chains
�Lexus recommends trailers with brakes that conform to
any applicable federal and state/provincial regulations.
� A safety chain must always be used between")
DRIVING TIPS
477
Brakes and safety chains
�Lexus recommends trailers with brakes that conform to
any applicable federal and state/provincial regulations.
� A safety chain must always be used between the towing
vehicle and the trailer. Leave sufficient slack in the
chain for turns. The chain should cross under the
trailer tongue to prevent the tongue from dropping to
the ground in case it becomes damaged or separated.
For correct safety chain procedures, consult your
Lexus dealer.
CAUTION
�If the total trailer weight exceeds 453 kg (1000 lb.),
trailer brakes are required.
� Never tap into your vehicle's hydraulic system as it
will lower its braking effectiveness.
� Never tow a trailer without using a safety chain
securely attached to both the trailer and the vehicle.
If damage occurs to the coupling unit or hitch ball,
there is possible danger of the trailer wandering over
into another lane.
Service connector for towing brake controller
Your vehicle is equipped with a service connector for the
towing brake controller as shown. Link the connector to the
towing brake controller via the sub wire harness stored in the
glove box. The detailed explanation of the sub wire harness
circuit is packed together with the sub wire harness. Be sure
to position the towing brake controller where it does not prevent
the driver from operating the pedal. Lexus recommends that
the sub wire harness be stored in the glove box when it is not
in use.
Page 500 of 668
 DRIVING TIPS
479
Connecting a trailer
Stop your vehicle and a trailer in line and perform the following:
1. Put the rear height control air suspension in the ªLOº (low)
mode. Turn the ignition swit")
DRIVING TIPS
479
Connecting a trailer
Stop your vehicle and a trailer in line and perform the following:
1. Put the rear height control air suspension in the ªLOº (low)
mode. Turn the ignition switch off or push the ªHEIGHT
CONTROL OFFº switch to turn off the rear height control air
suspension.
2. Connect a trailer.
3. Turn the ignition switch on or push the ªHEIGHT CONTROL
OFFº switch to turn on the rear height control air suspension.
Select the ªNº (normal) mode with the height select switch.
Disconnecting a trailer
Stop your vehicle and a trailer in line and perform the following:
1. Put the rear height control air suspension in the ªLOº (low)
mode. (Make sure the vehicle height is in the ªLOº (low) mode
by pushing the height select switch on the ª �º side.)
2. Turn the ignition switch off or push the ªHEIGHT CONTROL
OFFº switch to turn off the rear height control air suspension.
3. Set the supporting leg of a trailer on the ground and raise the
hitch by 100 mm (4 in.).
4. Turn the ignition switch on or push the ªHEIGHT CONTROL
OFFº switch to turn on the rear height control air suspension. 5. Wait for about 20 seconds until the rear vehicle height is
lowered by the automatic leveling function.
6. Make sure the hitch is disconnected. If not, raise the hitch
higher and repeat steps 2 through 5.
7. Move the vehicle forward in the ªLOº (low) mode where the
hitch does not touch anything in the ªNº (normal) mode.
8. Put the rear height control air suspension in the ªNº (normal)
mode.
Pre±towing safety check
�
Check that your vehicle remains level when a loaded or
unloaded tra iler is hitched. Do not drive if the vehicle has an
abnormal nose±up or nose±down condition, and check for
improper tongue load, overload, worn suspension or other
possible causes.
� Make sure the trailer cargo is securely loaded so that it
cannot shift.
� Check that your rear view mirrors conform to any federal,
state/provincial or local regulations. If they do not, install
required rear view mirrors appropriate for towing purposes.
Page 506 of 668
 DRIVING TIPS
485
CARGO AND LUGGAGE
Stowage precautions
When stowing cargo and luggage in the vehicle,
observe the following:
�Put cargo and luggage in the luggage compartment
when at all possible. Be")
DRIVING TIPS
485
CARGO AND LUGGAGE
Stowage precautions
When stowing cargo and luggage in the vehicle,
observe the following:
�Put cargo and luggage in the luggage compartment
when at all possible. Be sure all items are secured
in place.
� Be careful to keep the vehicle level. Placing the
weight as far forward as possible helps maintain
vehicle balance.
� For better fuel economy, do not carry unnecessary
weight.
CAUTION
�To prevent cargo and luggage from sliding
forward during braking, do not stack anything
in the luggage compartment higher than the
seatbacks. Keep cargo and luggage low, as
close to the floor as possible.
�Never allow anyone to ride in the luggage
compartment. It is not designed for
passengers. They should ride in their seats
with their seat belts properly fastened.
Otherwise, they are much more likely to suffer
serious bodily injury, in the event of sudden
braking or a collision.
� Do not place anything on the luggage cover
behind the rear seatback. Such items may
be thrown about and possibly injure people
in the vehicle during sudden braking or an
accident.
� Do not drive with objects left on top of the
instrument panel. They may interfere with the
driver's field of view. Or they may move
during sharp vehicle acceleration or turning,
and impair the driver's control of the vehicle.
In an accident they may injure the vehicle
occupants.
Page 521 of 668
IN CASE OF AN EMERGENCY
500
40PY040
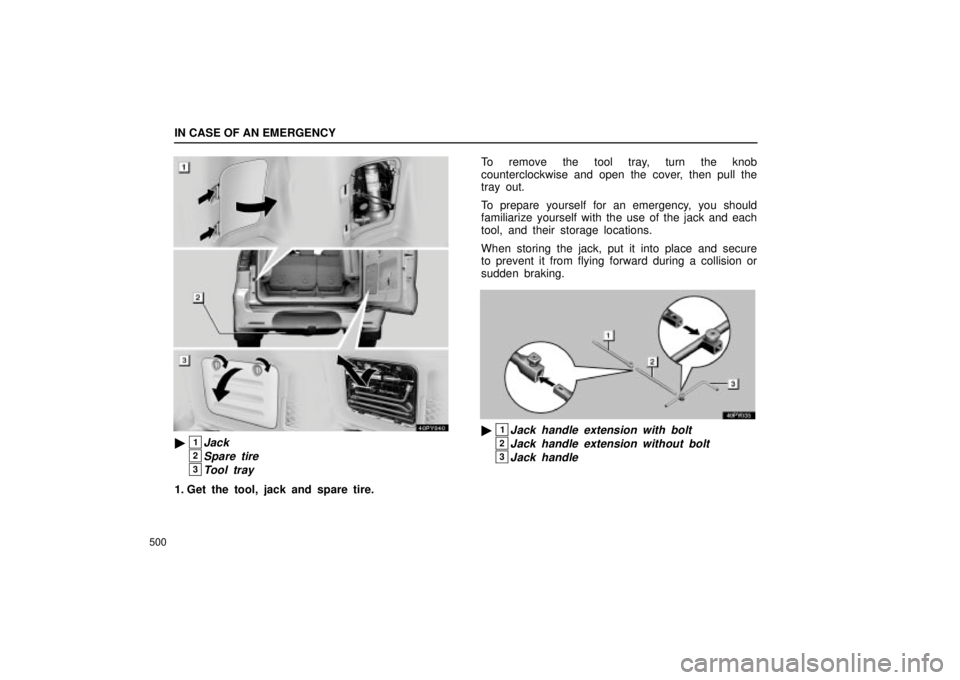
�1Jack
2Spare tire
3Tool tray
1. Get the tool, jack and spare tire.To remove the tool tray, turn the knob
counterclockwise and open the cover, then pull the
tray out.
To prepare yourself for an emergency, you should
familiarize yourself with the use of the jack and each
tool, and their storage locations.
When storing the jack, put it into place and secure
to prevent it from flying forward during a collision or
sudden braking.
�1Jack handle extension with bolt
2Jack handle extension without bolt
3Jack handle