Page 141 of 668
EXTERIOR EQUIPMENT
120
ROOF LUGGAGE CARRIER
�1Cross rails2Roof rails
The roof luggage carrier consists of roof rails and sliding
cross rails.
Adjusting the position of cross rails
1. Turn the knobs counterclockwise to loosen the cross
rails.
Page 143 of 668
 EXTERIOR EQUIPMENT
122
3. After adjusting, be sure to tighten the cross rails by
turning knobs clockwise.
CAUTION
Make sure the cross rails are fixed securely by pushing
forward and rearward them. F")
EXTERIOR EQUIPMENT
122
3. After adjusting, be sure to tighten the cross rails by
turning knobs clockwise.
CAUTION
Make sure the cross rails are fixed securely by pushing
forward and rearward them. Failure to do so may cause
an unexpected accident or severe injury in the event of
emergency braking or a collision.
Follow the manufacturer's instructions and precautions when
installing the attachments or their equivalent.
CAUTION
When you load cargo on the roof luggage carrier,
observe the following:
� Place the cargo so that its weight is distributed
evenly between the front and rear axles.
� If loading long or wide cargo, never exceed the
vehicle overall length or width. (See ªSpecificationsº
on page 627 for information on your vehicle overall
length and width.)
� Before driving, make sure the cargo is securely
fastened on the roof luggage carrier.
� Loading cargo on the roof luggage carrier will make
the center of the vehicle gravity higher. Avoid high
speeds, sudden starts, sharp turns, sudden braking
or abrupt maneuvers, otherwise it may result in loss
of control or vehicle rollover due to failure to operate
this vehicle correctly.
� If driving for a long distance, on rough roads, or at
high speeds, stop the vehicle now and then during
the trip to make sure the cargo remains in its place.
� Do not exceed 58 kg (130 lb.) cargo weight on the roof
luggage carrier.
NOTICE
When loading the luggages, be careful not to scratch
the surface of the moon roof.
Page 151 of 668
 OCCUPANT RESTRAINT SYSTEMS
130
Adjusting lumbar support
Push the control switch on either side.
The amount of lumbar support will change while the switch is
pushed.
REAR SEATS
Rear seat precautions
CA")
OCCUPANT RESTRAINT SYSTEMS
130
Adjusting lumbar support
Push the control switch on either side.
The amount of lumbar support will change while the switch is
pushed.
REAR SEATS
Rear seat precautions
CAUTION
�Adjustment should not be made while the vehicle is
moving.
� When folding the seat, secure the seat by adjusting
the length of the anchorage strap to prevent the seat
from falling down.
� When returning the seat to its original position,
observe the following precautions in order to prevent
personal injury in a collision or sudden stop.
There is no person or luggage around the seat and
operate slowly by supporting the seat with your
hands.
The seat is securely locked by pushing forward and
rearward on the top of the seatback and by trying to
pull up the edge of the bottom cushion. Failure to do
so will prevent seat belt from operating properly.
The seat belts are not twisted or caught under the
seat and are arranged in their proper position and are
ready to use.
� When using the seat, make sure the seat is securely
locked.
Page 153 of 668
OCCUPANT RESTRAINT SYSTEMS
132
�Third seat
Lean forward and pull the lock release lever. Then lean
back to the desired angle and release the lever.
CAUTION
Avoid reclining the seatback any more than needed.
The seat belts provide maximum protection when the
passengers are sitting up straight and well back in the
seats. If you are reclined, the lap belt may slide past
your hips and apply restraint forces directly to the
abdomen or your neck may contact the shoulder belt.
In the event of a frontal collision, the more the seat is
reclined, the greater the risk of death or personal injury.
Page 155 of 668
OCCUPANT RESTRAINT SYSTEMS
134
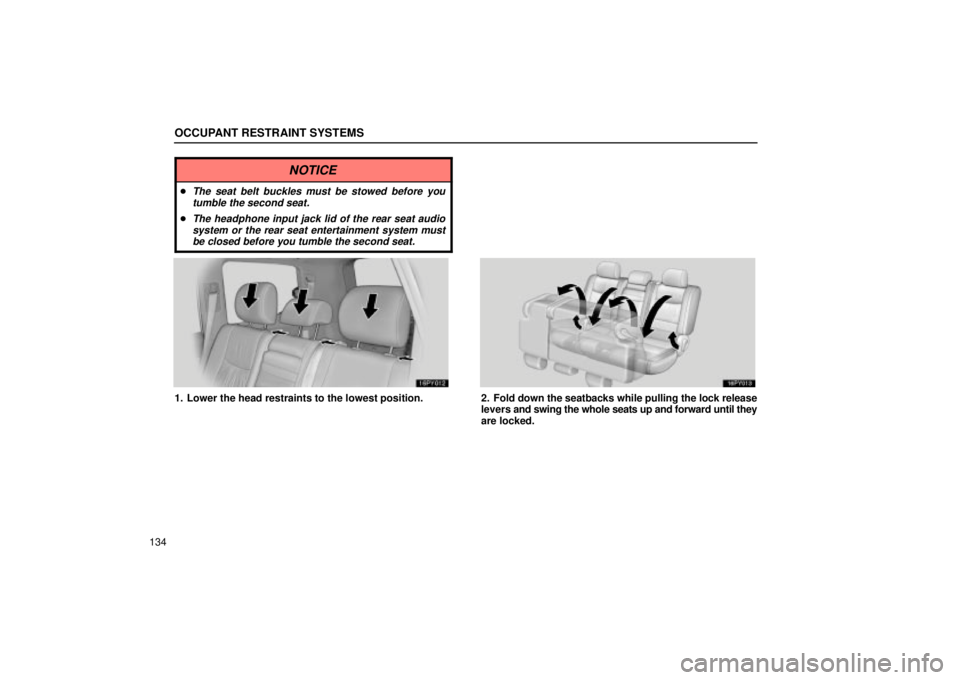
NOTICE
�The seat belt buckles must be stowed before youtumble the second seat.
�The headphone input jack lid of the rear seat audiosystem or the rear seat entertainment system mustbe closed before you tumble the second seat.
1. Lower the head restraints to the lowest position.2. Fold down the seatbacks while pulling the lock release
levers and swing the whole seats up and forward until they
are locked.
Page 156 of 668
OCCUPANT RESTRAINT SYSTEMS
135
To return the seats to the original positions, push the red
knobs and swing the whole seats down and swing the
seatback up.If you cannot raise the left side seatback because of the locked
seat belt, do not try it hard. Release the lock of the seat belt
in the following way.
1Push in the lower front edge of the seatback to slacken the
seat belt.
2Let the seat belt retract a little.
Page 157 of 668
OCCUPANT RESTRAINT SYSTEMS
136
CAUTION
When returning the seats to their original position,
observe the following precautions in order to prevent
personal injury in a collision or sudden stop:
�Be careful not get your hands or feet pinched in the
seat.
� Make sure the seats are securely locked by pushing
forward and rearward on the top of the seatbacks or
by trying to pull up the edge of the bottom cushions.
Failure to do so will prevent the seat belt from
operating properly.
� Make sure the seat belts are not twisted or caught
under the seat and are arranged in their proper
position and are ready to use.
Folding up third seats
Stow the rear seat belt buckles as shown above.
Page 158 of 668
OCCUPANT RESTRAINT SYSTEMS
137
�Seat belt hanger
For the outer seat belts, use the seat belt hangers to
prevent the belts from being tangled.
For the center seat belt, stow the seat belt tabs into the
cover of the roof as shown above.Make sure the tabs are securely locked in the cover.


 OCCUPANT RESTRAINT SYSTEMS
135
To return the seats to the original positions, push the red
knobs and swing the whole seats down and swing the
seatback up.If you cannot raise the left side seatback bec")

