Page 143 of 668
 EXTERIOR EQUIPMENT
122
3. After adjusting, be sure to tighten the cross rails by
turning knobs clockwise.
CAUTION
Make sure the cross rails are fixed securely by pushing
forward and rearward them. F")
EXTERIOR EQUIPMENT
122
3. After adjusting, be sure to tighten the cross rails by
turning knobs clockwise.
CAUTION
Make sure the cross rails are fixed securely by pushing
forward and rearward them. Failure to do so may cause
an unexpected accident or severe injury in the event of
emergency braking or a collision.
Follow the manufacturer's instructions and precautions when
installing the attachments or their equivalent.
CAUTION
When you load cargo on the roof luggage carrier,
observe the following:
� Place the cargo so that its weight is distributed
evenly between the front and rear axles.
� If loading long or wide cargo, never exceed the
vehicle overall length or width. (See ªSpecificationsº
on page 627 for information on your vehicle overall
length and width.)
� Before driving, make sure the cargo is securely
fastened on the roof luggage carrier.
� Loading cargo on the roof luggage carrier will make
the center of the vehicle gravity higher. Avoid high
speeds, sudden starts, sharp turns, sudden braking
or abrupt maneuvers, otherwise it may result in loss
of control or vehicle rollover due to failure to operate
this vehicle correctly.
� If driving for a long distance, on rough roads, or at
high speeds, stop the vehicle now and then during
the trip to make sure the cargo remains in its place.
� Do not exceed 58 kg (130 lb.) cargo weight on the roof
luggage carrier.
NOTICE
When loading the luggages, be careful not to scratch
the surface of the moon roof.
Page 521 of 668
IN CASE OF AN EMERGENCY
500
40PY040
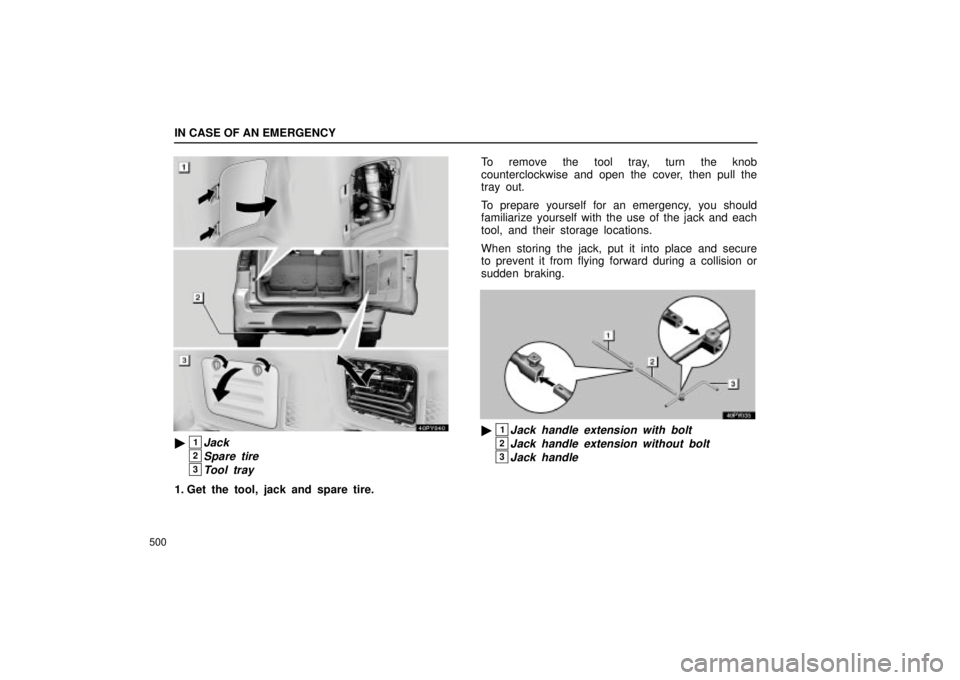
�1Jack
2Spare tire
3Tool tray
1. Get the tool, jack and spare tire.To remove the tool tray, turn the knob
counterclockwise and open the cover, then pull the
tray out.
To prepare yourself for an emergency, you should
familiarize yourself with the use of the jack and each
tool, and their storage locations.
When storing the jack, put it into place and secure
to prevent it from flying forward during a collision or
sudden braking.
�1Jack handle extension with bolt
2Jack handle extension without bolt
3Jack handle
Page 523 of 668
IN CASE OF AN EMERGENCY
502
40PY053
�1Lower2Raise3Cloth
To remove the spare tire:
1. Open the back door and remove the spare tire
carrier lid using a flat±bladed screwdriver.
2. Insert the end of the jack handle extension into the
lowering screw and put a cloth between the jack
handle extension and rear bumper to protect the
bumper surface.
3. Turn the jack handle counterclockwise until the
spare tire completely lowered to the ground. Make
sure the handle remains firmly fitted onto the jack
handle extension.
Page 528 of 668
IN CASE OF AN EMERGENCY
507
4. Loosen all the wheel nuts.
Always loosen the wheel nuts before raising the
vehicle.
Turn the wheel nuts counterclockwise to loosen them.
To get maximum leverage, fit the wrench to the nut
so that the handle is on the right side, as shown
above. Grab the wrench near the end of the handle
and pull up on the handle. Be careful that the wrench
does not slip off the nut.
Do not remove the nuts yet Ð just unscrew them
about one±half turn.
CAUTION
Never use oil or grease on the bolts or nuts.
The nuts may loose and the wheels may fall off,
which could cause a serious accident.
Page 532 of 668
IN CASE OF AN EMERGENCY
511
6. After making sure no one is in the vehicle, raise
it high enough so that the spare tire can be
installed.
Allow for the fact that you need more ground
clearance when putting on the spare tire than when
removing the flat tire.
To raise the vehicle, insert the jack handle extension
into the jack (it is a loose fit) and turn it clockwise
with the handle, making sure the handle remains firmly
fitted onto the jack handle extension. As the jack
touches the vehicle and begins to lift, double±check
that it is properly positioned.
CAUTION
Never get under the vehicle when the vehicle
is supported by the jack alone.
7. Remove the wheel nuts and remove the flat tire.
Lift the flat tire straight off and put it aside.
Roll the spare wheel into position and align the holes
in the wheel with the bolts. Then lift up the wheel
and get at least the top bolt started through its hole.
Wiggle the tire and press it back over the other bolts.
Page 534 of 668
IN CASE OF AN EMERGENCY
513
9. Lower the vehicle completely and tighten the
wheel nuts.
To lower the vehicle, turn the jack handle extension
counterclockwise with the handle, making sure the
handle remains firmly fitted onto the jack handle
extension.
Use only the wheel nut wrench to tighten the nuts.
Do not use other tools or any additional leverage other
than your hands, such as a hammer, pipe or your foot.
Make sure the wrench is securely engaged over the
nut.
Tighten each nut a little at a time in the order shown.
Repeat the process until all the nuts are tight.
CAUTION
�When lowering the vehicle, make sure all
portions of your body and all other persons
around will not be injured as the vehicle is
lowered to the ground.
� Have the wheel nuts tightened with torque
wrench to 112 N´m (11.5 kgf´m, 83 ft´lbf), as
soon as possible after changing wheels.
Otherwise, the nuts may loosen and the
wheels may fall off, which could cause a
serious accident.
Page 559 of 668
INTRODUCTION
538
Removing the engine compartment covers
Before checking the power steering fluid or fuses in the
engine compartment, remove the engine compartment
covers as follows:
61PY010
1Turn the plastic nuts counterclockwise and remove them.
2Push the core of the clips using a Phillips±head
screwdriver and remove the clips.
Page 578 of 668
ENGINE
557
If the oil level is below or only slightly above the low line,
add engine oil of the same type as already in the engine.
Remove the oil filler cap and add engine oil a little at a time,
checking the dipstick. We recommend that you use a funnel
when adding oil. The approximate quantity of oil needed to
raise the level between low line and full line on the dipstick is
indicated below for reference.
When the level reaches within the correct range, return the filler
cap and turn the cap clockwise until you hear a click.
Oil quantity. L (qt., Imp. qt.) 1.5 (1.6, 1.3)

 IN CASE OF AN EMERGENCY
507
4. Loosen all the wheel nuts.
Always loosen the wheel nuts before raising the
vehicle.
Turn the wheel nuts counterclockwise to loosen them.
To get maximum leverage, fit the")
 IN CASE OF AN EMERGENCY
511
6. After making sure no one is in the vehicle, raise
it high enough so that the spare tire can be
installed.
Allow for the fact that you need more ground
clearance when put")
 IN CASE OF AN EMERGENCY
513
9. Lower the vehicle completely and tighten the
wheel nuts.
To lower the vehicle, turn the jack handle extension
counterclockwise with the handle, making sure the
handle re")
 INTRODUCTION
538
Removing the engine compartment covers
Before checking the power steering fluid or fuses in the
engine compartment, remove the engine compartment
covers as follows:
61PY010
1Turn the")
 ENGINE
557
If the oil level is below or only slightly above the low line,
add engine oil of the same type as already in the engine.
Remove the oil filler cap and add engine oil a little at a time,
che")