2005 KIA CERATO oil change
[x] Cancel search: oil changePage 18 of 318

37
1 23456789
Knowing your vehicle
Your vehicle is equipped with an
electronic engine immobilizer system
to reduce the risk of unauthorized
vehicle use.
Your immobilizer system is com-
prised of a small transponder in the
ignition key, and antenna coil in the
key cylinder and BCM (Body Control
Module) in the instrument panel.
With this system, whenever you
insert your ignition key into the igni-
tion switch and turn it to ON, the
antenna coil in the ignition switch
receives a signal from the transpon-
der in the ignition key and then sendsthe signal to the BCM (Body controlModule).
The BCM checks the signal whether
the ignition key is valid.
If the key is determined to be valid,
the engine will start.
If the key is determined to be invalid,
the engine will not start.To deactivate the immobilizer sys-tem:
Insert the ignition key into the key
cylinder and turn it to the ON posi-tion.
To activate the immobilizer sys- tem:
Turn the ignition key to the OFF posi-
tion. The immobilizer system acti-
vates automatically. Without a valid
ignition key for your vehicle, the
engine will not start.
✽✽
NOTICE
When starting the engine, do not use
the key with other immobilizer keys
around.Otherwise the engine may not start
or may stop soon after it starts. Keepeach key separately not to have any
malfunction after you receive yournew vehicle.
IMMOBILIZER SYSTEM (IF EQUIPPED)
CAUTION
The transponder in your ignition key is an important part of theimmobilizer system. It is designed to give years of trou-blefree service, however youshould avoid exposure to mois- ture, static electricity and roughhandling. Immobilizer systemmalfunction could occur.
CAUTION
Do not change, alter or adjustthe immobilizer system becauseit could cause the immobilizer system to malfunction andshould only be serviced by anauthorized Kia dealer. Malfunctions caused by improp-er alterations, adjustments ormodifications to the immobilizer system are not covered by yourvehicle manufacturer warranty.
Page 148 of 318
Driving your vehicle
36
4
1 23456789
Mode
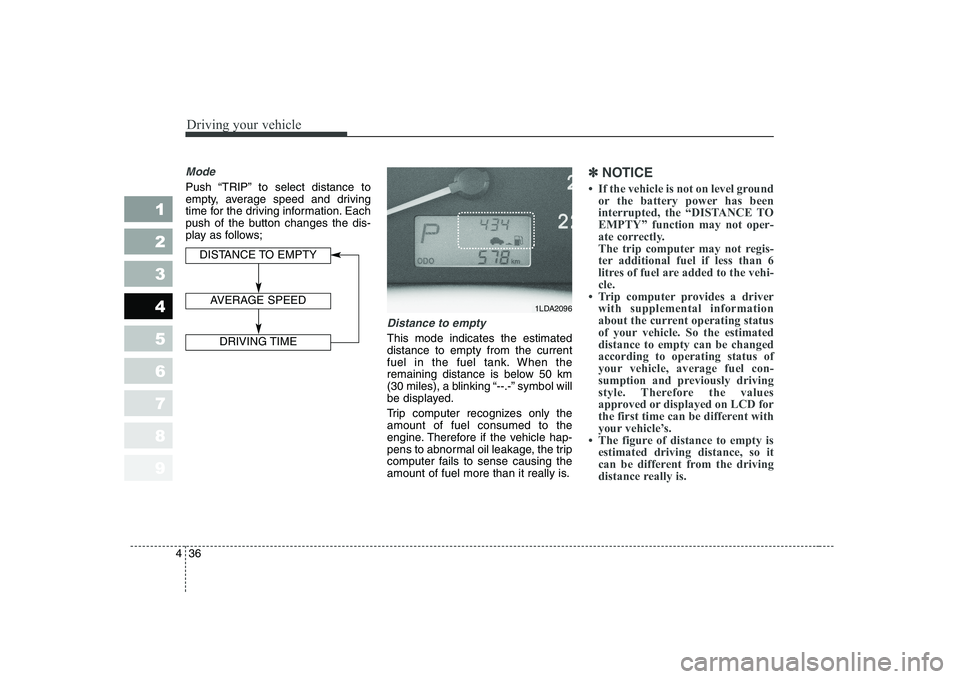
Push “TRIP” to select distance to
empty, average speed and driving
time for the driving information. Each
push of the button changes the dis-
play as follows;
Distance to empty
This mode indicates the estimated distance to empty from the current
fuel in the fuel tank. When the
remaining distance is below 50 km
(30 miles), a blinking “--.-” symbol will
be displayed.
Trip computer recognizes only the amount of fuel consumed to the
engine. Therefore if the vehicle hap-
pens to abnormal oil leakage, the trip
computer fails to sense causing the
amount of fuel more than it really is.
✽✽
NOTICE
Page 249 of 318
75
Maintenance
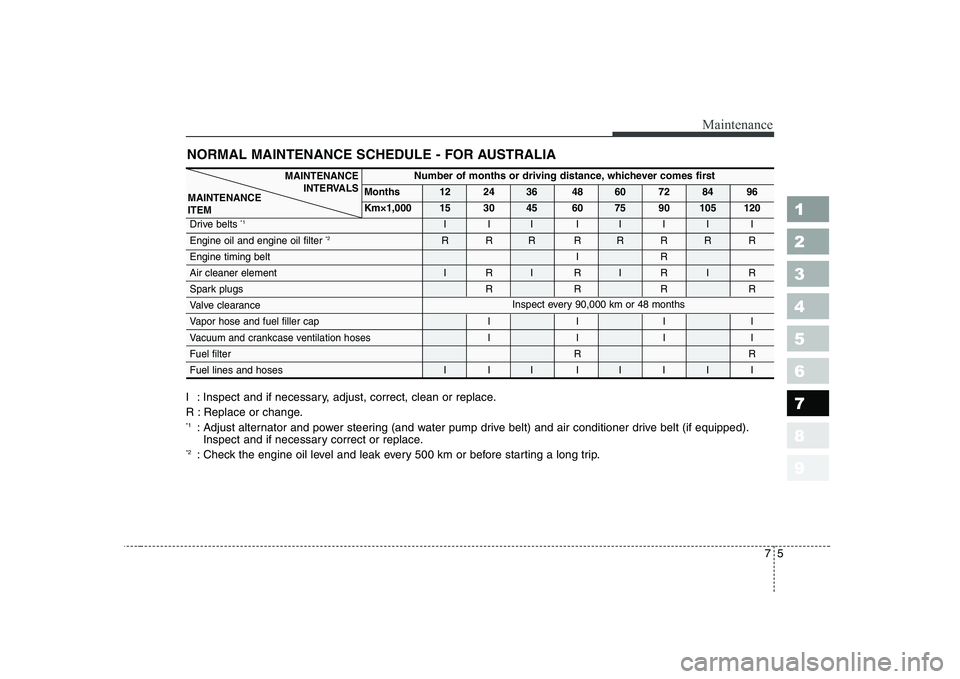
NORMAL MAINTENANCE SCHEDULE - FOR AUSTRALIA
1 23456789
I : Inspect and if necessary, adjust, correct, clean or replace.
R : Replace or change. *1: Adjust alternator and power steering (and water pump drive belt) and air conditioner drive belt (if equipped).
Inspect and if necessary correct or replace.
*2 : Check the engine oil level and leak every 500 km or before starting a long trip.
MAINTENANCE
INTERVALSNumber of months or driving distance, whichever comes first
Months 12 24 36 48 60 72 84 96
Km×1,000 15 30 45 60 75 90 105 120
Drive belts *1
III IIIII
Engine oil and engine oil filter *2
RRR RRRRR
Engine timing belt I R
Air cleaner element I R I R I R I R
Spark plugs R R R R
Valve clearance
Vapor hose and fuel filler cap I I I I
Vacuum and crankcase ventilation hoses I I I IFuel filter
RR
Fuel lines and hoses I I I I I I I I
Inspect every 90,000 km or 48 months
MAINTENANCE ITEM
Page 252 of 318
Maintenance
8
7
1 23456789
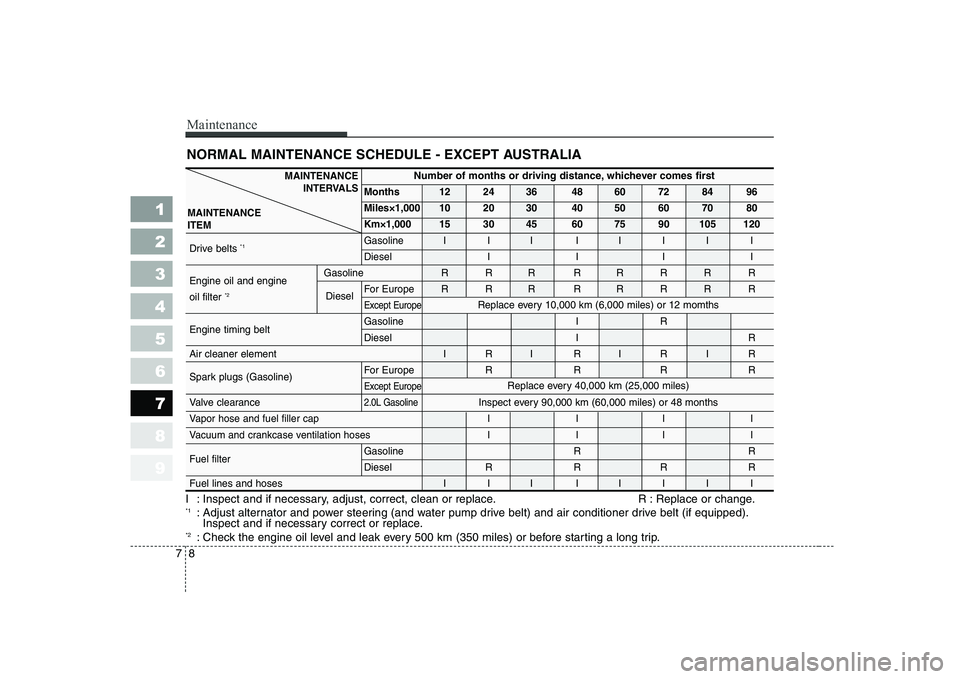
NORMAL MAINTENANCE SCHEDULE - EXCEPT AUSTRALIA
I : Inspect and if necessary, adjust, correct, clean or replace. R : Replace or change. *1
: Adjust alternator and power steering (and water pump drive belt) and air conditioner drive belt (if equipped).
Inspect and if necessary correct or replace.
*2 : Check the engine oil level and leak every 500 km (350 miles) or before starting a long trip.
MAINTENANCE
INTERVALS
MAINTENANCE ITEM
Replace every 40,000 km (25,000 miles)
Inspect every 90,000 km (60,000 miles) or 48 months
Diesel
Replace every 10,000 km (6,000 miles) or 12 momths
Number of months or driving distance, whichever comes first
Months 12 24 36 48 60 72 84 96
Miles×1,000 10 20 30 40 50 60 70 80
Km×1,000 15 30 45 60 75 90 105 120
Drive belts *1 Gasoline I I I I I I I I
Diesel I I I I
Engine oil and engine Gasoline R R R R R R R R
oil filter *2 For Europe R R R R R R R R
Except Europe
Engine timing belt Gasoline
I R
Diesel IR
Air cleaner element I R I R I R I R
Spark plugs (Gasoline) For Europe R R R R
Except Europe
Valve clearance 2.0L Gasoline
Vapor hose and fuel filler cap
I I I I
Vacuum and crankcase ventilation hoses I I I I Fuel filter
Gasoline RR
Diesel R R R R
Fuel lines and hoses I I I I I I I I
Page 257 of 318
713
Maintenance
1 23456789
OWNER MAINTENANCE
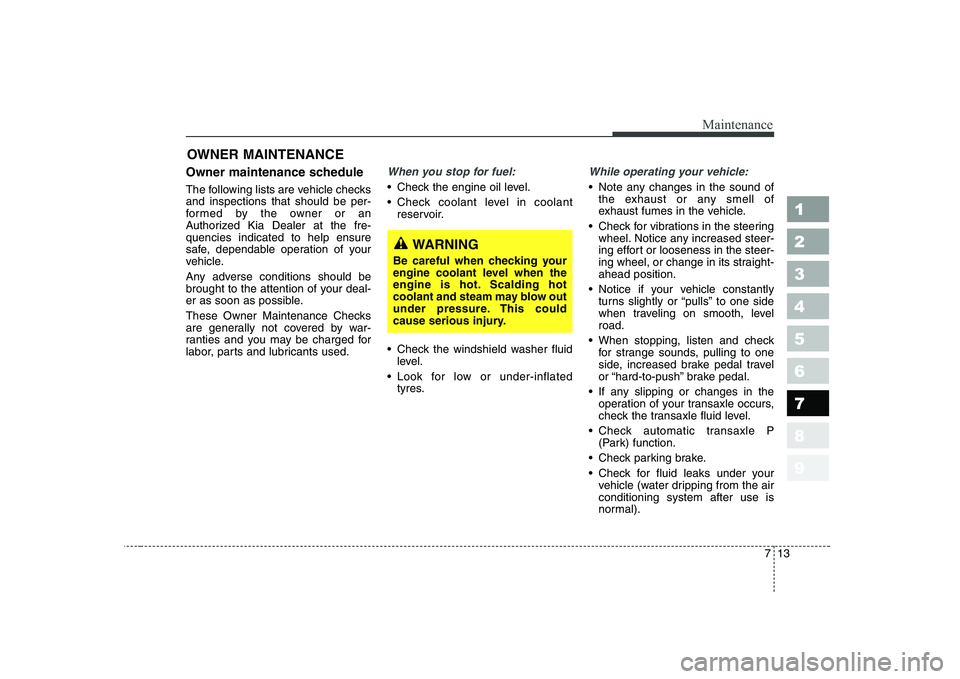
Owner maintenance schedule
The following lists are vehicle checks and inspections that should be per-
formed by the owner or an
Authorized Kia Dealer at the fre-quencies indicated to help ensure
safe, dependable operation of your
vehicle.
Any adverse conditions should be
brought to the attention of your deal-
er as soon as possible.
These Owner Maintenance Checks
are generally not covered by war-
ranties and you may be charged for
labor, parts and lubricants used.
When you stop for fuel:
Check the engine oil level.
Check coolant level in coolant reservoir.
Check the windshield washer fluid level.
Look for low or under-inflated tyres.
While operating your vehicle:
Note any changes in the sound ofthe exhaust or any smell of
exhaust fumes in the vehicle.
Check for vibrations in the steering wheel. Notice any increased steer-
ing effort or looseness in the steer-
ing wheel, or change in its straight-ahead position.
Notice if your vehicle constantly turns slightly or “pulls” to one side
when traveling on smooth, levelroad.
When stopping, listen and check for strange sounds, pulling to one
side, increased brake pedal travel
or “hard-to-push” brake pedal.
If any slipping or changes in the operation of your transaxle occurs,
check the transaxle fluid level.
Check automatic transaxle P (Park) function.
Check parking brake.
Check for fluid leaks under your vehicle (water dripping from the air conditioning system after use is
normal).
WARNING
Be careful when checking your
engine coolant level when the
engine is hot. Scalding hot
coolant and steam may blow out
under pressure. This could
cause serious injury.
Page 263 of 318
719
Maintenance
1 23456789
ENGINE OIL AND OIL FILTER
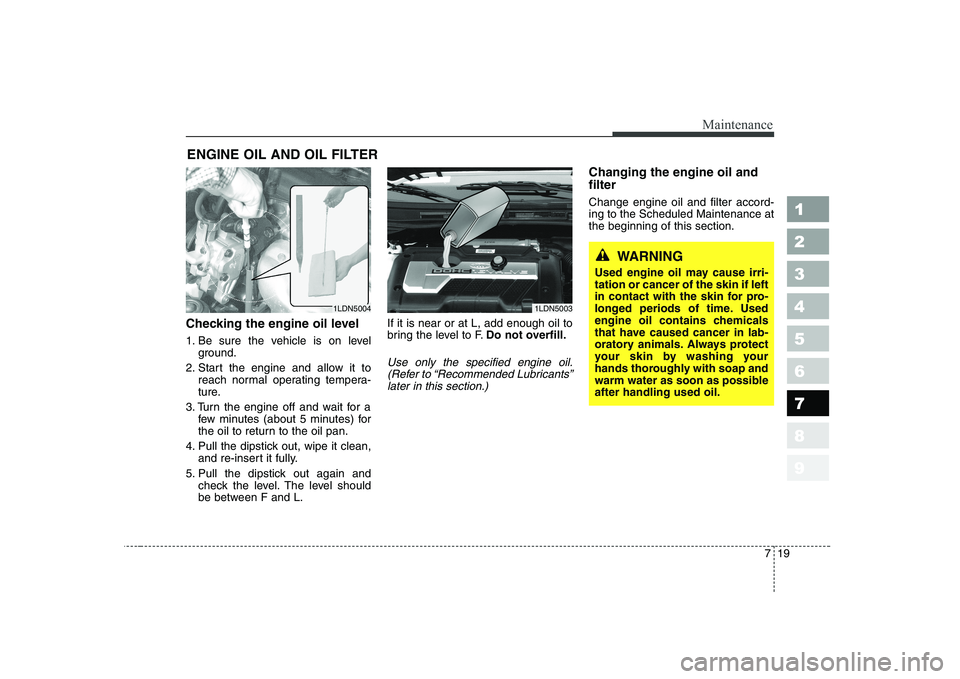
Checking the engine oil level
1. Be sure the vehicle is on level ground.
2. Start the engine and allow it to reach normal operating tempera-
ture.
3. Turn the engine off and wait for a few minutes (about 5 minutes) for
the oil to return to the oil pan.
4. Pull the dipstick out, wipe it clean, and re-insert it fully.
5. Pull the dipstick out again and check the level. The level should
be between F and L. If it is near or at L, add enough oil to
bring the level to F.
Do not overfill.
Use only the specified engine oil.
(Refer to “Recommended Lubricants” later in this section.)
Changing the engine oil and filter Change engine oil and filter accord- ing to the Scheduled Maintenance atthe beginning of this section.
1LDN50031LDN5004
WARNING
Used engine oil may cause irri- tation or cancer of the skin if left
in contact with the skin for pro-
longed periods of time. Used
engine oil contains chemicals
that have caused cancer in lab-
oratory animals. Always protect
your skin by washing your
hands thoroughly with soap and
warm water as soon as possibleafter handling used oil.
Page 264 of 318

Maintenance
20
7
1 23456789
1. Warm the engine up for a few min-
utes and then turn it off. Remove
the oil filler cap.
2. Raise and suitably support the vehicle.
3. Drain the oil into a suitable con-tainer by removing the oil drainplug. 4. Remove the engine oil filter with
an oil filter wrench.
✽✽ NOTICE
Do not allow the oil filter gasket to
remain on the oil filter mounting
surface. This will cause oil leakageand engine damage. Remove the oldgasket completely so that a new gas-
ket may be properly seated.
5. Use a clean rag to clean the oil fil- ter mounting surface on the
engine.
6. Apply a small amount of engine oil to the new oil filter O-ring seal.
CAUTION
Both the oil and engine are
hot. Do not burn yourself.
Keep all engine oil out of the reach of children.
1LDN70161LDN7017
WARNING - Lifting your
vehicle
If you raise your vehicle, always
ensure that it is supported at all
four jacking or lift points for the
vehicle. Do not use jacks meant
for tyre changes. Use only lift
equipment specifically recom-
mended for doing maintenance
work under the vehicle. Place
the vehicle and lift equipment
on a hard, level surface capable
of supporting the full weight of
the vehicle without moving or
deforming. If the support is not
stable, the vehicle could fall andcause serious or fatal injuries.
Follow the instructions with the
lift device.
Page 265 of 318
721
Maintenance
1 23456789
7. Install the oil filter and tighten it.(Refer to the oil filter caution label
for tightening instructions.)
8. Install a new washer on the drain plug. Don’t use an old washer
repeatedly.
9. Replace the drain plug after the oil has thoroughly drained. Torque the
10. Refill the engine with new oil to the F mark on the dipstick. Do not
overfill.
11. Reinstall the oil filler cap secure- ly.
12. Start the engine and inspect around the oil filter seal for leaks.
Stop the engine.
13. Check the oil level and fill to the F mark as necessary.Oil capacity
■1.6 L Gasoline Engine
With filter change : 3.3 litres (3.5 US qt.)Without filter change :3.0 litres (3.2 US qt.)
■ 2.0 L Gasoline Engine
With filter change :4.0 litres (4.2 US qt.)Without filter change :3.7 litres (3.9 US qt.)
■ 1.5 L Diesel Engine
With filter change :5.3 litres (5.6 US qt.)Without filter change :4.8 litres (5.07 US qt.)
■ 2.0 L Diesel Engine
With filter change :5.9 litres (6.2 US qt.)Without filter change :5.4 litres (5.7 US qt.)
Use only the specified Service
Grade engine oil. (Refer to “Recommended Lubricants” later inthis section.)
✽✽ NOTICE